Dividing Regions
You can divide one or more selected regions with the Scissors tool.
Select the regions you want to divide.
Select the Scissors tool.
Click-hold the regions you want to divide.
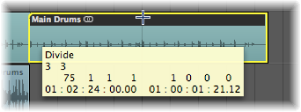
The help tag shows the current divide position.
Release the mouse button.
All selected regions are cut at the position shown in the help tag.
When selecting a cut point with the Scissors tool, you can move backward and forward in steps of one division. The grid is based on the Snap pop-up menu setting.
Hold down the Control key after you select the region with the Scissors tool to divide in the division value (1/16th, 1/32nd, and so on, as shown in the Transport bar).
Hold Control-Shift to divide regions with even more precision (ticks or samples).
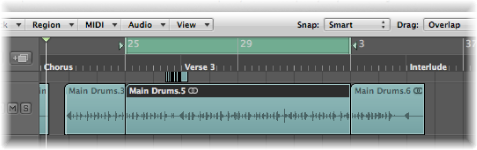
The newly created segments of an audio region are named after the original, with a sequential number appended to the end of the name.
Divided MIDI regions are named after the original, with no sequential numbering. Each MIDI region resulting from the division is independent and contains data.
Hold down the Option key while cutting a region with the Scissors tool.
A plus symbol appears next to the Scissors tool, and the help tag shows Divide Multiple.
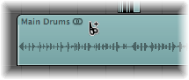
The selected region is cut into several pieces—each the same length as the first segment.

For example, to divide a 16-bar region into eight 2-bar regions, cut the region at the start of bar 3, while holding down the Option key.
Set the left and right locator positions where you want them.
Select the regions you want to divide within the locator boundaries.
Choose Region > Split > Split Regions by Locators (or use the Split Regions/Events by Locators or Marquee Selection key command).
All selected regions located wholly, or partly, between the locators are cut at the left and right locator positions. All regions created between the locator positions as a result of the Split operation are then automatically selected.
Tip: You can achieve the same effect by defining a cycle with the mouse in the Bar ruler, while holding down the Command key.
Select the regions you want to divide.
Choose Region > Split > Split Regions by Playhead (or use the Split Regions/Events by Playhead Position key command).
All selected regions are split exactly at the playhead location.
Tip: To cut at the nearest bar, use the Split Regions/Events by Rounded Playhead Position key command.
Handling Overlapping Notes in Divided MIDI Regions
If any notes in a divided MIDI region overlap other notes by more than a 1/16 note, you are asked if you want to keep, shorten, or split the notes.
Click Keep to leave all notes unaltered. The MIDI region is cut as expected, but you can end up with notes in the left half (earlier region) that are much longer than the MIDI region containing them. Such notes play normally, unless Clip Length is activated. (See Adjusting the Start or End Point of MIDI Regions.)
Click Shorten to truncate all overlapping notes, so that they end at the point where the original MIDI region was divided.
Click Split to divide overlapping notes across the two MIDI regions; two notes are created, with the same pitch and velocity as the original, and with the same total length as the original note.
Important: The Audio > Snap Edits to Zero Crossings setting in the Arrange area’s local menu bar has no effect when dividing audio regions, using any of the methods outlined above. Audio > Snap Edits to Zero Crossings, when activated, only applies to alterations of the start or end point of a region, not divide operations. If you want to automatically divide an audio file into multiple regions, use the Strip Silence function.
Dividing Audio Regions with Strip Silence
The Audio > Strip Silence function in the Arrange area’s local menu bar opens a window which allows you to slice an audio recording into different audio regions. This division is based on analysis of amplitude levels within the audio file. A detailed description of this function can be found in Removing Silent Passages from Audio Regions.