Resizing Regions
You can reduce or extend the length of any region by dragging the start or end point of the region, thus determining what part of the source (audio file or MIDI events) is played back in your project.
The data in regions is never deleted when they are reduced in length; playback simply stops at the end of the region.
Select the Pointer or Pencil tool, then place the mouse pointer over the lower-left or lower-right corner of the region.
The pointer changes to a Resize pointer.

Drag the corner to the left or right.
Note: If Hyper Draw or automation is activated, you need to grab the left or right side of the region title area.
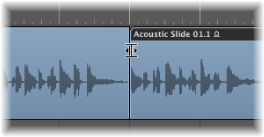
Select the Pointer or Pencil tool, then place the cursor over the upper-left or upper-right corner of two side-by-side regions.
The cursor changes to the Junction pointer.
Note: If there is a gap between the regions, the Loop tool is shown when the mouse pointer is moved over the upper-right corner of the earlier region.
Drag to the left or right.
Both regions are resized accordingly, with no gaps between them.
Note: You cannot make an audio region longer than the underlying audio file when using either of the resize operations described above.
Adjusting the Start Point of Audio Regions
Adjusting the start point of an audio region may also move the region anchor point, thus affecting its temporal reference point, and making it play back out of sync with other tracks. It is better, and simpler, to move the entire region to the right, if you want playback to start later.
If you want to remove the early portion of the region, you have several options, such as:
Marquee selection and muting
Cutting and muting or deleting
Creating a new region, and resizing it in the Audio Bin window
Using the Sample Editor to resize, and replace, the Arrange region
Directly edit the start and end markers in the Region row at the bottom of the Sample Editor.
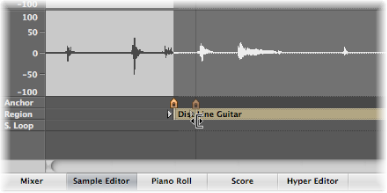
This action affects the size of the corresponding Arrange region immediately.
Select the portion of the audio file in the Sample Editor by dragging directly across the waveform display.
Choose Edit > Selection > Region in the Sample Editor (or use the corresponding key command).
This allows you to define an audio passage as a selection, and then convert it to a region, in place of the originally selected region.
Select the region in the Arrange area (presumably of a different length than the current Sample Editor selection).
Click the Sample Editor title to make sure that the Sample Editor has key focus.
Choose Edit > Region > Selection in the Sample Editor (or use the corresponding key command).
If Audio > Search Zero Crossings is turned on, any length adjustments to audio region start or end points snap to the nearest zero crossing point of the waveform.
The disadvantage of this option is that altered start or end points never land exactly on the selected musical grid. If this causes a problem, you can simply turn off the Audio > Search Zero Crossings setting. The primary reason for turning on this setting is that it prevents clicks and pops at region start and end points.
Adjusting the Start or End Point of MIDI Regions
You can move the left corner beyond the first event in a MIDI region. This action hides events from the beginning of the MIDI region, but these hidden events will continue to play back.
If you actually want to remove the information from the start of a MIDI region, you need to cut it and mute or delete the new start segment (new MIDI region).
The hide facility is useful in situations in which you might want to trigger MIDI controller events (such as sustain) before the musical phrase begins, but do not want to use a MIDI region that doesn’t fit into the current Arrange area grid (based on bars), as this would make arrangement far more complicated.
The Clip Length setting in the Inspector’s Region Parameter box determines whether:
Notes sounding when the region ends are abruptly cut off (active).
Notes should be played to their normal end point (inactive: default), regardless of where the region ends.
The point of this function is to allow you to alter the length of the last notes in a region directly from the Arrange area, by adjusting the length of the MIDI region. Clip length has no effect on folder regions.
Making Multiple Regions the Same Length
You can change the length of multiple regions to the same absolute amount, making them the same length, even if they were originally a different size.
Hold Option-Shift while changing the length with the Pointer tool.
Setting Region Start and End Points to the Playhead Position
You can move the start or end point of a selected region to the current playhead position with the following key commands:
Set Region/Event/Marquee Start to Playhead Position
Set Region/Event/Marquee End to Playhead Position
Note: The anchor point is also moved when using Set Region/Event/Marquee Start to Playhead Position on an audio region.
Adjusting Region Lengths to Fit Other Regions
On occasion, you may want to reduce or extend the length of all regions on a track, or between locators, ensuring that they directly adjoin each other without gaps.
Select the overlapping regions on a track, or select all regions on a track by clicking the track name in the track list.
Choose Region > Remove Overlaps (or use the corresponding key command).
This function searches all selected regions on a track for overlaps. If an overlap is found, the earlier (in time) region is reduced in length, thus removing the overlap.
You can extend selected regions, making them end exactly at the start point of the next region on the track.
Note: You cannot make an audio region longer than the underlying audio file.
Select the regions you want to extend.

Choose Region > Trim Region End to Next Region (or use the corresponding key command).

The selected regions are increased in length, making them end exactly at the start point of the next region on the track.
You can limit the length change to all selected regions within the locator boundaries.
Set the left and right locator positions by doing one of the following:
Drag from left to right across a portion of the Bar ruler.
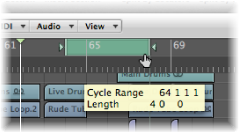
Set the value in the Transport bar’s Locator fields.

Select the regions within the locator boundaries.
Tip: You can quickly select all regions inside the locators by choosing Edit > Select Inside Locators (or using the corresponding key command, default assignment: Shift-L).
Choose Region > Trim Regions to Fill within Locators (or use the corresponding key command).
This function lengthens all selected regions (within the locator boundaries), closing the gaps between them. The last region on each track (within the locator boundaries) is not affected.
Time Stretching the Contents of a Region When Changing Length
In normal use, the position of events within MIDI regions is not affected by changes to the region length. Similarly, changes to audio region lengths have no impact other than starting and stopping playback at particular project positions.
You can, however, time stretch or compress the contents of regions when altering their length.
Option-drag the end of a MIDI region.
The events within the region are stretched or compressed, proportionately, by the amount that the MIDI region is altered in length.
You can make a rhythmic MIDI region play in half-time by stretching it to twice the original length, or in double-time by shortening it to half the original length.
Option-drag the end of an audio region.
This action stretches or compresses the audio by the amount that the region is altered in length, and replaces the original region with a new PCM audio file (in the original file format, or AIFF, if the original was not PCM).
Note: The current setting in the Snap pop-up menu has an impact on length changes.
You can make an audio region play at half-speed by stretching it to twice the original length, or at double-speed by shortening it to half the original length.
You can choose the time stretching and compression algorithm used for this function in the Arrange area’s Audio > Time Stretching Algorithm menu. Details on each algorithm are found in Using the Sample Editor’s “Time and Pitch Machine.
Time Stretching Multiple Regions
Modifier keys have an impact on how time stretching or compression works when multiple regions are selected. The following table outlines all modifier options, and their impact (or otherwise) when multiple region lengths are changed:
Modifier | Result |
|---|---|
None | Same absolute length change; no time correction |
Shift | Same absolute end position; no time correction |
Option | Same absolute length change, with time correction |
Option-Shift | Same absolute region length, with time correction |
Control | Can be used after clicking for finer resolution length changes, but cannot be used in conjunction with Option; no time correction |
MIDI Region-Specific Length Change Operations
The following functions apply only to MIDI regions.
Use the MIDI > Set Region Start to Bar command (or use the corresponding key command) to round the start point of the selected MIDI region to the nearest bar.
The MIDI > Set Optimal Region Sizes Rounded by Bar command (or the corresponding key command, default assignment: Shift-Command-B) reduces or increases the length of a selected MIDI region, making it just large enough to contain the events (or regions, if a folder) within it. The region borders are rounded to the nearest bar.
Hold down the Option key when using this function to round the region borders to the nearest denominator value (or use the Set Optimal Region Sizes Rounded by Denominator key command).