Getting to Know the Arrange Channel Strips
Before discussing the use of plug-ins, a basic understanding of some key channel strip functions is required.
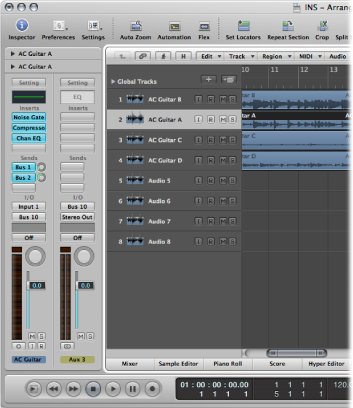
The Arrange (and Mixer) channel strips deal with audio and instrument (software or MIDI) tracks shown in the Arrange area, plus auxiliary (aux) and output channel strips. Each track in the Arrange window is represented and controlled by a channel strip. Put another way, the arrange tracks are routed to specific channel strips:
Audio channel strips control the playback and recording of audio signals on audio tracks.
Instrument channel strips allow you to use and control software instruments.
External MIDI channel strips control external MIDI tracks.
Note: Mixer channel strips are generated automatically when you create new audio, instrument, or external MIDI tracks in the Arrange window.
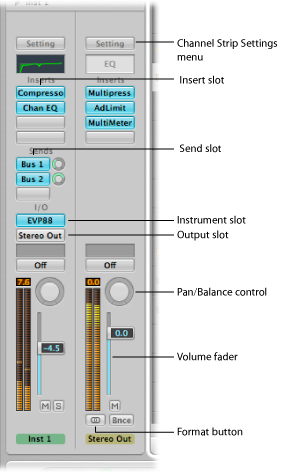
The Arrange channel strips, shown at the bottom of the Inspector, display the audio or instrument channel strip of the selected track on the left side, and the primary (first) destination for this channel strip on the right side.
The destination will be either:
An output channel strip, which represents the physical audio outputs of your audio interface
An aux channel strip, which is used for a variety of signal routing purposes
For example, if Send slot 1 of the left channel strip is routed to Bus 4, the fourth auxiliary channel strip is shown. Clicking Send slot 2 on the left channel strip (routed to Bus 7) updates the right channel strip to show the seventh aux channel strip. Selecting a particular output in the Output slot of the left channel strip displays the chosen output channel strip to the right. If the left channel strip is simply routed to an output channel strip, the output channel strip is shown by default.
You will perform most plug-in insertion, channel strip routing, and channel strip configuration tasks as part of your creative workflow in the Arrange window. You should use the Arrange channel strips for all related functions discussed in this chapter, rather than accessing the Mixer. For details about working in the Mixer, see the Mixing chapter.
The following is an overview of the main elements in the Arrange channel strips:
Setting Channel Strip Input Format
The channel strip input format determines the mono, stereo, or surround status of the channel strip. Note that software instrument and external MIDI channel strips do not have a format button.
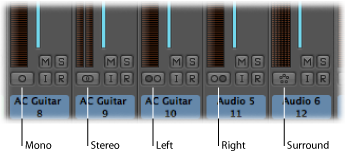
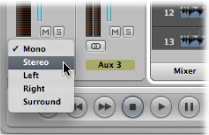
- Mono: One circle represents a mono input format. The level meter shows a single column.
- Stereo: Two, interlocked circles represent a stereo input format. The level meter divides into two independent columns when a stereo input format is chosen.
- Left: Two circles, with the left one filled, indicate a left channel input format. When this input format is chosen, the channel strip only plays the left channel of an audio file.
- Right: Two circles, with the right one filled, indicate a right channel input format. When this input format is chosen, the channel strip only plays the right channel of an audio file.
- Surround: Five circles indicate the surround channel input format. The level meter divides into multiple linked columns (the number matches the project surround format) when the surround input format is chosen.
Your chosen input format for a channel strip impacts the following two areas:
The plug-ins shown on the channel strip will be available as:
Mono-to-mono or mono-to-stereo versions on mono channel strips
Stereo-to-stereo versions on stereo channel strips
Surround or multi-mono versions on surround channel strips
The Pan control determines the position of the channel signal in the stereo field:
On mono channel strips (this includes left and right input format channels), the Pan control determines the left/right position of the signal.
On stereo channel strips, the Pan control determines the balance between the left and right channel signals.
Note: To access the Surround Panner, you must first set the channel strip output format to Surround, via the channel strip’s Output slot.
Click-hold the button directly below the channel strip’s level meter, and choose the input format from the menu that appears.
Tip: On a stereo or mono channel strip, you can simply click the button to switch between mono or stereo.
Setting Channel Strip Volume Level and Pan/Balance Position
You can set a channel strip’s volume level and pan/balance position.
Drag the channel strip’s Volume fader up or down.
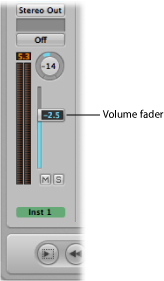
The maximum boost is +6 dB. You can reset the Volume fader to 0 dB (90) by Option-clicking it.
Drag the control up or down or left or right.
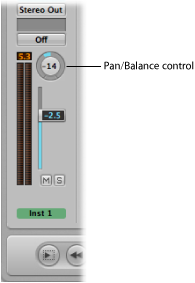
Option-click the Pan or Balance control to reset it to the centered (0) position.
When a channel strip output is set to Surround, the Pan or Balance knob is replaced by a Surround Panner. Full details on using surround channel strips, effects, and the surround panner are found in Working with Surround.
How Mono, Stereo, and Surround Effects Are Handled
You can insert mono, stereo, or surround instances of effects into channel strips.
Only versions of the plug-in that match the channel strip input format can be inserted (mono-to-mono or mono-to-stereo plug-in versions in mono input format channels, for example).
Option-click a channel strip’s Insert slot.
The Plug-in menu displays all formats the plug-in has to offer, rather than being limited to the matching format. Any down or up mixing that may be necessary happens automatically.