Automating Parameter Values in Ultrabeat’s Step Sequencer
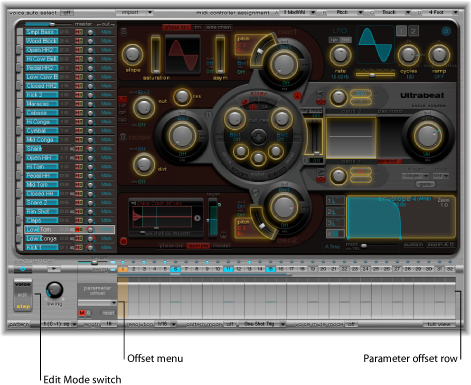
The Edit Mode switch engages Ultrabeat’s step automation feature. Step automation enables you to program parameter changes on a per-step basis—for each drum sound. You can adjust all parameters that can be automated, if desired, for each step.
Sound parameters that can be automated include all functions in the Synthesizer section except the menus (modulation routings and so on), buttons (oscillator type buttons, the buttons in the trigger/group section), and Pan/Spread parameters.
When you engage Step mode, Ultrabeat’s interface changes in the following ways:
Yellow frames appear around all parameters that can be automated in the Synthesizer section. Parameters that cannot be automated are still visible but are disabled.
The velocity/gate row in the step grid changes to show the (parameter) offset row.
Tip: When creating offsets in Step mode, you may decide that you want to make a quick change to the original drum sound. Rather than switching back and forth between edit modes for a simple change, you can press Command-Option to temporarily flip Ultrabeat back into Voice mode.
All parameters that you choose to automate will appear in the pop-up menu at the top of the (parameter) offset row. Click the grid header (left of the zero axis) to open the menu.
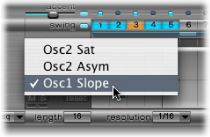
Note: The simple act of moving a control element in the Synthesizer section will add the parameter to the offset menu, so take care.
Using Ultrabeat’s (Parameter) Offset Row
This row enables you to view and enter offset values—on a per-step basis—for any of the Synthesizer section parameters that can be automated.
Parameter edits can be made in three ways:
By directly adjusting the controls in the Synthesizer section
By editing offset values in the offset row
With the shortcut menu (see Using Ultrabeat’s Parameter Offset Shortcut Menu Commands)
Note: Adjustments made in the offset row are relative to the current parameter value. Values shown in the offset row will be either added to, or subtracted from, the parameter value set in the Synthesizer section. In other words, parameter offsets increase or decrease—but do not specify—an absolute value for the parameter.
Select the desired sound.
Click a position in the (parameter) offset row that corresponds to the step you want to edit.
Make the desired parameter changes in the Synthesizer section. Your changes will be recorded as an offset value for this step.
Repeat step 3 for each parameter that you want to edit for this step.
A parameter offset that has been created for a given parameter on a given step is represented in two ways.
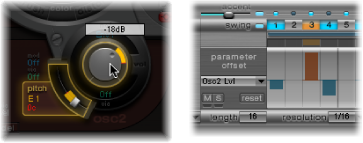
A yellow bar is drawn on the parameter that indicates the deviance (the offset) between the original parameter value and the new parameter value.
In the (parameter) offset row, the offset from the original parameter is represented as a bar starting from the 0 point (horizontal center line).
Positive offsets are shown as a bar above the center line.
Negative offsets are shown as a bar below the center line.
Using Ultrabeat’s Parameter Offset Shortcut Menu Commands
Control-click (or right-click) any step in the (parameter) offset row to open a shortcut menu. Choose one of the following commands:
- Alter: Changes the (selected) parameter values—for all steps—by a random amount.
- Randomize: Creates a new, random value for the selected parameter.
Note: Consider saving your sequence/pattern before using either of the above commands.
- Delete: Deletes all steps for the currently selected parameter.
Muting, Soloing, and Resetting Ultrabeat Parameter Offsets
The (parameter) offset row offers the M(ute), S(olo), and Reset buttons.
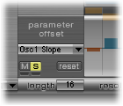
- M(ute): Mutes the offsets of the selected parameter. This does not remove or reset existing offsets.
- S(olo): Enables you to hear the effect of your offsets on the selected parameter in isolation.
- Reset: All offset values for the selected parameter are set to 0 (no offset).
A second click on the Reset button removes the parameter from the offset menu.
Note: The Reset button at the left of the velocity/gate row changes to Delete when clicked once. This Delete button mirrors the behavior of the Delete command: It deletes all steps for the currently selected parameter.