Compressor
The Compressor is designed to emulate the sound and response of a professional-level analog (hardware) compressor. It tightens up your audio by reducing sounds that exceed a certain threshold level, smoothing out the dynamics and increasing the overall volume—the perceived loudness. Compression helps bring the key parts of a track or mix into focus, while preventing softer parts from becoming inaudible. It is probably the most versatile and widely used sound-shaping tool in mixing, next to EQ.
You can use the Compressor with individual tracks, including vocal, instrumental, and effects tracks, as well as on the overall mix. Usually you insert the Compressor directly into a channel strip.
Compressor Parameters
The Compressor offers the following parameters:
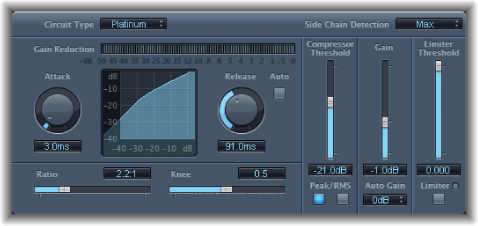
- Side Chain Detection pop-up menu: Determines if the Compressor uses the maximum level of each side-chained signal (Max) or the summed level of all side-chained signals (Sum) to exceed or fall below the threshold.
If either of the stereo channels exceeds or falls below the Threshold, both channels are compressed.
If Sum is chosen, the combined level of both channels must exceed the Threshold before compression occurs.
Using the Compressor
The following section explains how to use the main Compressor parameters.
Setting the Compressor Threshold and Ratio
The most important Compressor parameters are Threshold and Ratio. The Threshold sets the floor level in decibels. Signals that exceed this level are reduced by the amount set as the Ratio.
The Ratio is a percentage of the overall level; the more the signal exceeds the threshold, the more it is reduced. A ratio of 4:1 means that increasing the input by 4 dB results in an increase of the output by 1 dB, if above the threshold.
As an example, with the Threshold set at −20 dB and the Ratio set to 4:1, a −16 dB peak in the signal (4 dB louder than the threshold) is reduced by 3 dB, resulting in an output level of −19 dB.
Setting Suitable Compressor Envelope Times
The Attack and Release parameters shape the dynamic response of the Compressor. The Attack parameter determines the time it takes after the signal exceeds the threshold level before the Compressor starts reducing the signal.
Many sounds, including voices and musical instruments, rely on the initial attack phase to define the core timbre and characteristic of the sound. When compressing these types of sounds, you should set higher Attack values to ensure that the attack transients of the source signal aren’t lost or altered.
When attempting to maximize the level of an overall mix, it is best to set the Attack parameter to a lower value, because higher values often result in no, or minimal, compression.
The Release parameter determines how quickly the signal is restored to its original level after it falls below the threshold level. Set a higher Release value to smooth out dynamic differences in the signal. Set lower Release values if you want to emphasize dynamic differences.
Important: The discussion above is highly reliant on not only the type of source material, but also the compression ratio and threshold settings.
Setting the Compressor Knee
The Knee parameter determines whether the signal is slightly, or severely, compressed as it approaches the threshold level.
Setting a Knee value close to 0 (zero) results in no compression of signal levels that fall just below the threshold, while levels at the threshold are compressed by the full Ratio amount. This is known as hard knee compression, which can cause abrupt and often unwanted transitions as the signal reaches the threshold.
Increasing the Knee parameter value increases the amount of compression as the signal approaches the threshold, creating a smoother transition. This is called soft knee compression.
Setting Other Compressor Parameters
As the compressor reduces levels, the overall volume at its output is typically lower than the input signal. You can adjust the output level with the Gain slider.
You can also use the Auto Gain parameter to compensate for the level reduction caused by compression (choose either −12 dB or 0 dB).
When you use the Platinum circuit type, the Compressor can analyze the signal using one of two methods: Peak or root mean square (RMS). While Peak is more technically accurate, RMS provides a better indication of how people perceive the signal loudness.
Note: If you activate Auto Gain and RMS simultaneously, the signal may become over-saturated. If you hear any distortion, switch Auto Gain off and adjust the Gain slider until the distortion is inaudible.
Using a Side Chain with the Compressor
Use of a side chain with a compressor is common. This allows you to use the dynamics (level changes) of another channel strip as a control source for compression. For example, the dynamics of a drum groove can be used to rhythmically change the compression, and therefore dynamics, of a guitar part.
Important: The side-chain signal is used only as a detector or trigger in this situation. The side-chain source is used to control the Compressor, but the audio of the side-chain signal is not actually routed through the Compressor.
Insert the Compressor into a channel strip.
Select the channel strip that carries the desired signal (side-chain source) in the Side Chain menu of the Compressor plug-in.
Choose the desired analysis method (Max or Sum) from the Side Chain Detection pop-up menu.
Adjust the Compressor parameters.