Controller Assignments: Working in Easy View
Easy view allows you to see and assign controllers to channel strip and plug-in parameters, and to change the track that assignments apply to.
Choose Logic Pro > Preferences > Control Surfaces > Controller Assignments (or use Command-K), and click the Easy View button.
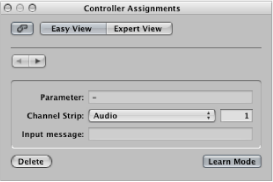
The Easy view of the Controller Assignments window contains the following fields and buttons:
- Expert View button: Click to open the editor in Expert view.
- Back/Forward buttons: Click to move back and forth between assignments.
- Link button: When active, the assignment that matches the most recently received MIDI message is automatically selected.
- Parameter field: Displays the name of the selected parameter.
- Channel Strip pop-up menu: Choose whether the assignment applies to the selected track, or matches the channel strip number entered in the field beside the pop-up menu (as shown in the Mixer’s All view).
- “Input message” field: Displays the incoming MIDI message data of the controller being assigned to a function.
Assigning and Deleting Controllers in Easy View
Only one set of assignment parameters is visible at a time in Easy view. You use the Learn process to assign controllers to channel strip and plug-in parameters. The Learn process basically involves moving a controller on your control surface. This sends a MIDI message to Logic Pro, thus “teaching” Logic Pro which controller you are assigning to the chosen parameter.
In the Mixer, or in any plug-in window, select the parameter that you want Logic Pro to learn as a controller assignment.
Choose Logic Pro > Preferences > Control Surfaces > Learn Assignment for [parameter name]. (Alternately, you can use the Learn new Controller Assignment key command, default: Command-L, to open the Controller Assignments window, and activate Learn mode.)
The Controller Assignments window opens in Easy view, with the Learn Mode button activated. In most cases, the name of the selected parameter is shown in the Parameter field.
Move the hardware controller you want to assign to the selected parameter.
Moving the controller sends a MIDI message to Logic Pro, which appears in the “Input message” field. This memorizes the controller assignment, and you can click the Learn Mode button to complete the Learn process.
If you do not click the Learn Mode button, Learn mode remains active, allowing you to make further assignments.
To make another assignment, select the parameter you want to assign in Logic Pro, then move the controller on the control surface.
When you finish, click the Learn Mode button (or press Command-L) to complete the Learn process.
Choose Logic Pro > Preferences > Control Surfaces > Learn Assignment for [parameter name] (or press Command-L) to open the Controller Assignments window.
Hold down the modifier key you want to use (Command, for example) as you select the parameter you want to assign, while moving the control.
Click the Learn Mode button to complete the Learn process.
If Logic Pro receives a MIDI message from the device while you are holding down the modifier key, the Learn Mode button is deactivated when you release the key, and the Learn process is complete. If you release the modifier key before Logic Pro receives a MIDI message, the Learn Mode button remains active, so you can still move a controller to send a MIDI message. In this situation, be sure to click the Learn Mode button when you are finished to end the Learn process.
Select the assignment you want to remove in the Controller Assignments window (Easy view), and click the Delete button.
Assigning a Series of Controllers in Easy View
Logic Pro includes a shortcut that makes it easy to assign a series of controllers to a series of similar parameters. For example, you can use this shortcut to assign a series of faders to volume; to assign a series of knobs to other channel strip parameters such as pan, solo, or mute; or to assign a series of controllers to a set of plug-in parameters.
In the Mixer, or in any plug-in window, select the parameter that you want Logic Pro to learn as a controller assignment.
Choose Logic Pro > Preferences > Control Surfaces > Learn Assignment for [parameter name]. (Alternately, you can use the Learn new Controller Assignment key command, default: Command-L, to open the Controller Assignments window, and activate Learn mode.)
The Controller Assignments window opens in Easy view, with the Learn Mode button activated. In most cases, the name of the selected parameter is shown in the Parameter field.
Assign the first controller in the series to the first parameter (assign fader 1 to control volume for channel strip 1, for example).
Assign the last controller in the series to the last parameter (assign fader 16 to control volume for channel strip 16, for example). The number of controllers between the first and last in the series must match the number of parameters between the first and last parameter. In the example, the distance between 1 and 16 would equal 15.
A “Do you want to fill up in between?” dialog appears.
Click OK to automatically fill the controllers between the first and last with the corresponding assignments.
Note: You can only use shortcuts for knobs that send a single channel message, where the first data byte is the controller number and the second data byte is the value. Alternatively, the controller number can be encoded in the MIDI channel, with a fixed first data byte. Consult the documentation that came with your device for information on its data structure.