To create changes over time to volume, pan, and effects settings, you add automation points to a track’s automation curve at different places, and then adjust the automation points so the value of the setting changes. You can adjust automation points by moving them up or down to a new value or by moving them left or right to a new point in the timeline. Numerical values are displayed alongside each automation point. You can also raise or lower the value of MIDI parameters associated with notes in instrument tracks or Drummer tracks. Note and numerical values are displayed alongside each MIDI data point. You can also add automation points at selection area or region borders.
When splitting a region containing region-based automation, automation points are automatically added to the automation curves of the original region and the new region at the point of the split. These new points can then be adjusted and moved to create new changes over time for the new region. For more information on splitting regions, see Split regions in the Tracks area.
Do any of the following:
To add an automation point to an empty automation curve: Click anywhere in the automation track.
This adds an automation point at the project start position, using the current fader value.
To add an automation point to an existing automation curve, do any of the following:
Click the automation curve.
Double-click an empty area of the automation track.
Click on or outside the automation curve with the Pencil tool.
All of these actions add an automation point at the clicked position.
With a MIDI controller data parameter showing in the Automation Parameter pop-up menu, drag a line across the portion of the region.
New MIDI data is created at every point at which notes intersect the line you drew.
You can use the Pencil Tool to draw multiple automation points on an automation curve.
Click-drag or Option-click-drag the Pencil Tool across the automation curve.
The organization of automation points depends upon the Pencil Tool setting in the Automation preferences. You have two options:
Hold Option for Stepped Editing: In this mode, click-dragging with the Pencil Tool creates a series of automation points in a curved formation, and Option-click-dragging creates a series of automation points in a stepped formation.
Hold Option for Curved Editing: In this mode, click-dragging with the Pencil Tool creates a series of automation points in a stepped formation, and Option-click-dragging creates a series of automation points in a stepped formation.
![]() You can do the following when Show Advanced Tools is selected in the Advanced preferences pane:
You can do the following when Show Advanced Tools is selected in the Advanced preferences pane:
Drag across a region with the Marquee tool, then click the marquee selection.
![]() You can do either of the following when Show Advanced Tools is selected in the Advanced preferences pane:
You can do either of the following when Show Advanced Tools is selected in the Advanced preferences pane:
To add one automation point at each region border: Select the region, then choose Mix > Create Track Automation > Create 1 Automation Point at Region Borders.
To add two automation points at each region border: Select the region, then choose Mix > Create Track Automation > Create 2 Automation Points at Region Borders.
Do any of the following:
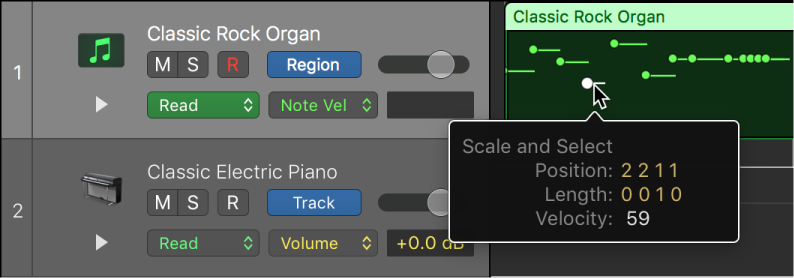
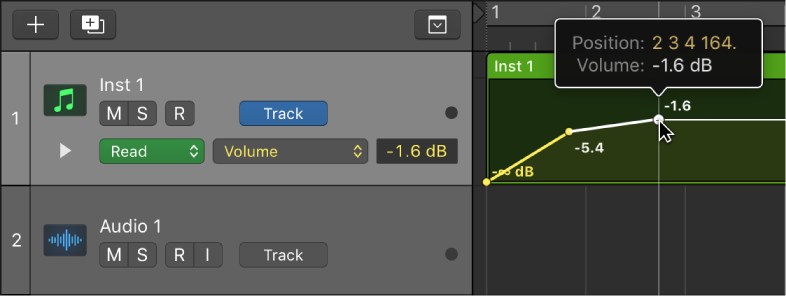
Drag an automation point up or down to change its value.
Drag an automation point left or right to move it to a different point in the timeline. Use the ruler to make sure automation points are aligned with a beat or measure.
With a MIDI data parameter showing in the Automation Parameter pop-up menu, select one more more MIDI values.
Drag up or down to change its value.