
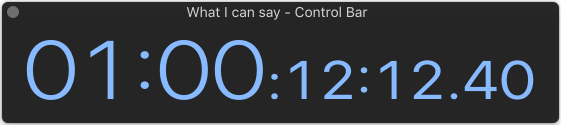
The control bar offers a default set of buttons and other controls, providing commonly used options. In the center of the control bar is the LCD, where you can view the playhead position in either time or beats, and set the project tempo, key, and time signature.
![]() When Show Advanced Tools is selected in the Advanced preferences pane, you can customize the control bar in the following ways:
When Show Advanced Tools is selected in the Advanced preferences pane, you can customize the control bar in the following ways:
You can show or hide the entire control bar to maximize the amount of available space in the main window.
You can show or hide individual buttons and other controls in the control bar.
You can open one or more giant beats display or giant time display as a floating window.
You can configure it to show SMPTE time with or without SMPTE view offset.
You can customize the time, tempo, and clock format in Display preferences.
The LCD has display modes that let you view the time format in either musical units (bars and beats) or absolute time units (minutes and seconds), independent of the time format of the ruler. You can show additional information using the Custom display mode.
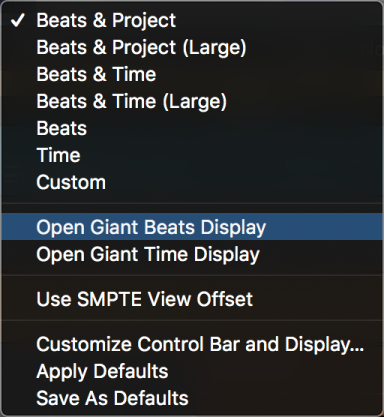
Click the triangle on the right side of the LCD, then choose one of the following from the pop-up menu:
Beats & Project: Displays the time format in bars and beats, and displays project properties (tempo, key, and time signature).
Beats & Time: Displays the playhead position in both musical and absolute time formats.
Beats: Displays the playhead position in musical time format.
Time: Displays the playhead position in absolute time format.
Custom: Displays the playhead position in both musical and absolute time formats, and additional information, such as the tempo, key, project end, left and right locator positions, MIDI In and MIDI Out status, and CPU and HD usage.
![]() Custom display mode is available only when Show Advanced Tools is selected in the Advanced preferences pane. The other modes (Beats and Project, Beats and Time, Beats, and Time) are available at all user levels.
Custom display mode is available only when Show Advanced Tools is selected in the Advanced preferences pane. The other modes (Beats and Project, Beats and Time, Beats, and Time) are available at all user levels.
Do one of the following:
To open a giant beats display: Click the triangle on the right side of the LCD, then choose Open Giant Beats Display from the pop-up menu.

To open a giant time display: Click the triangle on the right side of the LCD, then choose Open Giant Time Display from the pop-up menu.
You can open multiple giant beats and time display windows, and resize and reposition each one independently.
You can set a SMPTE offset for the project. As songs don’t always need to start precisely at bar 1, you can select any bar position to be played at the set SMPTE time.
Click the triangle on the right side of the LCD, then choose Use SMPTE View Offset from the pop-up menu.
Choose Logic Pro > Preferences > Display (or use the Open Display Preferences key command).

Choose one of the following settings in the Display Time as pop-up menu:
With Bits: Subframes (SMPTE bits 0 to 79) are shown.
Without Bits: Subframes are not shown.
With Quarter Frames: Quarter frames are shown.
As Feet Frames, 35 mm film: The display is displayed in feet and frames, for 35mm film.
As Feet Frames, 16 mm film: The display is displayed in feet and frames, for 16mm film.
With Milliseconds: The frame fractions are displayed in milliseconds instead of SMPTE bits (also called subframes). Remember that this value is dependent on the frame rate: at 25 fps, a frame is 40 milliseconds long, at 30 fps, approximately 33 ms.
With Samples: Frame fractions are shown as sample values.
With Frames and Samples: Both fractional frame and sample values are shown.
Select the “Zeros as spaces” checkbox if you want zero values to appear as blank spaces, rather than the number 0 in SMPTE time displays.
Choose one of the following settings in the Display Tempo as pop-up menu:
Beats Per Minute (BPM, Maelzel): Beats per minute, to four individually adjustable decimal places.
BPM without Decimals: Beats per minute, with no decimal places.
Frames Per Click with Eights: Frames per beat with eighths. After the value, you will see fpc.
Frames Per Click with Decimals: Frames per beat, to four decimal places. Take care, as this display can easily be confused with the bpm display.
Choose a clock format from the Clock Format pop-up menu.
Control-click the control bar, then choose Customize Control Bar from the menu.
Add or remove a control by selecting its checkbox in the dialog.
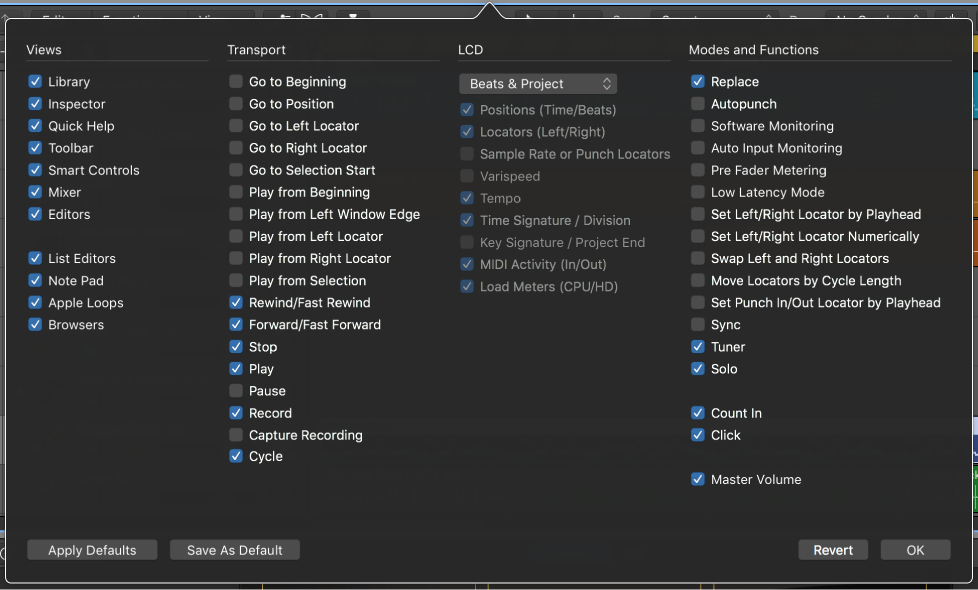
Do one of the following:
Click the Cancel button to keep the previously saved control bar layout.
Click the OK button to make the new control layout active.
Click the Save As Default button to save your current layout as the default, which is then applied whenever you create an empty new project, open a new main window, or click the Restore Defaults button.
Click the Restore Defaults button to return to the default layout.