You can define a specific event to use as a group selection switch. Whenever the defined selection event is triggered, zones pointing to this group can be played, while other groups selected with a different event are not played. The defined event does not play or alter a sound; it acts only as a group selection switch.
The Select Group By command is available in the View menu when you are in Groups view.
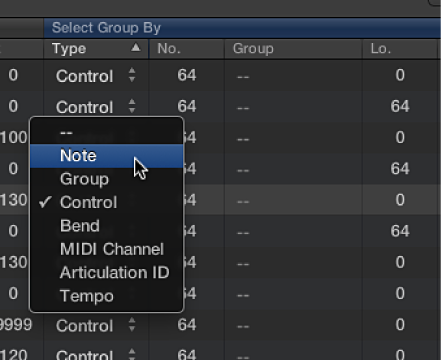
Group selection filters
The following group selection filters are available in the Type column pop-up menu:
Note: Used to select a group by MIDI note. You need to assign multiple groups to a different MIDI note; if the note is triggered, playback of the other group is stopped.
Group: Used to select a group based on membership of a master group. You need to assign multiple groups to one master group; if any group member within the master group is triggered, playback of the other group or groups is stopped.
Control: Used to select a group based on a specified controller number.
Bend: Used to select a group by bend range. Groups are played only if they fall within the specified bend range.
MIDI Channel: Used to select a group by MIDI channel. Groups are played only if they match the channel.
Articulation ID: Used to select a group based on the articulation ID. This parameter is available as a modulation destination, so you can switch between sample groups with a controller. For example, you could use your keyboard modulation wheel to switch between several hi-hat groups with different opening degrees.
Tempo: Used to select a group by tempo. Groups are played only if they fall within the specified tempo range.
If you want EXS24 mkII to automatically switch between two string sample groups, for example—one for staccato samples and one for legato samples—you could set the Select Group By menu to MIDI notes, and assign a different MIDI note to trigger each group. You can then use a note that is not triggering a sound as a remote group switch.
The following assumes that several groups already exist. See Create EXS24 mkII groups.
Click the Groups view button, then choose the Select Group By command from the View menu.
The Select Group By fields are displayed in the Group view.
Choose Note from the pop-up menu shown in the Type column for the first group you want to switch.
This is the base group. The default note number is C-2, shown in the No. column field.
Drag vertically in the No. column field to change the note number of the base group.
This should be a note that has no assigned zone. When you play this note, this group is selected—all other groups are unselected.
Choose Note from the pop-up menu shown in the Type column for the second group you want to switch.
Drag vertically in the No. column field to change the note number of the second group.
This should be a note that has no assigned zone. When you play this note, the second group is selected—all other groups are unselected.
You can use multiple group selection criteria to refine your group selections. For example, you could specify that only a particular range of specified controller message values switches between different articulations, for example. This could be further refined with a second Select Group By selection with MIDI channel specified as the group selection criteria.
Do one of the following:
Click the plus sign in the upper-right corner of the Select Group By column.
Select Group By (2) fields are displayed in the Group view.
Click the minus sign to remove a Select Group By condition and to broaden the group selection criteria.
The term round robin is used to describe sample switching when a single key is struck repeatedly. This feature can be particularly useful in live performance or for avoiding abrupt, machine-gun-like effects when switching between real instrument samples.
In EXS24 mkII, you can use a group as the selection criteria for the Select Group By condition. When one group is played, other groups are silent.
Click the Sampler Instruments pop-up menu and load an instrument.
Click the Edit button to open the Instrument Editor window. Click the Zones button if Groups view is shown.
Assign two zones to the same key (note C2, for example), and play the onscreen keyboard or play C2 on a connected MIDI keyboard.
You can see and hear two samples (zones) being played. For clarity, these are zone 1 and zone 2.
Now assign another zone to another note (C3, for example) on the onscreen keyboard.
Play C3 on your MIDI keyboard to hear a different zone being triggered. This is zone 3.
Drag vertically in the Lo column for zone 3 until C2 is shown.
If you repeatedly strike C2, you will hear zones 1, 2, and 3 being played.
Repeat steps 4 and 5 for other notes, if required.
Click the Groups button to switch to Groups view.
Choose Group: Group Select By from the View menu.
Click the Type subcolumn in the zone 2 row, then choose Group from the pop-up menu.
Click the Group subcolumn in the zone 2 row and choose zone 1.
Repeat steps 9 and 10 in the zone 3 row, but choose zone 2 in the Group column.
Repeatedly click note C2 on the onscreen keyboard, or play C2 on a connected MIDI keyboard.
You can hear zones 1, 2, and 3 switched one after the other.
This example illustrates the use of groups as the selection or switching criteria. The selection of zone 1, zone 2, and zone 3 in the Group menu enables you to specify the trigger group for another group. Because these trigger groups are unique in the Group column, you sequentially step through groups.