Source components are shown only in advanced view. Click the Advanced button to switch to advanced view, then click the A/B/C/D button to select the source you want to edit.
Alchemy spectral element effects provide a number of creative options in the spectral synthesis engine. Two effects units are available in the lower half of the spectral parameters shown in the source subpage. See Spectral element controls for information on other spectral element parameters.
Note: You must first perform a sample import with a spectral analysis or draw in the Spectral edit window before you can use any of the spectral engine parameters. See Import browser and Spectral edit window.
Spectral effect parameters
Spectral effect on/off buttons: Enable or disable the spectral effect unit.
Spectral effect pop-up menus and fields: Choose a spectral effect type. See spectral effect descriptions below.
Mix knob: Set the balance between the original signal and the processed sound. This parameter is common to all spectral effect types.
Parameter knob 1: Set the value for the parameter assigned to the chosen spectral effect. The parameter name and function vary with each effect type.
Parameter knob 2: Set the value for the parameter assigned to the chosen spectral effect. The parameter name and function vary with each effect type.
Parameter knob 3: Set the value for the parameter assigned to the chosen spectral effect. The parameter name and function vary with each effect type.
Bloom
Bloom produces a burst of frequencies based on the source sound. Note that this effect requires a small amount of calculation time to collect and release a group of frequencies. As a result, there may be a gap between playing a note and hearing the effect.
Tip: Try single note samples with a strong initial attack, such as a piano, and set Mix to a value that introduces the effect as part of the tail of the sound.
Mix: Set the balance between the original signal and the processed sound.
Threshold: Set the amount of lower amplitude frequencies heard in the effect.
Attack: Set the time it takes for effect-generated frequencies to fade in.
Shift: Move the emphasis of the effect from lower harmonics (negative values) to higher harmonics (positive values). When centered (0), the original frequency balance is used.
Blur
Blur produces a frequency blurring effect.
Tip: Try a melodic loop with pitch variations to best hear the impact of this effect.
Mix: Set the balance between the original signal and the processed sound.
Length: Set the time period that frequencies are sustained (blurred over time).
Variance: Set the degree of variation for frequency selection (frequencies that are blurred).
Gate: Determine the impact of the source sound envelope on the effect and the number of audible frequencies. For example, when used on a loop, higher settings produce a simplified sound with more frequent gaps in the effect output.
Cloud
Cloud produces what might best be described as a cloud of frequency grains, resulting in a textured chorus effect.
Tip: Try this effect on vocal samples.
Mix: Set the balance between the original signal and the processed sound.
Threshold: Set a sustained emphasis on the highest amplitude harmonics.
Attack: Set the time it takes for frequencies emphasized by the Threshold setting to fade in.
Simplify: Reduce lower amplitude frequencies to enhance prominent frequencies, thus reducing detail and definition in favor of an increasingly pure tone.
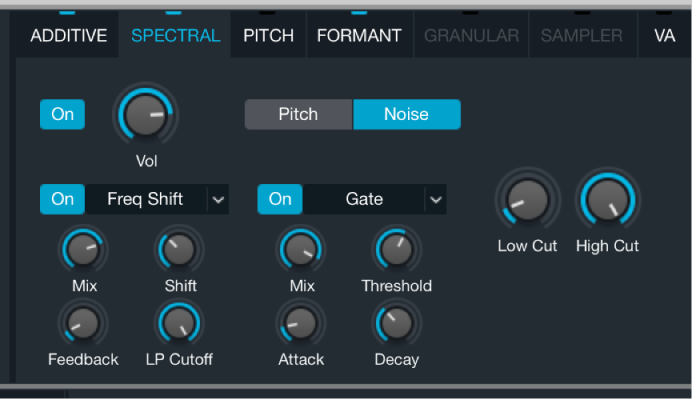
Gate
Gate is best described as a combination of a square wave LFO and envelope follower modulation for frequencies in the spectrum. Depending on your settings and source material, this can either produce a choppy sound or a smoother one.
Tip: Drum loops are an ideal starting point when learning uses for this effect.
Mix: Set the balance between the original signal and the processed sound.
Threshold: Set the amount of lower amplitude frequencies that are allowed to pass through the gate. This reduces detail and enhances prominent frequencies in the source sound.
Attack: Set the time it takes for effect-controlled frequencies to fade in.
Decay: Set the time it takes for effect-controlled frequencies to fade out.
Glide
Glide creates adjustable, repeating upward filter sweeps that are based on the source content. Note that this effect requires a small amount of calculation time before the results of your adjustments are heard.
Tip: Sources with wide frequency ranges produce a more pronounced filter sweep sound, whereas sources with limited frequencies can result in unique melodic drones as narrow filters sweep across their ranges.
Mix: Set the balance between the original signal and the processed sound.
Freq: Set the starting frequency for the sweep.
Width: Set the width of the filter (the frequency range, or band, affected by the filter).
Shift: Set the height of the sweep.
Freq Shift
Freq(uency) Shift moves the spectral bins higher or lower in the spectrum, reducing the level of (or entirely dropping) some frequencies while emphasizing others. This is a powerful sound design tool that can dramatically alter the sound and can introduce inharmonic overtones.
Tip: Try single note samples with a strong initial attack, such as a piano, and blend the mix level so that the effect comes in as part of the tail of the sound.
Mix: Set the balance between the original signal and the processed sound.
Shift: Moves bins up (positive) or down (negative) the frequency spectrum. Start with small adjustments as this parameter has a wide range.
Feedback: Set the intensity of selected frequencies.
LP Cutoff: Set the cutoff frequency. Higher frequencies are attenuated.
Freq Stretch
Freq(uency) Stretch is an unusual and powerful effect in that spectral peaks are shifted based on a combination of the Alpha and Beta knobs, resulting in a series of inharmonic stretches and randomizations.
Tip: This effect is highly dependent on the available frequency range in the imported sample. For example, the Alpha and Beta knobs are useful across the entire range with drum loops, whereas the most useful Alpha and Beta ranges are small positive or negative deviations from the center position when used with spoken vocals.
Mix: Set the balance between the original signal and the processed sound.
Alpha: Shift harmonics to produce an effect that is reminiscent of a formant filter. A setting of 1 (centered) is closest to the source sound.
Beta: Set the frequency range of the effect. A setting of 1 (centered) is closest to the source sound.
Variance: Introduce randomization to frequency shifts which, depending on source material and Alpha/Beta settings, range from “underwater” sounds to powerful noise clouds.
Metallize
Metallize produces classic comb filter style effects.
Tip: Experiment with drum loops to clearly hear the impact of the controls.
Mix: Set the balance between the original signal and the processed sound.
Interval: Set the effect frequency.
Simplify: Reduce the number of effect-generated frequencies, resulting in a simplified sound.
Feedback: Set the intensity of the effect. Higher settings emphasize harmonics, creating metallic resonances.
Shimmer
Shimmer sweeps the frequencies to varying degrees and speeds, imparting either slow frequency shifts or fast shimmering sounds.
Tip: Try pure organ samples to clearly see the results of the effect in the real-time spectrogram display, particularly at moderate rate settings.
Mix: Set the balance between the original signal and the processed sound.
Rate: Set the sweep speed.
Shimmer: Set the intensity of the frequency sweep.
Feedback: Adjust to introduce resonant, metallic harmonics that are reminiscent of sounds that can be attained with comb filters.
Shuffle
Shuffle randomly rearranges blocks of bins, resulting in an increasingly abstract and scattered sound.
Tip: Import a bell sample, and start with very low settings to see and hear the impact of controls on the sound.
Mix: Set the balance between the original signal and the processed sound.
Factor: Set the number of blocks (of bins) that you want to shuffle.
Range: Set the distance (number of bins) that you want to move each block.
Bins: Set the number of bins contained in each block. Note that bins are numbered (and selected) sequentially.
Smear
Smear averages between blocks of frequencies to create a smoother, more consistent sound. It delivers different results to the Blur effect.
Tip: Try melodic loops that have pitch variations to showcase this effect.
Mix: Set the balance between the original signal and the processed sound.
Smooth: Set the number of frequency blocks to smooth between. Higher settings result in less sonic variation, so use smaller adjustments with this control.
Bright: Emphasize higher frequencies.
Phase On: Enable to preserve the original phases of the source sound. This natural variation in the sound provides a more organic cloud-like effect. Disable to lock the phases of the source, resulting in a tight, metallic sound.