Welcome to iTunes Producer

Introduction

This guide describes iTunes Producer for music, Apple’s tool for preparing and sending your music for sale in the iTunes Store, and the steps necessary to install and use iTunes Producer for music.

This guide is organized as follows:

  • Get started, provides an overview of iTunes Producer, describes the system requirements and supported formats, and outlines the steps to install and start using iTunes Producer.

  • Create your album, describes how to create an album to submit to the iTunes Store.

  • Describe your album, explains how to prepare your album for delivery to the iTunes Store by providing details about the album and tracks.

  • Deliver your album, provides details on how to deliver your album to the iTunes Store for processing and how to send Apple a log report if you encounter errors during delivery.

  • Create, describe, and deliver your ringtone, describes how to create, prepare, and deliver your ringtone to the iTunes Store and how to send Apple a log report if you encounter errors during delivery.

  • More resources, provides a glossary of terms you’ll encounter as you read this guide, featured tasks with some of the top tasks performed using iTunes Producer, details on where you can get additional help, and a revision history for your reference.

Note: Because Apple periodically releases new versions and updates to its software, images and output shown in this guide might be somewhat different from what you see on your screen.

What’s new?

iTunes Producer 3.1.4 for music contains the following enhancements:

  • Updated system requirements. iTunes Producer now requires Mac OS X version 10.13 or later. For details, see Requirements.

  • Removed the table of IP addresses and replaced it with a link to ensure access to the latest changes: System and network requirements.

Get started

About iTunes Producer

iTunes Producer (iTP) for music is a tool to help you prepare content for sale in the iTunes Store. Using iTP, you can encode your music into Apple Lossless Core Audio Format (CAF) files, upload cover art, enter album and track or ringtone details, and send your album or ringtone and all your prepared files as an iTunes Store package (iTP package) directly to the iTunes Store.

Requirements

iTunes Producer requires a Mac running OS X version 10.13. Apple recommends a broadband Internet connection with an upload rate of 1MB/sec or faster.

To view a list of servers iTunes Producer uses to deliver content to the iTunes Store, click System and network requirements. For the best upload experience, verify that all of the ports and IP addresses are accessible.

Note:

Because Apple periodically releases new versions and updates to its software, servers listed in the linked table might change mid-release.

Supported formats

iTunes Producer (iTP) for music supports the import of uncompressed audio files. When importing your music keep the following in mind:

  • iTP supports audio files with appropriate file extensions (.wav, .caf, .m4a, .flac) encoded in a lossless format (Linear PCM or ALAC).

  • iTP supports audio files with data encoded using linear PCM (CD audio) or Apple Lossless format.

  • Audio for pre-cut ringtones must be between 5 and 30 seconds in length. There is no maximum length for standard songs.

Apple recommends the following specifications: 16 bit or higher bit depth and 44.1 kHz or higher sample rate.

Note: iTP can import AIFF audio files from a CD or a top-level removable device (for example, a USB memory stick).

You can use your keyboard to perform many of the same actions you perform using the mouse. With full keyboard access, you use the Tab key, arrow keys, and Space bar to move to and select or enable items on the screen.

Install iTunes Producer

You can install and run iTunes Producer (iTP) for music on the Mac OS X version 10.10 or later operating system.

To install iTP:

  1. Navigate to Music in Resources and Help in iTunes Connect.

  2. Click View Tools in the Other Resources section.

  3. Click the iTunes Producer download link.

    iTunes Connect downloads the self-extracting installation package.

  4. Review the Read Before You Install iTunes Producer file, double-click the installation package (iTunesProducer.pkg), and follow the instructions that appear.

    Note: When installing iTP on the Mac, before you can install the software, you must log in to your computer as a member of the administrator group.

  5. Read the installation introduction, then click Continue.

  6. Click Install to perform the standard installation.

    The installation package installs files in your Applications folder.

    Type your administrator password and click Install Software, if prompted.

  7. Click Close.

    Open the iTP application by double-clicking the iTunes Producer.app icon in the Applications folder, or the folder you specified during a custom install. You are now ready to begin using iTP. For more information, see Sign in to or out of iTunes Producer.

Sign in to or out of iTunes Producer

Before you can use iTunes Producer (iTP) to create content for the iTunes Store, you must sign in to iTP using your iTunes Connect sign-in information. To prevent anyone from accessing your iTunes Producer account while you are away from your computer, you can sign out of your account.

Note: The iTP package window includes an active user button containing the Apple ID for the currently signed in user. Click the button to display the Sign In window to change or update your Apple ID and password.

To sign in to iTunes Producer:

  1. Double-click the iTunes Producer.app icon in the Applications folder.

  2. Read the iTunes Producer Software License Agreement, then click Agree.

    iTP opens the Sign In window.

    Sign In window
  3. Type your iTunes Connect sign-in information (Apple ID and password) in the Sign In window.

  4. Click Keep me signed in to stay signed in when you quit iTunes Producer.

  5. Click Sign In.

    iTP verifies your iTunes Connect sign-in information and stores your Apple ID and password for future iTP operations.

  6. Review the welcome information, then click Continue.

    To review the welcome information at a later time, choose Help > Welcome in the iTunes Producer menu.

    iTP displays the Template Chooser window so you can begin using iTP. For more information, see Creating Your Album.

    Note: iTP displays a provider button in the top left of the Template Chooser window indicating the currently active provider. If your account is attached to more than one iTunes Connect provider, you can use the provider button to choose the provider you want to use for the current package. Click the button to change providers, view the Apple ID for the currently signed in user, or sign out.

If you change your iTunes Connect password, you must use the Sign In window to reset your Apple ID and password in iTP. To reset your Apple ID and password, choose Window > Sign In As in the iTunes Producer menu, then repeat steps 3 through 6 above.

To sign out of iTunes Producer:

Do one of the following:

  • Choose Window > Sign Out Of <user_name> in the iTunes Producer menu.

  • Deselect Keep me signed in in the Sign In window, then quit iTunes Producer or, to change accounts, click the active user button in the iTP package window, then sign in using new iTunes Connect sign-in information.

Note: If you have two-step verification turned on for your Apple ID, you must verify your identity using one of your devices and generate an app-specific password before you can sign in to iTunes Producer. For more information, see https://support.apple.com/HT204152.

Create your album

About creating your album

The first step in preparing content for sale in the iTunes Store is to create an album containing the music you want to submit. You can select the music you want to include in an album from a CD, from audio files on your computer, from an existing iTunes Store package (iTP package), by looking up the metadata from an existing iTunes Store album, or by importing album and track details from a file.

The following screenshot displays the iTP Template Chooser window with Audio CD selected.

Template chooser

iTP displays a provider button in the top left of the Template Chooser window indicating the currently active provider. If your account is attached to more than one iTunes Connect provider, you can use the provider button to choose the provider you want to use for the current package. Click the provider button to confirm your are signed in with the correct Apple ID, change providers, or sign out and try again. If you do not see any of the above activities in the iTP Template Chooser window, you might not be signed in with the correct provider or you might not have configured iTP for music delivery.

Note:

  • You must create an album even if you want to submit only one song.

  • To submit an album that has several volumes (discs), include all volumes in the same album.

Create an album from a CD

You can create your album by importing the music you want to submit to the iTunes Store from a CD.

To import your music from a CD:

  1. Click Audio CD in the Template Chooser window, then click Choose.

    iTP displays an untitled package window with the Import pane selected.

  2. Insert the CD (with the label facing up or toward you) containing the music you want to import into your computer’s disc drive.

  3. Select the CD, under Devices.

    By default, iTP selects all tracks. To select a subset of tracks on the CD, Command-click a checkbox to deselect all tracks and then select the checkboxes for the specific tracks you want to import.

  4. Click Import.

    iTP imports the music for your album and encodes each file into an Apple Lossless Core Audio Format (CAF) file.

    When you import album information, iTP automatically populates the track’s artist, genre, label name, and copyright information based on the album information.

    Click Cancel button to cancel the import.

  5. Repeat steps 2 through 4 for multi-disc albums.

  6. Click Next.

    iTP displays the Album pane so you can begin describing your music and entering information about the album and tracks. For more information, see Describing Your Album.

iTP plays an alert sound when the album import is complete. If iTP encounters an error during import, iTP plays an error sound and bounces the iTP icon in the Dock.

When you are sure the album and track details are complete and correct, you can send your album to iTunes for processing. For more information, see Delivering Your Album.

Create an album from audio files

You can create your album by selecting the music you want to submit to the iTunes Store from files on your computer.

To select your music from audio files on your computer:

  1. Click Audio Files in the Template Chooser window, then click Choose.

    iTP displays an untitled package window with the Album pane selected.

  2. Use the Album pane to add album information (for example, artist names and roles) and rights and pricing. For more information, see About Album Details.

  3. Use the Tracks pane to add the audio files containing the music you want to include in your album, and add track information (for example, title and version), lyrics, and rights and pricing. For more information, see About Track Details.

Continue using the Album and Tracks panes to add files, describe your music, and enter details about the album and tracks. For more information, see Describing Your Album.

When you are sure the album and track details are complete and correct, you can send your album to iTunes for processing. For more information, see Delivering Your Album.

Open an existing package

You can create your album by opening a previously saved iTunes Store package (iTP package), editing album and track details, and updating the music you want to submit to the iTunes Store.

To select your music from an existing package:

  1. Do one of the following in the Template Chooser window:

    • Click Open Recent, then choose the local package file from the pop-up menu.

    • Use the search field to search for the local or remote package file. To narrow your search, select from the criteria (for example, All Music, Album Name, UPC, Vendor ID, Apple ID) in the pop-up menu before you search.

    • Choose File > Open in the iTunes Producer menu, then choose the local package file from the Open window.

    iTP opens the music package with the Album pane selected.

  2. Use the Album pane to add and edit album information (for example, artist names and roles) and rights and pricing. For more information, see About Album Details.

    You can also replace assets you want to update (for example, cover art ).

  3. Use the Tracks pane to add and edit track information (for example, title and version), lyrics, and rights and pricing. For more information, see About Track Details.

    You can also replace assets you want to update (for example, individual music files).

  4. Use the Import pane to add and replace audio files by importing the music from a CD. For more information, see Create an album from a CD.

Continue using the Album and Tracks panes to edit the package. For more information, see Describing Your Album.

Note: If you previously delivered the album to the iTunes Store, you cannot update all information in the Album and Tracks panes. For more information, see What elements can I update in my album? in Featured tasks.

When you are sure the album and track details are complete and correct, you can send your album to iTunes for processing. For more information, see Delivering Your Album.

Look up metadata for an existing album

Create your album using metadata from an existing album when you want to update your metadata or assets and resend the package to iTunes. You can create your album by looking up the metadata from an existing iTunes Store album you previously delivered, editing album and track details, and updating the music you want to submit to the iTunes Store.

To select your music by looking up metadata from an existing album:

  1. Use the search field to search for the metadata from an existing album in the iTunes Store. To narrow your search, select from the criteria (for example, All Music, Album Name, UPC, Vendor ID, Apple ID) in the pop-up menu before you search.

    iTP authenticates the UPC/EAN/JAN or Vendor ID number, searches for the associated metadata, then displays a list of suggestions, organized into categories based on your search text, under the search field.

  2. Select a suggestion.

  3. Do one of the following:

    • Click Create Album. iTP imports the metadata and displays the Album pane. Use the Album pane to add and edit album information (for example, label name) and rights and pricing. For more information, see About Album Details.

      You can also replace assets you want to update (for example, cover art ).

    • Click Redeliver Audio. iTP imports the metadata and displays the Import pane. Use the Import pane to add and replace audio files by importing the music from a CD. For more information, see Create an album from a CD.

  4. Use the Tracks pane to add and edit track information (for example, label name), lyrics, and rights and pricing. For more information, see About Track Details.

    You can also replace assets you want to update (for example, individual music files).

Continue using the Album and Tracks panes to edit metadata. For more information, see Describing Your Album.

Note: If you previously delivered the album to the iTunes Store, you cannot update all information in the Album and Tracks panes. For more information, see What elements can I update in my album? in Featured tasks.

When you are sure the album and track details are complete and correct, you can send your album to iTunes for processing. For more information, see Delivering Your Album.

Create an album from a file

You can create your album by importing album and track details from an iTunes Producer file and selecting the music you want to submit to the iTunes Store.

When creating an album from a file, be sure to use the iTunes Producer templates. To get a copy of the templates, choose File > Open Music File Import Template in the iTunes Producer menu. iTunes Producer opens Finder and creates a temporary MusicFileImportTemplates folder containing the Multiple_artist.txt, Localization.txt, and Ringtone.txt templates. The Multiple_artist.txt template provides you with an example of multiple artist album imports. The Localization.txt template provides you with an example of localized album imports. The Ringtone.txt template provides you with an example of ringtone album imports. To always have an original version of the template file, be sure to make a copy of the template before editing.

To import album and track details from a file:

  1. Click Import, select the filename containing the details you want to import into your album, then click Open.

    iTP imports the album and track details from the iTunes Producer file and displays the Album or Tone pane.

    Notes:

    • Any fields iTP cannot import are left blank, including misspelled field names or fields not acceptable for import.

    • If there is more than one UPC in the file, iTP imports the album and track details and displays an iTP package window, with the Album pane selected, for each unique UPC.

  2. Use the Album pane to add and edit album information (for example, artist names and roles) and rights and pricing. For ringtones, use the Tone pane to add and edit ringtone information and rights and pricing details. For more information, see About Album Details or Provide ringtone details.

  3. Use the Tracks pane to add and edit track information (for example, title and version), lyrics, and rights and pricing, and to add the audio files containing the music you want to include in your album. For more information, see About Track Details.

  4. Use the Import pane to add and replace audio files by importing the music from a CD. For more information, see Create an album from a CD.

Continue using the panes to add files, describe your music, and enter details. For more information, see Describing Your Album or About Ringtones.

When you are sure the album and track details are complete and correct, you can send your album to iTunes for processing. For more information, see Delivering Your Album or Send your ringtone package to the iTunes Store.

Using the templates, you can import fields into your album for a range of languages and localized values (for a list of languages, see the Languages pop-up menu in the Album > Info pane).

The following is an example of a template and the fields you can import for your album (required fields in bold).

Name

Description

Example

Language

The primary language of the album.

English

Album Title

The title of the album.

Astoria

Album <language> Title

The title of the album. Where <language> is one of the languages listed in the Languages pop-up menu in the Album > Info pane.

Album Phonetic Title

For Japanese, the reading (furigana) of the title in full-width Hiragana or Katakana. For Chinese, Album Phonetic Title supports Pinyin. This phonetic information provides a better search experience for your users.

Notes:

  • This field is for Japanese and Chinese phonetic titles only.

  • For Japanese, use a space character to indicate any meaningful separation units.

  • iTunes Producer strictly enforces a 255-byte limit, stored in the UTF-8 encoding. For single-byte characters (such as those drawn from the ASCII character set), this equates to a 255-character limit; for multiple-byte characters (such as Japanese), this can equate to as few as 71 characters.

Album Title Version

The album title version, if applicable.

Live

Album <language> Title Version

The album title version, if applicable. Where <language> is one of the languages listed in the Languages pop-up menu in the Album > Info pane.

Album Artist

The artist name. In this context, artist can be any contributor including non-performing persons (for example, a producer), groups (for example, a band name), or composition-related contributors (for example, songwriter/lyricist, or composer). Individual artists should be separated by a semi-colon and not grouped together (for example, use "Ella Fitzgerald; Louis Armstrong" instead of "Ella Fitzgerald and Louis Armstrong").

Ian Axel

Album Artist Apple ID

The artist Apple ID. iTunes assigns every artist a unique Apple ID; Apple recommends using the Apple ID to avoid the ambiguity in cases where artists share the same name as other music artists, or film actors or crew members.

To find the artist's Apple ID, see How do I find an artist’s Apple ID? in Featured tasks. For any subsequent updates, you can use the Apple ID instead of or in addition to the name, to avoid ambiguity.

251002233

Album <language> Artist

The artist name. In this context, artist can be any contributor including non-performing persons (for example, a producer), groups (for example, a band name), or composition-related contributors (for example, songwriter/lyricist, or composer). Individual artists should be separated by a semi-colon and not grouped together (for example, use "Ella Fitzgerald; Louis Armstrong" instead of "Ella Fitzgerald and Louis Armstrong"). Where <language> is one of the languages listed in the Languages pop-up menu in the Album > Info pane.

Album Phonetic Artist

For Japanese, the reading (furigana) of the artist name in full-width Hiragana or Katakana. For Chinese, Album Phonetic Artist supports Pinyin. This phonetic information provides a better search experience for your users.

Notes:

  • This field is for Japanese and Chinese phonetic titles only.

  • For Japanese, use a space character to indicate any meaningful separation units.

  • iTunes Producer strictly enforces a 255-byte limit, stored in the UTF-8 encoding. For single-byte characters (such as those drawn from the ASCII character set), this equates to a 255-character limit; for multiple-byte characters (such as Japanese), this can equate to as few as 71 characters.

Album Artist Role

The artist's role in the album. Role names must be in English.

Performer

Album Artist Primary

Indicates whether or not the album artist is the primary artist.

TRUE

Content Provider

Indicates the provider you want to use for the current package. If your account is attached to more than one iTunes Connect provider, you can use Content Provider to specify the provider you want to associate with the current package.

Apple Entertainment

UPC/EAN/JAN

A valid GS1 12-digit UPC (Universal Product Code), 13- or 14-digit EAN (European Article Number), or JAN (Japanese Article Number) for the album identifier.

123456789012

Album Label Name

The name of the label that released the album.

TinyOGRE Entertainment

Album Recording Location

The location where the album was recorded.

Album Copyright

The copyright line for the album.

Ian Axel / TinyOGRE, LLC

Album Copyright Year

The copyright year for the album.

2011

Album P Copyright

The performance copyright for the album.

Ian Axel / TinyOGRE, LLC

Album P Copyright Year

The performance copyright year for the album.

2011

Album Genre

The primary genre for the album.

Pop

Album Genre 2

The secondary genre for the album.

Rock

Original Release Year

The original year of the first consumer-available physical album release (LP, cassette, 8-track, CD, or other physical media).

2011

Release Date

The original date of the first consumer-available physical album release (LP, cassette, 8-track, CD, or other physical media).

2012/01/28

Sale Start Date

The date on which the album will be available for sale in the specified territory.

2012/01/28

Album Parental Advisory

Indicates whether the album is explicit or clean.

None

Track Title

The title of the track.

Piano Man With a Plan

Track <language> Title

The title of the track. Where <language> is one of the languages listed in the Languages pop-up menu in the Album > Info pane.

Track Phonetic Title

For Japanese, the reading (furigana) of the title in full-width Hiragana or Katakana. For Chinese, Track Phonetic Title supports Pinyin. This phonetic information provides a better search experience for your users.

Notes:

  • This field is for Japanese and Chinese phonetic titles only.

  • For Japanese, use a space character to indicate any meaningful separation units.

  • iTunes Producer strictly enforces a 255-byte limit, stored in the UTF-8 encoding. For single-byte characters (such as those drawn from the ASCII character set), this equates to a 255-character limit; for multiple-byte characters (such as Japanese), this can equate to as few as 71 characters.

Track Title Version

A version description for the track, if there are multiple versions of the same track or if you want to provide any additional identifying information.

Live

Track <language> Title Version

A version description for the track, if there are multiple versions of the same track or if you want to provide any additional identifying information. Where <language> is one of the languages listed in the Languages pop-up menu in the Album > Info pane.

Track Artist

The name of the artist on the track.

Ian Axel

Track <language> Artist

The name of the artist on the track. Where <language> is one of the languages listed in the Languages pop-up menu in the Album > Info pane.

Track Phonetic Artist

For Japanese, the reading (furigana) of the artist name in full-width Hiragana or Katakana. For Chinese, Track Phonetic Artist supports Pinyin. This phonetic information provides a better search experience for your users.

Notes:

  • This field is for Japanese and Chinese phonetic titles only.

  • For Japanese, use a space character to indicate any meaningful separation units.

  • iTunes Producer strictly enforces a 255-byte limit, stored in the UTF-8 encoding. For single-byte characters (such as those drawn from the ASCII character set), this equates to a 255-character limit; for multiple-byte characters (such as Japanese), this can equate to as few as 71 characters.

Track Artist Apple ID

The artist Apple ID. iTunes assigns every artist a unique Apple ID; Apple recommends using the Apple ID to avoid the ambiguity in cases where artists share the same name as other music artists, or film actors or crew members.

To find the artist's Apple ID, see How do I find an artist’s Apple ID? in Featured tasks. For any subsequent updates, you can use the Apple ID instead of or in addition to the name, to avoid ambiguity.

251002233

Track Artist Role

The artist’s role on the track.

Primary

Track Artist Primary

Indicates whether or not the track artist is the primary artist.

TRUE

ISRC

A valid 12-digit alphanumeric ISRC (International Standard Recording Code) code for the track.

USABC0512353

Track P Copyright

The performance copyright for the track.

Ian Axel / TinyOGRE, LLC

Track P Copyright Year

The performance copyright year for the track.

2011

Track Genre

The primary genre for the track.

Pop

Track Genre 2

The secondary genre for the track.

Rock

Track Label Name

The name of the label that released the track.

TinyOGRE Entertainment

Track Number

The track number, used to order the tracks within a disc within an album.

9

Total Tracks

A positive number indicating the total number of tracks in the album.

9

Disc Number

A positive number indicating the disc number for the track in the album. For albums with multiple discs, the Disc Number indicates on which disc the track is located.

1

Preview Start

The number of seconds into the track that the preview should start playing.

105

Track Parental Advisory

Indicates whether the track is explicit or clean.

None

Track Audio Language

Indicates the language in which the track is sung, if that language is different from the album language.

If you do not specify a language, iTP uses the album language. If a track is sung in Chinese, but you do not know if it is Mandarin or Cantonese, you can choose either as the audio language. If you get a warning when you deliver the metadata, you can edit the data to use the correct language.

Dutch

Album Type

Indicates that the album is a ringtone. You must indicate the type as ringtone to distinguish it from a standard album.

ringtone

Cleared For Sale

Indicates whether or not the track should be made available for sale in the specified territory.

TRUE

Notes:

  • You can exclude any column data, as long as you leave the column and column heading intact.

  • Only include fields for the data you want to import. iTP imports empty or blank fields as blank data and overwrites any existing data.

  • All rows of data must be contiguous. To import data successfully, there can be no blank rows of data between any two rows of data.

  • For genre and parental advisory fields, which appear as pop-up menus in iTP, the import data must exactly match the menu choices.

  • If you have a mix of UPCs and EANs, for example, you must choose one field name and enter both types into the same field. For example, both UPCs and EANs must go in the UPC/EAN/JPN field.

  • To specify more than one artist role for an album or track, separate artist roles with a semi-colon (;). For example, "Writer; Performer". To further define artist roles, use comas (,). For example, if the first artist’s roles are writer and performer and the second artist’s role is performer, specify "Writer, Performer; Performer". iTP strips out extra whitespace at the front and end of any artist name.

  • If you are using Excel to save your data as a Unicode Text UTF-16 file, be sure to review the data before you save the file. Excel can automatically remove all leading zeros from your UPC, EAN, and JAN numbers and also save the numbers in scientific notation. Reviewing your data before you save the file as a Unicode Text UTF-16 file can help avoid this issue. To ensure your UPC, EAN, and JAN numbers do not have leading zeros removed and are not displayed in scientific notation, first select the UPC, EAN, or JAN column in your spreadsheet. Choose Format > Cells and select Text for the category. Now you can properly enter your UPC, EAN, and JAN numbers in the cells.

Describe your album

About preparing your album

After you create your initial album, you can provide album and track details, including artists, titles, copyright information, previews, rights and pricing, and more. Your album should contain all the songs in each album or compilation that you want to submit to the iTunes Store.

Provide album details

About album details

Before sending your album to the iTunes Store, use the Album pane of iTunes Producer (iTP) to provide album information and rights and pricing details.

When providing album details, be sure to follow the iTunes Store Music Style Guide. The iTunes Store Music Style Guide specifies the iTunes Store required style, standards and conventions for classical and non-classical content. Conforming to these styles is important to ensure your content is easily discovered, presented correctly, and accurately disclosed to eliminate customer confusion and complaints. Following the standards and style guide can help ensure that content goes live in the iTunes Store and reduce the time needed for review by Apple. Non-conforming content might be edited or rejected. To download a copy of the iTunes Store Music Style Guide, visit “Resources and Help” on iTunes Connect.

Enter album information

Use the Album > Info pane to provide as much detail as possible about your album. The information you provide represents all the album-level metadata.

To provide album information details:

  1. Click Info at the bottom of the Album pane.

    Album pane
  2. Enter album information:

    Language: Choose a language to indicate where you want to sell the album. For more information, see Add localizations.

    Artists: Click Add Artist, type the name and Apple ID of the primary artist on the album, then choose a role from the Role pop-up menu. iTunes assigns every artist a unique Apple ID; Apple recommends using the Apple ID to avoid the ambiguity in cases where artists share the same name as other music artists, or film actors or crew members. You can refer to the artist by name, Apple ID, or both. If you specify both a name and Apple ID, iTunes Producer ignores the name in favor of the Apple ID. To find the artist's Apple ID, see How do I find an artist’s Apple ID? in Featured tasks. For any subsequent updates, you can use the Apple ID instead of or in addition to the name, to avoid ambiguity. Only artists on the front cover or spine of the CD should be listed as having a primary role.

    To add additional artists or other contributors (Songwriter, Remixer, Producer, and so on) to the album, click Add Artist again, type the name and Apple ID of the of the artist or contributor, choose a role for the artist or contributor from the Role pop-up menu, then select whether or not this is a primary role. You can also add composition-related contributors (for example, lyricist or composer) using Add Artist. Always include composition-related contributor information when available.

    If you import album information or enter Album > Info information before Tracks > Info information, iTP automatically populates the track’s artist, genre, label name, and copyright information based on the album information. If you want to cascade all album artists to all tracks included in the album, including tracks added before the Album > Info information, click Cascade Artists.

    Title: Type the name of the album in English. If the album’s native language is not an ISO Latin-1 or Latin-2 language (for example, Japanese), see Add localizations.

    Title Version: Type a version description for the title in English, if applicable. You can use Title Version when there are multiple versions of the same album by the same artist. For example, "Remastered," "Bonus Track Version," or "Extended Version". If the album’s native language is not an ISO Latin-1 or Latin-2 language (for example, Japanese), see Add localizations.

    Genre (Primary): Choose a genre for the album from the pop-up menu.

    Genre (Secondary): Choose a second genre for the album, if applicable, from the pop-up menu.

    Content Provider: Choose the provider you want to use for the current package. If your account is attached to more than one iTunes Connect provider, you can use Content Provider to choose the provider you want to associate with the current package.

    Label Name: Type the name of the label that released the album. Apple uses this information for financial reporting.

    Copyright: Type the copyright line (YYYY copyright info) for the album in the first Copyright field and the copyright line (YYYY copyright info) for the performance (sound recording for the album) in the second Copyright field. Do not type the word "copyright" or include any copyright symbols; it is added automatically. iTunes displays the performance copyright line in the iTunes Store.

    UPC/EAN/JAN: Type a valid 12-digit UPC (Universal Product Code), 13- or 14-digit EAN (European Article Number), or JAN (Japanese Article Number) for the album identifier. Be sure to include the check digit. A unique code is required for each album. iTunes rejects any new album submitted with a previously-used code. You cannot change UPC/EAN/JAN codes once you deliver your album to the iTunes Store.

    Original Release Date: Type the original date (YYYY-MM-DD) of the first consumer-available physical album release (LP, cassette, 8-track, CD, or other physical media). Use this same date for albums that are re-releases (for example, re-mastered, or releases on new media types such as CD, digital, and so on). You can enter values such as “today”, “tomorrow”, and “next month”, and iTP correctly formats the date. This is not the digital release date, unless this album has not previously been released on any format.

    GRid Type the global release identifier (GRid) for the album. GRids must be unique across all products (the combined set of both albums and tracks). GRids must not be more than 18 alphanumeric characters. GRids cannot contain dashes (-), spaces, underscores (_), symbols, or other punctuation.

    GRids are a new industry standard but still not widely used. If a GRid is not used at your company, do not enter a value.

    Total Tracks: Type a positive number indicating the total tracks in the album. iTP multiplies the total number of tracks by the Wholesale Price Tier value to determine customer pricing.

    Pre-order previews allowed: Select whether or not a pre-order’s media should be available for preview during the pre-order period. By default, iTP allows pre-order previews. Pre-order previews allowed only affects preview availability during the pre-order period, and applies to every territory and every track. When the pre-order ends and the album is released for sale, previews are always available.

  3. Drag the album’s cover art to the Cover Art box, or click Choose and select a cover art file.

    Cover art should be at least a 1400 x 1400 pixel JPEG or PNG file in RGB Color mode. For best results, deliver the largest pixel dimensions possible.

    Do not scale up artwork if it is smaller than the required size. If you are scanning your cover art be sure to scan at the highest resolution, or at least 1400 x 1400 pixels. Cover art must be at least 72 dots per inch (dpi). Do not submit art that contains an embedded color profile, back cover, or thumbnail art.

    To replace a previously added file, drag a new file to the Cover Art box or click Choose to select a new file. To delete and then replace the file, select the file and press the Delete key or click the Delete icon or choose Edit > Delete in the iTunes Producer menu, then add a new file.

  4. Click Next or Rights & Pricing at the bottom of the Album pane. For more information, see Enter album rights and pricing.

Notes:

  • For Japanese-language albums, type the native language values for each artist, title, and title version.

  • Enter individual artists separately, not grouped together. For example, specify "Ella Fitzgerald" and "Louis Armstrong" separately instead of "Ella Fitzgerald and Louis Armstrong". You can enter individual members of a band. For example, you can specify "Harry Connick, Jr. Trio" (primary) and "Harry Connick, Jr." for an album.

  • To reorder artists, select the artist and drag and drop in the desired position in the Artists box.

  • When you add an artist to your album package, iTunes Producer searches the entire iTunes Store for artists matching your search criteria. iTunes Producer also returns additional information (for example, locale and genre) to help you choose the correct artist. Click View in iTunes Store button in the Apple ID column to view the artist page in the iTunes Store.

  • The UPC/EAN/JAN identifiers are usually printed on the barcode of music CDs. After you enter a UPC/EAN/JAN value and save your album, iTP creates an iTunes Store package for your album using the UPC/EAN/JAN value and a .itmsp extension.

  • If you import album information or enter Album > Info information before Tracks > Info information, iTP automatically populates the track’s artist, genre, label name, and copyright information based on the album information. If you want to cascade album information to all tracks in the album, including tracks added before the Album > Info information, choose File > Cascade Artists|Genres|Label Name|Copyright|All To Tracks in the iTunes Producer menu items.

Enter album rights and pricing

Use the Album > Rights & Pricing pane to provide as much detail as possible about your album. The information you provide represents all the album-level metadata.

To provide album rights and pricing details:

  1. Click Rights & Pricing at the bottom of the Album pane.

    Album pane

    By default, iTP defines World (WW) rights and pricing for your album. Unless you have rights in specific territories, use WW for all your albums.

  2. Click Add Territory to change availability.

    If you don't see a country or region that includes only the countries where the album can be sold, create a territory line entry for each country or region where the album can be sold.

    Click Add Territory Group to add several territories at once.

    To remove a previously added territory, select the territory and then click Remove Territory.

    Use the search field to filter territories in the table by Code, Territory, Start, or Tier information.

  3. Choose the country or region where you have rights to sell the album from the Territory pop-up menu.

    Click Make Default to specify that you want iTP to use all the designated rights and pricing as the default rights and pricing for all future albums.

  4. Enter rights and pricing information for the album:

    Sales Start Date: Type the date (YYYY-MM-DD) on which the album will be available for sale in the selected territory. Albums won't be shown in the store until the specified Sales Start Date. If you do not provide a sales start date, the album is available for sale immediately after normal quality assurance processing.

    Pre-Order Sales Start Date: Type the date (YYYY-MM-DD) on which the album will be available for pre-order sales in the selected territory. Albums won't be shown in the store until the specified Pre-Order Sales Start Date. The Pre-Order Sales Start Date must be earlier than the Sales Start Date. If you do not want to create a pre-order for the album, leave the Pre-Order Sales Start Date field blank.

    Cleared for sale: Select whether or not the album should be made available for sale in the selected territory. By default, iTP clears the album for sale. Deselecting Cleared for sale removes the album from the iTunes Store. To include the fewest number of territories, choose World from the Territory pop-up menu. Because the product for the most specific territory is used, you can use Cleared for sale as an exclusion mechanism for a country or regional clearance. For example, if you have rights for the world except for the UK (GB), then you have two products: one for the world where you select Cleared for sale and one for the UK where you deselect Cleared for sale. iTunes sells the resulting album everywhere that you have a current agreement with the exception of the UK.

    Cleared for Ticketmaster: Select whether or not the album should be made available for sale through the Ticketmaster website when customers buy event tickets in the selected territory. By default, iTP clears the album for Ticketmaster sale. Cleared for Ticketmaster is only available in certain territories.

    Album Wholesale Price Tier: Choose a price tier for the album. Each tier's value is defined by the terms of your agreement. If you choose an invalid price, album pricing defaults to standard pricing. The album price cannot be higher than the sum of the prices for each track. Based on your country or region, iTunes automatically sets the suggested retail single price for each track you submit (per the terms of your agreement). If you do not choose a wholesale price tier, iTunes sells the individual tracks from the album, but does not offer the album for sale as a complete album.

    For more information, click Help button to display a pop-up dialog containing the available wholesale price tier names, pricing currency, and tier codes for the selected territory. To select an album wholesale price tier, click the tier name, then click Done.

    Default Track Wholesale Price Tier: Choose a default price tier for all tracks in the album. Each tier's value is defined by the terms of your agreement. If you choose an invalid price, track pricing defaults to standard pricing.

    For more information, click Help button to display a pop-up dialog containing the available wholesale price tier names, pricing currency, and tier codes for the selected territory. To select a track wholesale price tier, click the tier name, then click Done.

  5. Repeat steps 2 through 4 for each territory where you have rights to sell the album.

  6. Click Next.

    iTunes Producer displays the Tracks pane so you can continue describing your music and entering information about the tracks in the album. For more information, see About track details.

Note: To indicate an album is cleared for sale in every country or region, choose World from the Territory pop-up menu. Some countries or regions in the ISO2A country list contain other countries or regions (for example, United States includes Puerto Rico), and World contains all territories.

Provide track details

About track details

Before sending your album to the iTunes Store, use the Tracks pane of iTunes Producer (iTP) to provide track information, lyrics, and rights and pricing details. In order for your tracks to appear correctly in the iTunes Store, you must enter information for each song in the album.

When providing track details, be sure to follow the iTunes Store Music Style Guide. The iTunes Store Music Style Guide specifies the iTunes Store required style, standards and conventions for classical and non-classical content. Conforming to these styles is important to ensure your content is easily discovered, presented correctly, and accurately disclosed to eliminate customer confusion and complaints. Following the standards and style guide can help ensure that content goes live in the iTunes Store and reduce the time needed for review by Apple. Non-conforming content might be edited or rejected. To download a copy of the iTunes Store Music Style Guide, visit Resources and Help on iTunes Connect.

To edit track details for multiple tracks at once, select more than one track in the table and edit track information, lyrics, and rights and pricing.

Enter track information

Use the Tracks > Info pane to provide as much detail as possible about each track in your album. The information you provide represents all the track-level metadata.

To provide track information details:

  1. Click Info at the bottom of the Tracks pane.

    Tracks pane
  2. Do one of the following if you want to add a digital booklet or iTunes LP:

    • Click Add Digital Booklet and drag and drop a PDF file (up to 10MB) into the File box to add a digital booklet to the album, or click Choose and select a file. You can enter copyright and vendor identifier information for the booklet.

      Copyright: Type the copyright line (YYYY copyright info) for the digital booklet. Do not type the word copyright or include any copyright symbols; it is added automatically.

      Vendor Identifier: Type a permanent, unique (with respect to the identifiers of other booklets included in the same package) identifier for the digital booklet. Apple recommends using the UPC of your album as the vendor identifier. Vendor identifiers do not need to be a fixed number of digits. Although vendor identifiers can contain digits, iTP treats them as strings, not numbers. Thus, a vendor identifier of “00000000012345” is not the same as “12345”. The vendor identifier can only contain up to 100 alphanumeric characters and underscores (_); it cannot contain spaces, dashes (-), ampersands (&), other punctuation, or symbols. The vendor identifier is case-sensitive and must not start with an underscore.

      Parental Advisory: Choose Clean, Explicit, or None from the pop-up menu to indicate whether or not a booklet contains explicit content. If you do not specify a parental advisory, iTP marks the digital booklet None to indicate a booklet for which neither a clean or explicit version exists. Choose Clean only if the digital booklet is an edited version of an original explicit form of the digital booklet.

    • Click Add iTunes LP and drag and drop an iTunes LP zip file (up to 30MB) into the File box to add an iTunes LP to the album, or click Choose and select a file. You can enter vendor identifier, track and disc number, and locale and description information for the file. You can also add up to five screenshots for the iTunes LP.

      Vendor Identifier: Type a permanent, unique identifier for the iTunes LP. Apple recommends using the UPC of your album as the vendor identifier. Vendor identifiers do not need to be a fixed number of digits. Although vendor identifiers can contain digits, iTP treats them as strings, not numbers. Thus, a vendor identifier of “00000000012345” is not the same as “12345”. Vendor identifiers cannot be reused. The vendor identifier can only contain up to 100 alphanumeric characters and underscores (_); it cannot contain spaces, dashes (-), ampersands (&), other punctuation, or symbols. The vendor identifier is case-sensitive and must not start with an underscore.

      Track Number: and Disc Number: Indicates the track and disc number for the iTunes LP in the album. The iTunes Store displays the iTunes LP as the first track, but the iTunes LP must be the last track on the last Disc of the album. iTP automatically populates the Track Number and Disc Number fields. You should only change these settings with the advice of your Technical Account Manager.

      Locale: Click Add Locale, choose a locale from the pop-up menu, and type a localized description for the iTunes LP. The locale indicates both the language and the specific location where the language is spoken. You should provide a locale and localized description for each country where the iTunes LP is available. Descriptions can be up to 550 characters in length, can include Rich Text formatting, and must be suitable for public display. To add additional locales, click Add Locale again, choose a locale from the pop-up menu, and type a localized description for the iTunes LP. You must specify a default locale. By default, iTP uses the first locale.

      Description(s): Verify the locales and localized descriptions for the iTunes LP, and specify a default locale. By default, iTP uses the first locale. If you do not specify a locale and localized description for a country where the iTunes LP is available, the iTunes Store displays the default description. For example, if your agreement allows you to sell in the Japanese Store and you do not provide a Japanese locale and description, the specified default description appears in the Japanese Store.

      Screenshots: Click Screenshots at the bottom of the Tracks pane for an iTunes LP. Drag and drop a screenshot into the Screenshot box to add a screenshot to the iTunes LP, or click Choose and select a file, or click Add Screenshot and select a file. Use screenshots to give users an idea of your iTunes LP content. You must add at least one screenshot for the iTunes LP, and can add up to a total of five screenshots. Screenshots appear in the iTunes Store in the order listed, with the default screenshot used in the album page. To reorder screenshots, select the screenshot and drag and drop in the desired position in the box or use the up and down arrows to reorder the screenshots.

  3. Click Add Track and drag and drop an audio file into the File box, or click Choose and select a file, or select an existing track at the top of the Tracks pane.

    Use the search field to filter tracks in the table by Title, Artist, Label Name, Copyright, ISRC, Preview Start information, Lyrics, Code, Territory, or Wholesale Price Tier.

    Click Play button below the File box to listen to your track. iTP does not currently support playback of FLAC files.

    To replace a previously added file, drag a new file to the File box or click Choose to select a new file. To delete and then replace the file, select the file and press the Delete key or click the Delete icon or choose Edit > Delete in the iTunes Producer menu, then add a new file.

  4. Enter track information:

    Artists: Click Add Artist, type the name and Apple ID of the primary artist on the track, then choose a role from the Role pop-up menu. iTunes assigns every artist a unique Apple ID; Apple recommends using the Apple ID to avoid the ambiguity in cases where artists share the same name as other music artists, or film actors or crew members. You can refer to the artist by name, Apple ID, or both. If you specify both a name and Apple ID, iTunes Producer ignores the name in favor of the Apple ID. To find the artist's Apple ID, see How do I find an artist’s Apple ID? in Featured tasks. For any subsequent updates, you can use the Apple ID instead of or in addition to the name, to avoid ambiguity.

    To add additional artists or other contributors (Songwriter, Remixer, Producer, and so on) to the track, click Add Artist again, type the name and Apple ID of the artist or contributor, choose a role for the artist or contributor from the Role pop-up menu, then select whether or not this is a primary role. You can also add composition-related contributors (for example, lyricist or composer) using Add Artist. Always include composition-related contributor information when available.

    Title: Type the name of the track in English. If the track’s native language is not an ISO Latin-1 or Latin-2 language (for example, Japanese), see Add localizations.

    Title Version: Type a version description for the title in English, if there are multiple versions of the track or if you want to provide any additional identifying information. For example, "Remix," "Hidden Track," "Bonus Track," or "Live". You can use Title Version to distinguish different versions of the same track by the same artist (for example, "Live from San Francisco", "Pump You Up Remix"). If the track’s native language is not an ISO Latin-1 or Latin-2 language (for example, Japanese), see Add localizations.

    Genre (Primary): Choose a genre for the track from the pop-up menu.

    Genre (Secondary): Choose a second genre for the track, if applicable, from the pop-up menu.

    Track Number: and Disc Number: Type a positive number indicating the track number in the album and the disc number for the track in the album. For albums with multiple discs, the Disc Number indicates on which disc the track is located. The combination of disc number and track number must be unique across all tracks in an album.

    Label Name: Type the name of the label that released the track. If you leave this field blank, iTP uses the album label name. Apple uses this information for financial reporting.

    Copyright: Type the copyright line (YYYY copyright info) for the performance (sound recording for the track). Do not type the word copyright or include any copyright symbols; it is added automatically. If you leave this field blank, iTP uses the album copyright line.

    ISRC: Type a valid 12-digit alphanumeric ISRC (International Standard Recording Code) code for the track (for example, GBAAN0400735). ISRC codes can contain only alphanumeric characters (last seven characters must be numeric), and cannot contain dashes (-), spaces, symbols, or other punctuation. A unique ISRC code is required for each track. An ISRC can appear more than once in the iTunes Store if the same recording is included in more than one album (for example, "greatest hits" albums tend to feature tracks from other albums). In this case, the two tracks must have exactly the same audio. A re-recorded, remixed, or otherwise different track (no matter how similar) must have a unique ISRC. You cannot change ISRC codes once you deliver your album to the iTunes Store.

    Preview Start: Type the number of seconds (“##”) into the track that the preview should start playing. If you leave this field blank, the preview will start at 45 seconds for content over 75 seconds in length and 0 seconds for content under 75 seconds in length.

    Parental Advisory Choose an advisory label to indicate whether the track is explicit or clean, if applicable. If you do not choose a value, iTP uses None.

    Audio Language Choose the language in which the track is sung, if that language is different from the album language you specified. If you do not choose a language, iTP uses the album language. If a track is sung in Chinese, but you do not know if it is Mandarin or Cantonese, you can choose either as the audio language. If you get a warning when you deliver the metadata, you can edit the data to use the correct language.

    Part of a gapless album: Select whether or not there is a gap in the audio separating the current track from the next track on the album. If selected, iTP does not add an audio gap during playback. "Part of a gapless album" only applies to the gap between the selected track and the track that proceeds it.

  5. Repeat steps 3 and 4 for each track in the album.

  6. Click Next or Lyrics at the bottom of the Tracks pane. For more information, see Enter track lyrics.

Notes:

  • You can add either a digital booklet or an iTunes LP file to your album, but not both.

  • Screenshots should be 1280 x 720 pixel JPEG or PNG files in RGB Color mode. Do not scale up a screenshot if it is smaller than the required size.

  • iTP cannot deliver an iTunes LP containing video. To deliver an iTunes LP with video, you must work with an approved iTunes LP provider. Apple lists qualified iTunes LP providers, developers, and delivery houses in iTunes Music Encoding Houses in Resources and Help on iTunes Connect.

  • For Japanese-language albums, type the native language values for each artist, title, and title version.

  • Enter individual artists separately, not grouped together. For example, specify "Ella Fitzgerald" and "Louis Armstrong" separately instead of "Ella Fitzgerald and Louis Armstrong". You can enter individual members of a band. For example, you can specify "Harry Connick, Jr. Trio" (primary) and "Harry Connick, Jr." for a track.

  • When you add an artist, iTunes Producer searches the entire iTunes Store for artists matching your search criteria. iTunes Producer also returns additional information (for example, locale and genre) to help you choose the correct artist. Click View in iTunes Store button in the Apple ID column to view the artist page in the iTunes Store.

  • When you click Add Track, iTP automatically populates the track’s artist, genre, label name, and copyright information based on the album information.

Enter track lyrics

Use the Tracks > Lyrics pane to provide lyrics for each track in your album.

To provide track lyrics:

  1. Click Lyrics at the bottom of the Tracks pane.

    Tracks pane
  2. Select the track you want to provide lyrics for at the top of the Tracks pane.

    the search field to filter tracks in the table by Title, Artist, Label Name, Copyright, Lyrics, ISRC, Preview Start information, Code, Territory, or Wholesale Price Tier.

  3. Type the lyrics for the selected track in Lyrics. Lyrics can be up to 2000 characters in length, can include Rich Text formatting, and must be suitable for public display.

  4. Repeat steps 2 and 3 for each track in the album.

  5. Click Next.

    iTunes Producer displays the Localizations pane so you can provide localized text, if applicable. For more information, see Add localizations.

  6. Click Next or Rights & Pricing at the bottom of the Tracks pane. For more information, see Enter track rights and pricing.

Enter track rights and pricing

Use the Tracks > Rights & Pricing pane to provide as much detail as possible about each track in your album. The information you provide represents all the track-level metadata.

To provide track rights and pricing details:

  1. Click Rights & Pricing at the bottom of the Tracks pane.

    Tracks pane
  2. Select the track you want to define rights for at the top of the Tracks pane.

    iTP displays the territory names and country codes you defined for the album.

    Use the search field to filter tracks in the table by Title, Code, Territory, Wholesale Price Tier, Artist, Label Name, Copyright, ISRC, Preview Start information, or Lyrics.

  3. Select the territory where you want to define rights.

  4. Enter rights and pricing information for the track:

    Cleared for sale: Select whether or not the track should be made available for sale in the selected territory. By default, iTP clears the track for sale the same day as the album's Sales Start Date. Deselecting Cleared for sale removes the track from the iTunes Store, it does not make the track an album-only track. Because the product for the most specific territory is used, you can use Cleared for sale as an exclusion mechanism for a regional clearance. For example, if you have rights for the world except for the UK (GB), then you would have two products: one for the world where you select Cleared for sale and one for the UK where you deselect Cleared for sale. iTunes sells the resulting track everywhere that you have a current agreement with the exception of the UK.

    Track Wholesale Price Tier: Choose a price tier for the selected track. Each tier's value is defined by the terms of your agreement. If you choose an invalid price, track pricing defaults to standard pricing. Choosing a track wholesale price tier overrides the default track wholesale price tier specified in the Album > Rights & Pricing pane, if applicable.

    For more information, click Help button to display a pop-up dialog containing the available wholesale price tier names, pricing currency, and tier codes for the selected territory. To select a track wholesale price tier, click the tier name, then click Done.

  5. Repeat steps 3 and 4 for each territory.

  6. Repeat steps 2 through 5 for each track in the album.

  7. Click Next.

    iTunes Producer displays the Localizations pane so you can provide localized text, if applicable. For more information, see Add localizations.

  8. Click Next.

    iTunes Producer displays the Delivery pane so you can submit your album to the iTunes Store. For more information, see Send your album package to the iTunes Store.

Note: If you select Cleared for sale, iTP makes the track available in all territories where you have an active agreement and automatically adds the following clearances:

  • If you have a agreement in a single territory, iTP adds a clearance for this contracted territory only.

  • If you have a agreement in more than one territory, iTP adds world clearances and, in the future, if you sign more agreements, this product appears in all new territories.

Provide localization details

About localizations

iTunes Producer (iTP) provides support for multiple language localizations within a single album that will be sold in countries where different languages are spoken. Using the Localizations pane, you can supply localized metadata for album and track text.

To provide localization details, choose iTunes Producer > Preferences in the iTunes Producer menu, click Music, then select "Display localization". iTP adds a Localizations pane in the package window so you can provide localization information for album and track text.

The following screenshot displays the Localizations pane with the localized text for the KNOCK.itmsp album in iTP.

Localizations pane

Notes:

  • If the album and track text you are localizing (for example, artist, title, and so on) contains the exact same words, including case, iTP only displays the first occurrence of the word in the Localizations pane.

  • To change the iTP default language, choose iTunes Producer > Preferences in the iTunes Producer menu, click Music, then choose a language from the Default Language pop-up menu.

Add localizations

You can provide localized text for albums and tracks that will be for sale in iTunes Stores. For iTunes Store locales set to English speaking countries (for example, AU, NZ, UK, CA, US, and so on), the iTunes Store displays the English values. For iTunes Store locales set to non-English speaking countries (for example, Germany, Italy, Spain, and so on), the iTunes Store displays the localized values.

To provide localizations:

  1. Choose the album language from the Language pop-up menu in your album’s Album > Info pane.

  2. Click the Localizations pane.

    iTP displays the field names and values (text entered in the Album and Tracks panes) for your album and track text.

    Use the search field to filter localizations in the table by Field Name or language information.

  3. Click Add.

  4. Select the locales you want to localize album and track text, then click Choose.

    iTP adds a column for each locale. For locales with phonetic localizations (for example, Japanese), iTP adds two columns in the Localizations pane.

  5. Select a row for the album or track text you want to localize.

  6. Type the localized text in the locale fields.

  7. Press the Return key.

    iTP adds the localizations in the columns for the selected row.

  8. Repeat steps 5 through 7 for all text you want to localize.

  9. Click Make Default to specify that you want iTP to use all the designated localization information as the default for all future albums.

  10. Verify your localized text.

Notes:

  • To remove a locale and it’s localized text, click Remove, select the locales you want to remove, then click Choose. For locales with phonetic localizations (for example, Japanese), iTP removes both columns in the Localizations pane. You cannot delete the album language values.

  • Providing Phonetic localizations can help users find content more easily during iTunes Store searches. Use a space character to delimitate any meaningful separation units.

Deliver your album

About delivering your album package

The final step in preparing your music for sale in the iTunes Store is to deliver your album to iTunes for processing. Once you have created your album and entered all your album and track details, you can deliver your album and all your prepared files as an iTunes Store package (iTP package) directly to Apple’s iTunes Store. This section describes how to send your iTP package to iTunes for processing and how to send Apple a log report if you encounter errors during album delivery.

Send your album package to the iTunes Store

When you are sure your album is complete and correct, including all album and track details, you can send your album and all your prepared files as an iTunes Store package (iTP package) to iTunes for processing.

To deliver your album package:

  1. Choose File > Save in the iTunes Producer menu.

    If applicable, specify a name for your music package and click Save.

  2. Click the Delivery pane for your album in the iTunes Producer package window.

    Delivery pane

    iTunes Producer (iTP) processes all the album and track details and displays any warnings or errors.

  3. Fix any delivery warnings or errors.

    Double-click on a warning or error to have iTP jump to the exact location of the problem. For more information about errors, click the support URL displayed in the Delivery pane or see Resources and Help on iTunes Connect at https://www.apple.com/itunes/go/itunesconnect/contactus.

    Click Activity to display the Background Activity window and view delivery status information for all packages you are currently sending, including pending messages, time remaining, warning and error messages, and so on.

  4. Click Deliver.

    iTP packages your album and track details, and all prepared files into an iTP package and sends it to the iTunes Store.

    Tip: Shift-click the Deliver button to access live logging information during the delivery process. If needed, you can copy the logging information and send the report to Apple to help with troubleshooting any delivery issues.

    You can also choose File > Save and Deliver in the iTunes Producer menu to package and save your album and track details, and all prepared files into an iTP package and send it to the iTunes Store. Or, to send multiple packages at once, choose File > Save and Deliver All in the iTunes Producer menu. iTP packages your album and track details, and all prepared files for all open package windows into iTP packages and sends them to the iTunes Store.

Notes:

  • Until Apple has imported all your metadata, you can continue to update albums and resend packages. After final import, you must use iTunes Connect to update metadata not supported through iTP.

  • iTP plays an alert sound and displays a green checkmark when the package delivery is complete. If iTP encounters an error during delivery, iTP plays an error sound and bounces the iTP icon in the Dock.

  • To modify your delivery settings, choose iTunes Producer > Preferences in the iTunes Producer menu, click Advanced, then deselect Signiant, Aspera, or DAV. You should only change these settings with the advice of your Technical Account Manager. For any questions, email your iTunes Technical Account Manager at iTunesProducer@apple.com.

Send your log report to Apple

If you encounter an error while delivering your album to Apple, iTunes Producer creates a log report for you to send to Apple to help with troubleshooting your delivery issues.

To send the log report:

  1. Click Send to Apple or Magnify Glass button in the Delivery pane.

    Review the details of the error log and, optionally, add notes and comments before sending.

  2. Click Send to Apple.

    iTP delivers the error log to the iTunes Producer support team.

  3. Click Done.

Create, describe, and deliver your ringtone

About ringtones

The first step in preparing content for sale in the iTunes Store is to create a package containing the ringtone you want to submit. You can select the ringtone from a pre-cut 5 to 30 second audio file on your computer. You can enter all the metadata, add the file for the ringtone from your computer, and deliver the package to the iTunes Store.

The following screenshot displays the iTP Template Chooser window with Ringtone selected.

Template chooser

iTP displays a provider button in the top left of the Template Chooser window indicating the currently active provider. If your account is attached to more than one iTunes Connect provider, you can use the provider button to choose the provider you want to use for the current package. Click the provider button to confirm your are signed in with the correct Apple ID, change providers, or sign out and try again. If you do not see any of the above activities in the iTP Template Chooser window, you might not be signed in with the correct provider or you might not have configured iTP for music delivery.

Note: Ringtones are only available in the iTunes Store on the iPhone.

Create your ringtone

You can create a ringtone using a pre-cut 5 to 30 second audio file on your computer.

To select a ringtone audio file on your computer:

  1. Click Ringtone in the Template Chooser window, then click Choose.

    iTP displays an untitled package window with the Tone pane selected.

  2. Use the Tone pane to add the audio file, and add ringtone information (for example, title and artist names) and rights and pricing. For more information, see Provide ringtone details.

When you are sure the ringtone details are complete and correct, you can send your ringtone to iTunes for processing. For more information, see Send your ringtone package to the iTunes Store.

Describe your ringtone

Provide ringtone details

After you create your initial ringtone, you can provide ringtone details, including artists, title, copyright information, rights and pricing, and more.

Before sending your ringtone to the iTunes Store, use the Tone pane of iTunes Producer (iTP) to provide ringtone information and rights and pricing details. In order for your ringtone to appear correctly in the iTunes Store, you must enter information for the ringtone.

When providing ringtone details, be sure to follow the iTunes Store Music Style Guide. The iTunes Store Music Style Guide specifies the iTunes Store required style, standards and conventions for classical and non-classical content. Conforming to these styles is important to ensure your content is easily discovered, presented correctly, and accurately disclosed to eliminate customer confusion and complaints. Following the standards and style guide can help ensure that content goes live in the iTunes Store and reduce the time needed for review by Apple. Non-conforming content might be edited or rejected. To download a copy of the iTunes Store Music Style Guide, visit “Resources and Help” on iTunes Connect.

Enter ringtone information

Use the Tone > Info pane to provide as much detail as possible about the ringtone. The information you provide represents all the ringtone metadata.

To provide ringtone information details:

  1. Click Info at the bottom of the Tone pane.

    Tone pane
  2. Drag and drop an audio file, between 5 and 30 seconds in length, into the Audio File box, or click Choose and select a file.

    Click Play button below the Audio File box to listen to your ringtone.

    To replace a previously added file, drag a new file to the Audio File box or click Choose to select a new file. To delete and then replace the file, select the file and press the Delete key or click the Delete icon or choose Edit > Delete in the iTunes Producer menu, then add a new file.

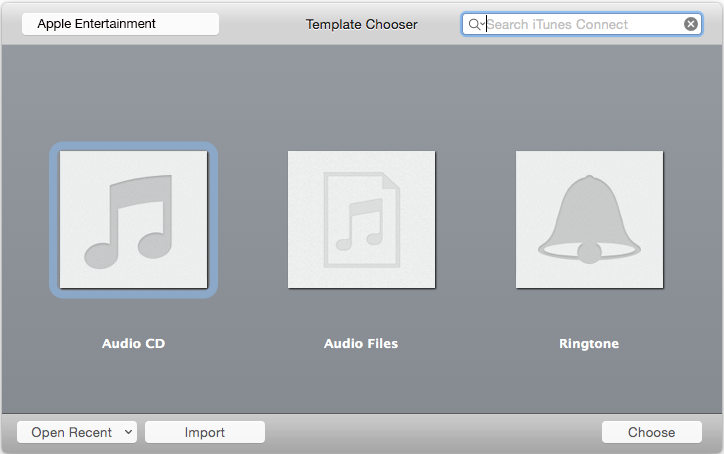
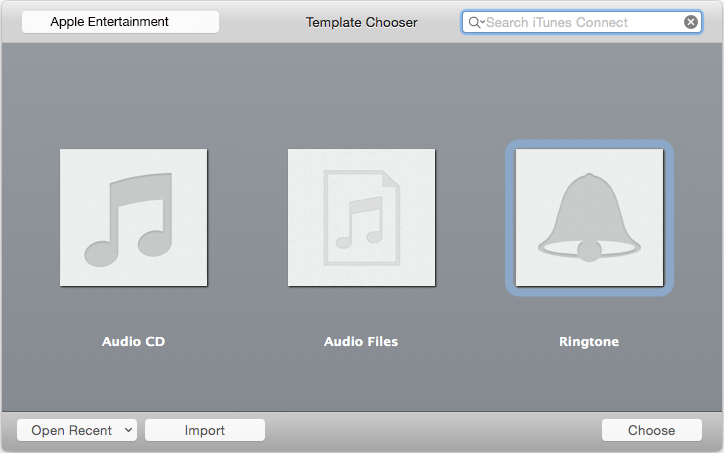
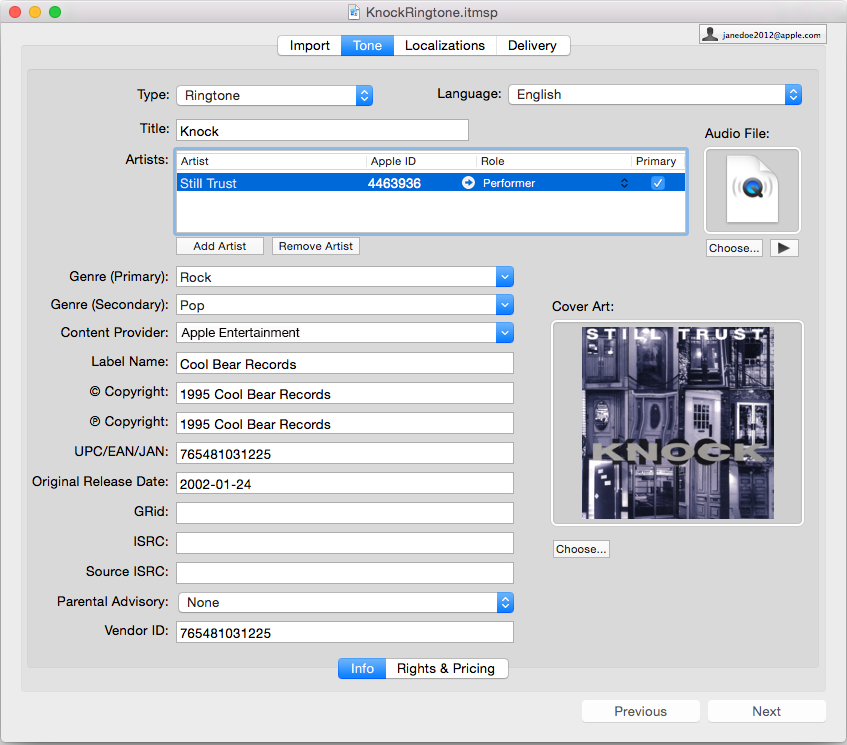
  3. Enter ringtone information:

    Type: Indicates the type of tone you are sending as an iTunes Store package (iTP package) to the iTunes Store. By default, iTP specifies a ringtone.

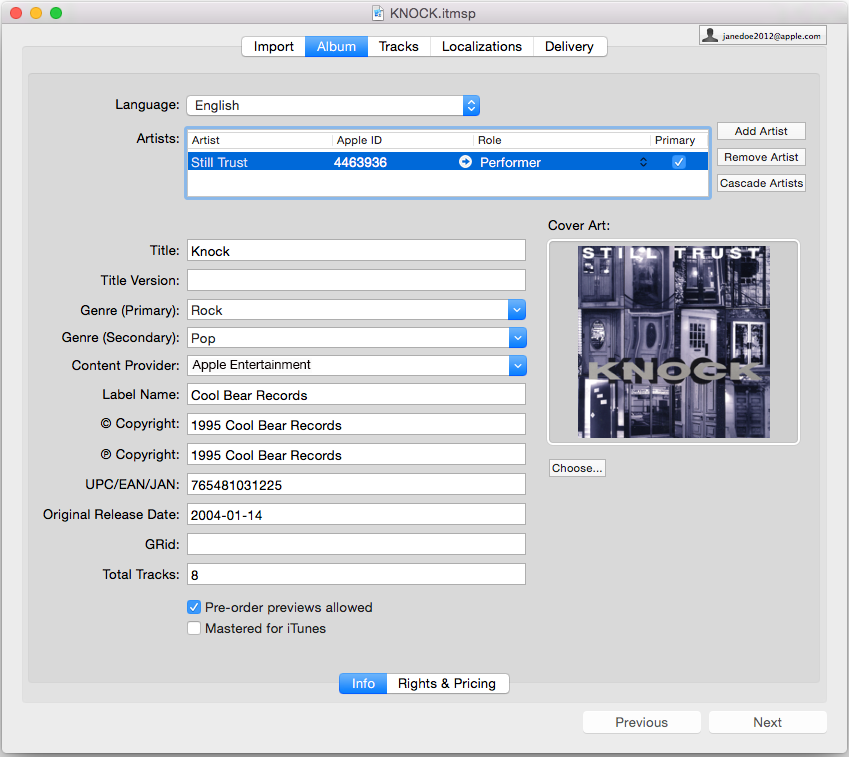
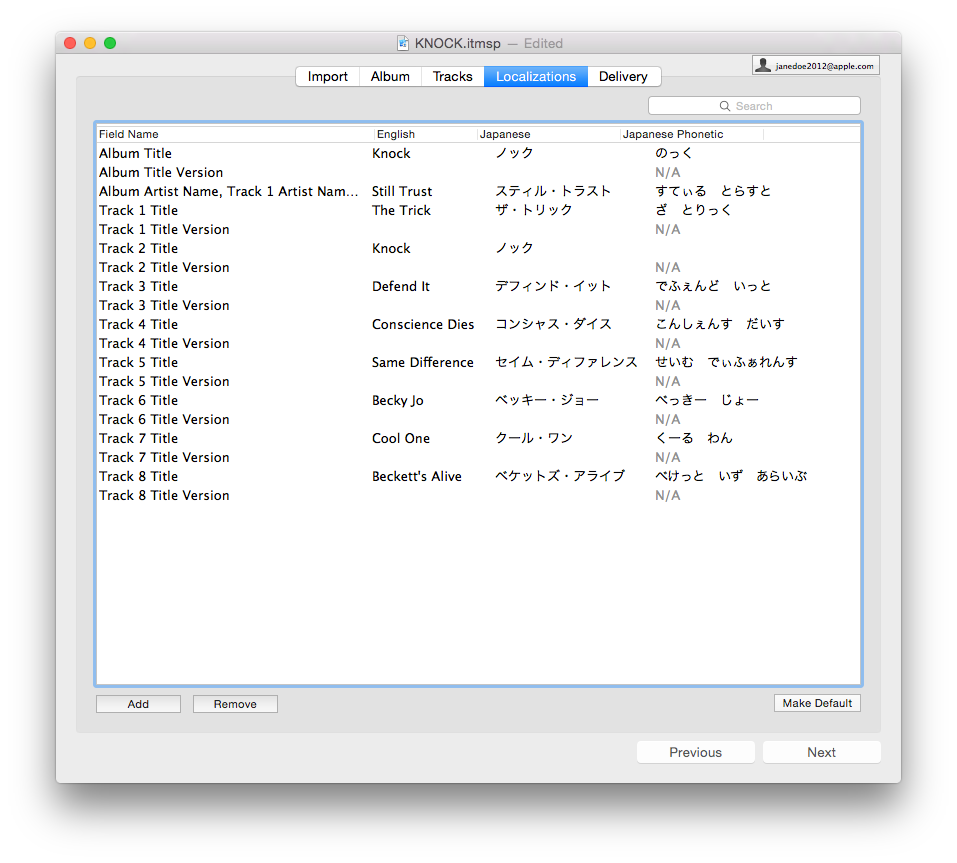
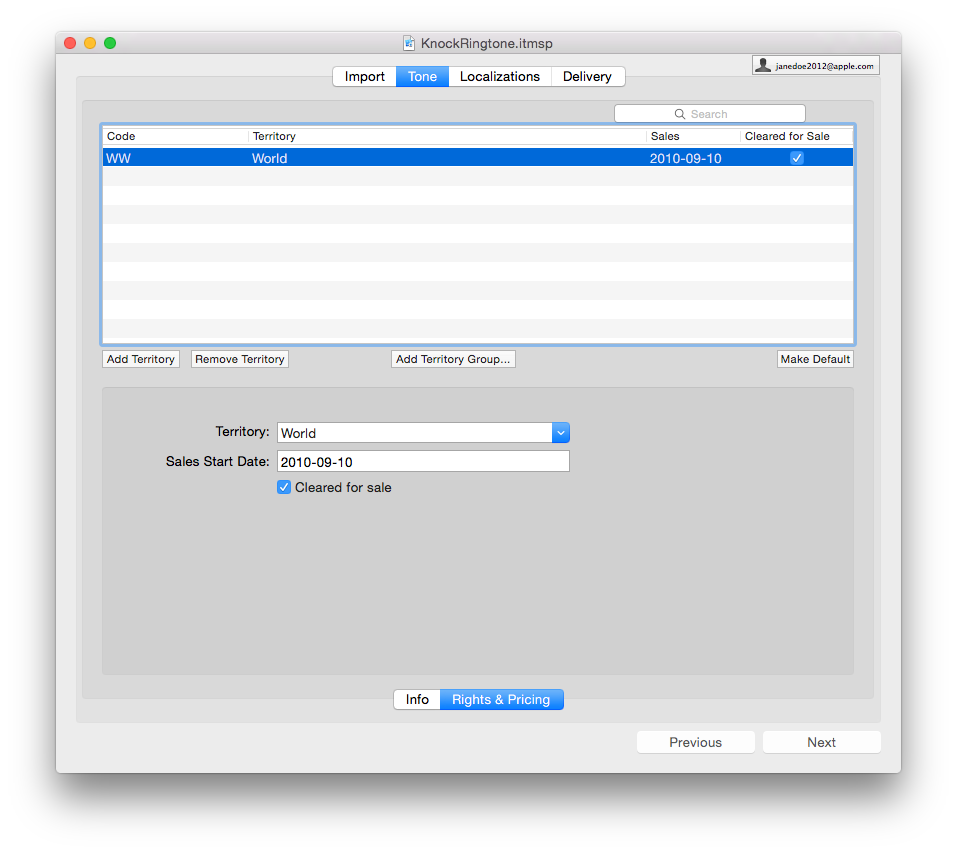
    Language: Choose a language to indicate where you want to sell the ringtone. For more information, see Add localizations.

    Title: Type the name of the ringtone in English (for example, for ringtones, the name of the song from which the the ringtone was created). If the ringtone’s native language is not an ISO Latin-1 or Latin-2 language (for example, Japanese), see Add localizations.

    Artists: Click Add Artist, type the name and Apple ID of the primary artist on the ringtone, then choose a role from the Role pop-up menu. iTunes assigns every artist a unique Apple ID; Apple recommends using the Apple ID to avoid the ambiguity in cases where artists share the same name as other music artists, or film actors or crew members. You can refer to the artist by name, Apple ID, or both. If you specify both a name and Apple ID, iTunes Producer ignores the name in favor of the Apple ID. To find the artist's Apple ID, see How do I find an artist’s Apple ID? in Featured tasks. For any subsequent updates, you can use the Apple ID instead of or in addition to the name, to avoid ambiguity.

    To add additional artists or other contributors (Songwriter, Remixer, Producer, and so on) to the ringtone, click Add Artist again, type the name and Apple ID of the artist or contributor, choose a role for the artist or contributor from the Role pop-up menu, then select whether or not this is a primary role. You can also add composition-related contributors (for example, lyricist or composer) using Add Artist. Always include composition-related contributor information when available.

    Genre (Primary): Choose a genre for the ringtone from the pop-up menu.

    Genre (Secondary): Choose a second genre for the ringtone, if applicable, from the pop-up menu.

    Content Provider: Choose the provider you want to use for the current package. If your account is attached to more than one iTunes Connect provider, you can use Content Provider to choose the provider you want to associate with the current package.

    Label Name: Type the name of the label that released the ringtone. Apple uses this information for financial reporting.

    Copyright: Type the copyright line (YYYY copyright info) for the ringtone in the first Copyright field and the copyright line (YYYY copyright info) for the performance (sound recording for the ringtone) in the second Copyright field. Do not type the word copyright or include any copyright symbols; it is added automatically. iTunes displays the performance copyright line in the iTunes Store.

    UPC/EAN/JAN: Type a valid 12-digit UPC (Universal Product Code), 13- or 14-digit EAN (European Article Number), or JAN (Japanese Article Number) for the ringtone identifier. Be sure to include the check digit. A unique code is required for each ringtone. iTunes rejects any new ringtone submitted with a previously-used code. You cannot change UPC/EAN/JAN codes once you deliver your ringtone to the iTunes Store.

    Original Release Date: Type the original date (YYYY-MM-DD) of the first consumer-available physical release (LP, cassette, 8-track, CD, or other physical media) for the song from which the ringtone was created. Use this same date for ringtones that are re-releases (for example, re-mastered, or releases on new media types such as CD, digital, and so on). You can enter values such as “today”, “tomorrow”, and “next month”, and iTP correctly formats the date. This is not the digital release date, unless the song from which the ringtone was created has not previously been released on any format.

    GRid: Type the global release identifier (GRid) for the ringtone. GRids must be unique across all products. GRids must not be more than 18 alphanumeric characters. GRids cannot contain dashes (-), spaces, underscores (_), symbols, or other punctuation.

    GRids are a new industry standard but still not widely used. If a GRid is not used at your company, do not enter a value.

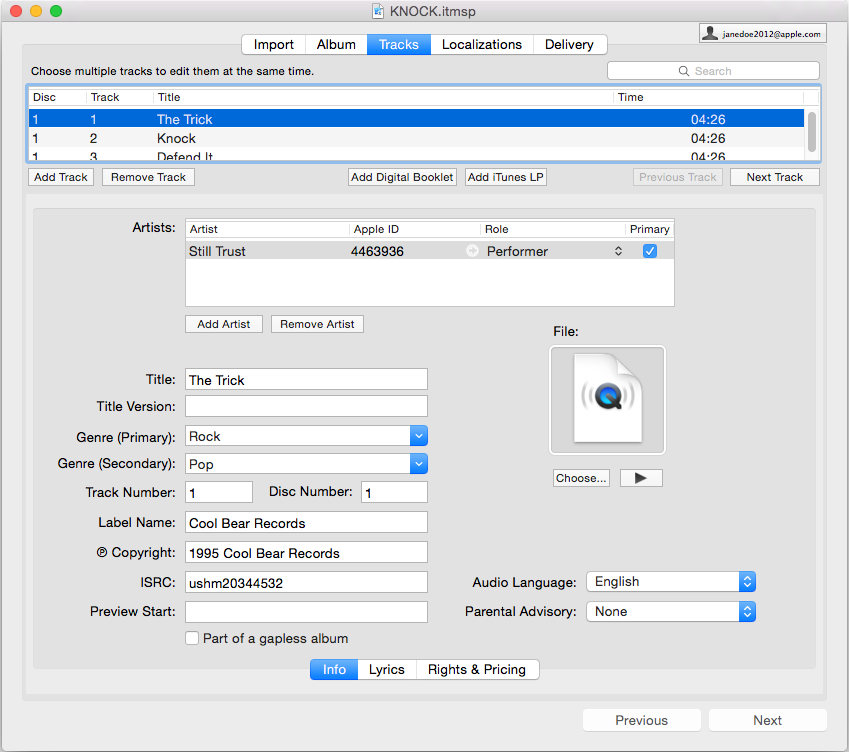
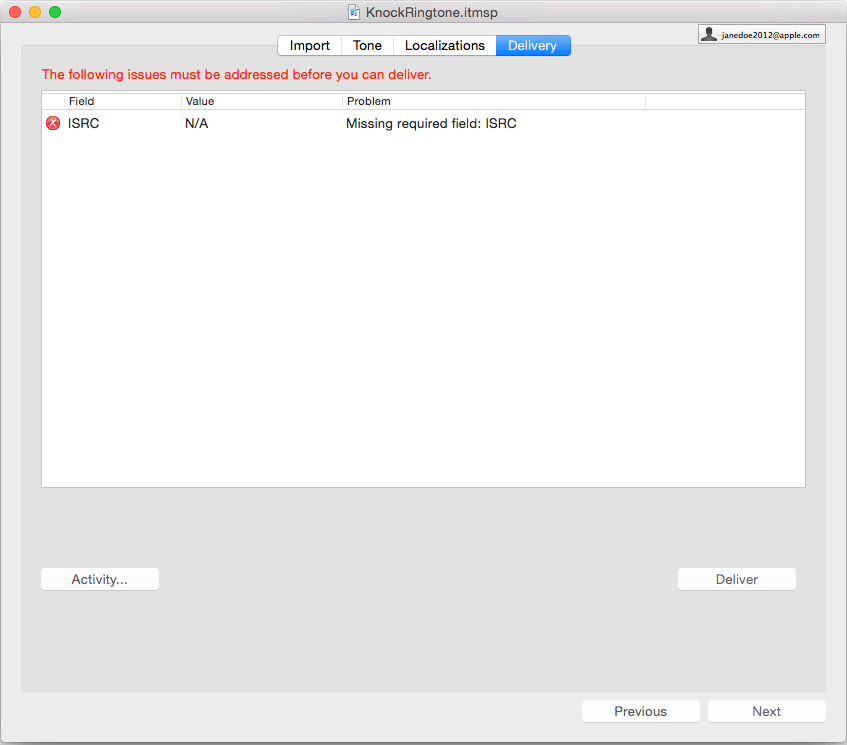
    ISRC: Type a valid 12-digit alphanumeric ISRC (International Standard Recording Code) code for the ringtone (for example, GBAAN0400735). ISRC codes can contain only alphanumeric characters (last seven characters must be numeric), and cannot contain dashes (-), spaces, symbols, or other punctuation. A unique ISRC code is required for each ringtone. An ISRC can appear more than once in the iTunes Store if the same recording is included in more than one ringtone. In this case, the two ringtones must have exactly the same audio. A re-recorded, remixed, or otherwise different ringtone (no matter how similar) must have a unique ISRC. You cannot change ISRC codes once you deliver your ringtone to the iTunes Store.

    Source ISRC: Type a valid 12-digit alphanumeric ISRC (International Standard Recording Code) code for the song from which the ringtone was created (for example, GBAAN0400735). ISRC codes can contain only alphanumeric characters (last seven characters must be numeric), and cannot contain dashes (-), spaces, symbols, or other punctuation.

    Parental Advisory: Choose an advisory label to indicate whether the ringtone is explicit or clean, if applicable. If you do not choose a value, iTP uses None.

    Vendor ID: Type a permanent, unique (with respect to the identifiers of other ringtones included in the same package) identifier for the ringtone. Apple recommends using the ISRC of your ringtone as the vendor identifier. Vendor identifiers do not need to be a fixed number of digits. Although vendor identifiers can contain digits, iTP treats them as strings, not numbers. Thus, a vendor identifier of “00000000012345” is not the same as “12345”. The vendor identifier can only contain up to 100 alphanumeric characters and underscores (_); it cannot contain spaces, dashes (-), ampersands (&amp;), other punctuation, or symbols. The vendor identifier is case-sensitive and must not start with an underscore.

  4. Drag the ringtone’s cover art to the Cover Art box, or click Choose and select a cover art file.

    Cover art should be at least a 1400 x 1400 pixel JPEG or PNG file in RGB Color mode. For best results, deliver the largest pixel dimensions possible.

    Do not scale up artwork if it is smaller than the required size. If you are scanning your cover art be sure to scan at the highest resolution, or at least 1400 x 1400 pixels. Cover art must be at least 72 dots per inch (dpi). Do not submit art that contains an embedded color profile, back cover, or thumbnail art.

    To replace a previously added file, drag a new file to the Cover Art box or click Choose to select a new file. To delete and then replace the file, select the file and press the Delete key or click the Delete icon or choose Edit > Delete in the iTunes Producer menu, then add a new file.

  5. Click Next or Rights & Pricing at the bottom of the Tone pane. For more information, see Enter ringtone rights and pricing.

Notes:

  • For Japanese-language ringtones, type the native language values for each artist and title.

  • Enter individual artists separately, not grouped together. For example, specify "Ella Fitzgerald" and "Louis Armstrong" separately instead of "Ella Fitzgerald and Louis Armstrong".

  • To reorder artists, select the artist and drag and drop in the desired position in the Artists box.

  • When you add an artist to your ringtone package, iTunes Producer searches the entire iTunes Store for artists matching your search criteria. iTunes Producer also returns additional information (for example, locale and genre) to help you choose the correct artist. Click View in iTunes Store button in the Apple ID column to view the artist page in the iTunes Store.

Enter ringtone rights and pricing

Use the Tone > Rights & Pricing pane to provide as much detail as possible about the ringtone. The information you provide represents all the ringtone metadata.

To provide ringtone rights and pricing details:

  1. Click Rights & Pricing at the bottom of the Tone pane.

    Tone pane

    By default, iTP defines World (WW) rights and pricing for your ringtone. Unless you have rights in specific territories, use WW for all your ringtones.

  2. Click Add Territory to change availability.

    If you don't see a region that includes only the countries where the ringtone can be sold, create a territory line entry for each country or region where the ringtone can be sold.

    Click Add Territory Group to add several territories at once.

    Use the search field to filter territories in the table by Code and Territory information.

  3. Choose the region where you have rights to sell the ringtone from the Territory pop-up menu.

    Click Make Default to specify that you want iTP to use all the designated rights and pricing as the default rights and pricing for all future ringtones.

  4. Enter rights and pricing information for the ringtone:

    Sales Start Date: Type the date (YYYY-MM-DD) on which the ringtone will be available for sale in the selected territory. Ringtones won't be shown in the store until the specified Sales Start Date. If you do not provide a sales start date, the ringtone is available for sale immediately after normal quality assurance processing.

    Cleared for sale: Select whether or not the ringtone should be made available for sale in the selected territory. Deselecting Cleared for sale removes the ringtone from the iTunes Store. Because the product for the most specific territory is used, you can use Cleared for sale as an exclusion mechanism for a regional clearance. For example, if you have rights for the world except for the UK (GB), then you would have two products: one for the world where you select Cleared for sale and one for the UK where you deselect Cleared for sale. iTunes sells the resulting ringtone everywhere that you have a current agreement with the exception of the UK.

  5. Repeat steps 2 through 4 for each territory where you have rights to sell the ringtone.

  6. Click Next.

    iTunes Producer displays the Localizations pane so you can provide localized text, if applicable. For more information, see Add localizations.

  7. Click Next.

    iTunes Producer displays the Delivery pane so you can submit your ringtone to the iTunes Store. For more information, see Send your ringtone package to the iTunes Store.

Note: If you select Cleared for sale, iTP makes the ringtone available in all territories where you have an active agreement and automatically adds the following clearances:

  • If you have an agreement in a single territory, iTP adds a clearance for this contracted territory only.

  • If you have an agreement in more than one territory, iTP adds world clearances and, in the future, if you sign more agreements, this product appears in all new territories.

Deliver your ringtone

Send your ringtone package to the iTunes Store

The final step in preparing content for sale in the iTunes Store is to deliver your ringtone to iTunes for processing. Once you have created your ringtone and entered all your ringtone details, you can deliver your ringtone and all your prepared files as an iTunes Store package (iTP package) directly to Apple’s iTunes Store. This section describes how to send your iTP package to iTunes for processing and how to send Apple a log report if you encounter errors during ringtone delivery.

When you are sure your ringtone is complete and correct, including all ringtone details, you can send your ringtone and all your prepared files as an iTunes Store package (iTP package) to iTunes for processing.

To deliver your ringtone package:

  1. Choose File > Save in the iTunes Producer menu.

    If applicable, specify a name for your ringtone package and click Save.

  2. Click the Delivery pane for your ringtone in the iTunes Producer package window.

    Delivery pane

    iTunes Producer (iTP) processes all the ringtone details and displays any warnings or errors.

  3. Fix any delivery warnings or errors.

    Double-click on a warning or error to have iTP jump to the exact location of the problem.

    Click Activity to display the Background Activity window and view delivery status information for all packages you are currently sending, including pending messages, time remaining, warning and error messages, and so on.

  4. Click Deliver.

    iTP packages your ringtone details, and all prepared files into an iTP package and sends it to the iTunes Store.

    You can also choose File > Save and Deliver in the iTunes Producer menu to package and save your ringtone details, and all prepared files into an iTP package and send it to the iTunes Store. Or, to send multiple packages at once, choose File > Save and Deliver All in the iTunes Producer menu. iTP packages your ringtone details, and all prepared files for all open package windows into iTP packages and sends them to the iTunes Store.

Notes:

  • Until Apple has imported all your metadata, you can continue to update ringtones and resend packages. After final import, you must use iTunes Connect to update metadata not supported through iTP.

  • iTP plays an alert sound and displays a green checkmark when the package delivery is complete. If iTP encounters an error during delivery, iTP plays an error sound and bounces the iTP icon in the Dock.

  • To modify your delivery settings, choose iTunes Producer > Preferences in the iTunes Producer menu, click Advanced, then deselect Signiant, Aspera, or DAV. You should only change these settings with the advice of your Technical Account Manager. For any questions, email your iTunes Technical Account Manager at iTunesProducer@apple.com.

Send your ringtone log report to Apple

If you encounter an error while delivering your ringtone to Apple, iTunes Producer creates a log report for you to send to Apple to help with troubleshooting your delivery issues.

To send the log report:

  1. Click Send to Apple or Magnify Glass button in the Delivery pane.

  2. Review the details of the error log and, optionally, add notes and comments before sending.

  3. Click Send to Apple to deliver the error log to the iTunes Producer support team.

More resources

Glossary

Term

Description

check digit

A mathematically generated number required for UPC/EAN/JAN album identifiers, and used for consistency checking purposes. For more details, see the UPC validation documentation located at http://www.gs1.org/barcodes/support/check_digit_calculator.

checksum

A redundancy check used to guarantee that the asset files Apple receives are correct and complete. All content files you deliver to Apple must include an industry-standard MD5 digest checksum. iTunes Producer automatically generates these checksums for you. Once an album is received, the MD5 digest checksum contained in the metadata file (one for each file you send) is compared against the actual file received by Apple. If any differences are detected between the checksum calculated before delivery, and the checksums calculated during delivery, iTunes Producer rejects the entire package.

iTunes Connect

A suite of web-based tools you can use to manage your content in the iTunes Store.

iTunes LP

An interactive experience created to accompany albums. An iTunes LP allows a user to hear an album, view lyrics, liner notes, and band photos, and more. An iTunes LP can contain photos, additional audio, and more.

iTunes Plus

Digital Rights Management (DRM) free songs in the iTunes Store that have no usage restrictions and feature higher-quality 256 kbps AAC encoding.

iTunes Producer file

A tab-delimited file (encoded in UTF-16 format) or spreadsheet file used to import album and track details.

iTunes Store package

An iTunes Producer generated file with the .itmsp file extension. iTunes Producer generates a package file from your uploaded audio files, cover art, album and track information and rights and pricing, and so on.

lossless data compression

A class of data compression algorithms that allow the exact original data to be reconstructed from the compressed data. Common lossless audio compression formats include FLAC (Free Lossless Audio Codec) and Apple Lossless. Compare lossy data compression.

lossy data compression

A class of data compression algorithms that allow an approximation of the original data to be reconstructed, in exchange for better compression rates. Common lossy audio compression formats include MP3, AAC (Advanced Audio Coding), and IMA ADPCM. Compare lossless data compression.

metadata

Supplemental information about a media file type. For example, an audio file can contain information such as the name of the person that created the file, the length of the file, the title of the file, description, and so on.

scale up

Increasing the size of an image without re-scanning or re-importing the original art.

"sum of tracks" pricing

A type of iTunes Store pricing. The iTunes Store sets the album’s price as the sum of the prices for each track (“sum of tracks” price) when the price that results from the wholesale price received for an album is higher than adding up the individual prices of each track in the album. If this occurs, the iTunes Store still displays a Buy Album button, but reports the sales as individual track sales rather than album sales. For pre-orders, if any territory is priced at sum of tracks, a pre-order is not created in the respective territory.

ticket

A notice on iTunes Connect that you need to fix package information such as metadata, cover art, audio files, and so on. For example, if there is a problem with your album title, iTunes creates a metadata ticket and emails you a notification so you can verify and fix the problem using iTunes Connect.

Featured tasks

This section features some of the top tasks performed using iTunes Producer.

How do I deliver an album that is available for pre-order sales?

  1. Create your album in iTunes Producer (iTP). For information on creating an album, see Creating Your Album.

  2. Click the Album > Info pane for your album in the iTP package window.

  3. Select Pre-order previews allowed.

    By default, iTP allows pre-order previews. Pre-order previews allowed only affects preview availability during the pre-order period, and applies to every territory and every track. When the pre-order ends and the album is released for sale, previews are always available.

  4. Click the Album > Rights & Pricing pane for your album.

  5. Type the date (YYYY-MM-DD) on which the album will be available for pre-order sales in the selected territory in Pre-Order Sales Start Date.

    A pre-order sales start date is required to create a pre-order. Pre-order sales start dates can vary by territory. To apply the pre-order to all territories, Shift-click to select all territories, then edit the value in Pre-Order Sales Start Date.

  6. Click the Delivery pane.

    iTP processes all the album and track details and displays any warnings or errors.

  7. Fix any delivery warnings or errors.

    Double-click on a warning or error to have iTP jump to the exact location of the problem.

  8. Click Deliver.

    iTP packages your album and track details, and all prepared files into an iTP package and sends it to the iTunes Store.

Important: You cannot add tracks or change the pre-order track link-up or sequence once you deliver an album to iTunes.

Can I save a preliminary version of my album before sending it to iTunes?

If you’re not ready to send your album to the iTunes Store and want to finish later, you can save a preliminary version.

To save your album:

  • Choose File > Save in the iTunes Producer menu for your album.

    iTunes Producer saves your album and all your prepared files as an iTunes Store package (iTP package) using the UPC/EAN/JAN value or album title as the filename with an .itmsp extension.

To reopen a saved album, open iTP, Click Open Recent, then choose a package file from the pop-up menu.

By default, iTP saves your albums in the Music > iTunes Producer > Playlists folder.

Note:

  • Your iTP package window is Untitled until you save the music package.

  • By default, iTP automatically saves your album as Untitled.itmsp, UPC/EAN/JAN.itmsp, or title.itmsp every 15 seconds.

What elements can I update in my album?

You cannot update all album and track details for an album you previously delivered to the iTunes Store. The following is a list of the details you can update with a redelivery:

  • Album details:

    • Label name

    • Copyright information

    • Original release date

    • Cover art, if the new cover’s checksum is different than the checksum of the cover currently in iTunes

    • Pre-order previews

    • Territories (you can add new territories)

    • Sales start date

    • Pre-order sales start date

    • Clearance information

    • Wholesale price information

  • Track details:

    • Digital Booklet or iTunes LP, if you previously delivered a digital booklet or iTunes LP

    • Label name

    • Copyright information

    • Gapless

    • Preview start time

    • Parental advisory information

    • Audio files, if the new audio file’s checksum is different than the checksum of the audio file currently in iTunes

    • Lyrics

    • Clearance information

    • Wholesale price information

Note: If Apple opens a metadata ticket before you deliver your updated packages, you can redeliver to update the album title and title version and the track title and title version.

Why is editing disabled for my album?

After you deliver your album to the iTunes Store, or if you are looking up metadata for an existing album, iTunes Producer disables editing for fields you can no longer update.

To turn on editing for your album:

  • Choose File > Enable Editing in the iTunes Producer menu for your album.

Apple does not recommend enabling editing. If you enable editing and make updates to your album, you might not be able to deliver your album to the iTunes Store. Use the enable editing feature when you are instructed to do so by your iTunes Technical Account Manager (for example, when you've delivered a partial album).

Can I sort information within iTunes Producer package windows?

  • Many panes in iTunes Producer (iTP) display information in lists, allowing you to sort the information by column heading. For example, in the Tracks > Info pane, you can sort tracks by disc number, track number, title, or time. To change the order in which iTP displays tracks in the list and sort tracks by title, click the Title column heading. To reverse the sort order, click the column heading again.

    iTP indicates the current sort order by highlighting the column and displaying Sort Order icon in the column heading.

I don't see any activities in the Template Chooser window. What should I do?

  • If the Template Chooser window does not display any activities, you do not have an active agreement with iTunes. You must complete the agreement process before you can deliver content for sale in the iTunes Store. For more information, see Agreements, Tax and Banking on iTunes Connect.

How do I deliver an iTunes LP along with my album?

  1. Create your album in iTunes Producer (iTP). For information on creating an album, see Creating Your Album.

  2. Click the Tracks pane for your album in the iTP package window.

  3. Click Add iTunes LP and drag and drop an iTunes LP zip file into the File box, or click Choose and select a file. You can enter vendor identifier, track and disc number, and locale and description information for the file. You can also add up to five screenshots for the iTunes LP.

    Vendor Identifier: Type a permanent, unique identifier for the iTunes LP. Apple recommends using the UPC of your album as the vendor identifier. Vendor identifiers do not need to be a fixed number of digits. Although vendor identifiers can contain digits, iTP treats them as strings, not numbers. Thus, a vendor identifier of “00000000012345” is not the same as “12345”. Vendor identifiers cannot be reused. The vendor identifier can only contain up to 100 alphanumeric characters and underscores (_); it cannot contain spaces, dashes (-), ampersands (&), other punctuation, or symbols. The vendor identifier is case-sensitive and must not start with an underscore.

    Track Number: and Disc Number: Indicates the track and disc number for the iTunes LP in the album. The iTunes Store displays the iTunes LP as the first track, but the iTunes LP must be the last track on the last Disc of the album. iTP automatically populates the Track Number and Disc Number fields. You should only change these settings with the advice of your Technical Account Manager.

    Locale: Click Add Locale, choose a locale from the pop-up menu, and type a localized description for the iTunes LP. The locale indicates both the language and the specific location where the language is spoken. You should provide a locale and localized description for each country where the iTunes LP is available. Descriptions can be up to 550 characters in length, can include Rich Text formatting, and must be suitable for public display. To add additional locales, click Add Locale again, choose a locale from the pop-up menu, and type a localized description for the iTunes LP. You must specify a default locale. By default, iTP uses the first locale.

    Description(s): Verify the locales and localized descriptions for the iTunes LP, and specify a default locale. By default, iTP uses the first locale. If you do not specify a locale and localized description for a country where the iTunes LP is available, the iTunes Store displays the default description. For example, if your agreement allows you to sell in the Japanese Store and you do not provide a Japanese locale and description, the specified default description appears in the Japanese Store.

    Screenshots: Click Screenshots at the bottom of the Tracks pane for an iTunes LP. Drag and drop a screenshot into the File box to add a screenshot to the iTunes LP, or click Choose and select a file, or click Add Screenshot and select a file. Use screenshots to give users an idea of the iTunes LP content. You must add at least one screenshot for the iTunes LP, and can add up to a total of five screenshots. Screenshots appear in the iTunes Store in the order listed, with the default first. To reorder screenshots, select the screenshot and drag and drop in the desired position in the box or use the up and down arrows to reorder the screenshots.

  4. Click the Delivery pane.

    iTP processes all the album and track details and displays any warnings or errors.

  5. Fix any delivery warnings or errors.

    Double-click on a warning or error to have iTP jump to the exact location of the problem.

  6. Click Deliver.

    iTP packages your album and track details, and all prepared files into an iTP package and sends it to the iTunes Store.

Notes:

  • You can add either a digital booklet or an iTunes LP file to your album, but not both.

  • Screenshots should be 1280 x 720 pixel JPEG or PNG files in RGB Color mode. Do not scale up a screenshot if it is smaller than the required size.

  • iTP cannot deliver an iTunes LP containing video. To deliver an iTunes LP with video, you must work with an approved iTunes LP provider. Apple lists qualified iTunes LP providers, developers, and delivery houses in iTunes Music Encoding Houses in Resources and Help on iTunes Connect.

How can I check the history and status of packages?

You can check the history and status of packages after you deliver them to the iTunes Store.

  • To check package history:

    • Choose File > Package History in the iTunes Producer menu for your album, type the UPC, EAN, or JAN number, then click Search.

  • To check package status:

    • Choose Window > Lookup Status in the iTunes Producer menu, type the UPC, EAN, or JAN number, then click Search.

iTunes Producer displays the current state and date created for the package.

How do I find an artist’s Apple ID?

If you do not know an artist's Apple ID, you can:

  • Do a metadata lookup on an existing album.

  • Search for the artist in the iTunes Store, Control-click the artist name, then select Copy Link.

  • Review the artist report on iTunes Connect.

  • When you add an artist to your album package, iTunes Producer searches the entire iTunes Store for artists matching your search criteria. iTunes Producer also returns additional information (for example, locale and genre) to help you choose the correct artist. Click View in iTunes Store button in the Apple ID column to view the artist page in the iTunes Store.

How do I create a custom territory group, country or region, for my album?

  1. Create your album in iTunes Producer (iTP). For information on creating an album, see Creating Your Album.

  2. Click the Album > Rights & Pricing pane for your album in the iTP package window.

  3. Click the Add Territory Group button.

    You can also use Edit > Regions in the iTunes Producer menu to create, remove, and edit custom territory groups (also known as regions).

  4. Click the Create button.

  5. Type a name for the new custom territory group.

  6. Select the territories you want to include in the new custom territory group.

  7. Click Save.

    iTunes Producer adds your new custom territory group.

  8. Click Choose.

Notes:

  • To delete a territory group, select an existing territory group and then click the Remove button.

  • To customize a territory group, select an exiting territory group, click the Edit button, then follow steps 5 through 8 above.

  • You can only remove or edit custom territory groups. You cannot remove or edit iTP territory groups (for example, North America, Latin America, and Europe.

How do I deliver a digital booklet along with my album?

  1. Create your album in iTunes Producer (iTP). For information on creating an album, see Creating Your Album.

  2. Click the Tracks > Info pane for your album in the iTP package window.

  3. Click Add Digital Booklet and drag and drop a PDF file into the File box, or click Choose and select a file. You can enter copyright and vendor identifier information for the booklet.

    Copyright: Type the copyright line (YYYY copyright info) for the digital booklet. Do not type the word copyright or include any copyright symbols; it is added automatically.

    Vendor Identifier: Type a permanent, unique (with respect to the identifiers of other booklets included in the same package) identifier for the digital booklet. Apple recommends using the UPC of your album as the vendor identifier. Vendor identifiers do not need to be a fixed number of digits. Although vendor identifiers can contain digits, iTP treats them as strings, not numbers. Thus, a vendor identifier of “00000000012345” is not the same as “12345”. The vendor identifier can only contain up to 100 alphanumeric characters and underscores (_); it cannot contain spaces, dashes (-), ampersands (&), other punctuation, or symbols. The vendor identifier is case-sensitive and must not start with an underscore.

    Parental Advisory: Choose Clean, Explicit, or None from the pop-up menu to indicate whether or not a booklet contains explicit content. If you do not specify a parental advisory, iTP marks the digital booklet None to indicate a booklet for which neither a clean or explicit version exists. Choose Clean only if the digital booklet is an edited version of an original explicit form of the digital booklet.

  4. Click the Delivery pane.

    iTP processes all the album and track details and displays any warnings or errors.

  5. Fix any delivery warnings or errors.

    Double-click on a warning or error to have iTP jump to the exact location of the problem.

  6. Click Deliver.

    iTP packages your album and track details, and all prepared files into an iTP package and sends it to the iTunes Store.

Important: The music digital booklets you deliver along with your album are expressly designed for the iTunes Store format and cannot be reproductions of the liner notes with borders to increase their size. Use the following specifications when creating your music digital booklet:

  • A PDF file format with the .pdf extension (select View > Fit Visible before saving)

  • 72 dpi minimum (or 150 dpi if using in image files)

  • 11 in W x 8.264 in H minimum dimensions (28 cm x 21 cm)

  • RGB color formatted

  • All images full-bleed as shown in the following sample pages (test documents in Preview, Acrobat, and in the iTunes application, should be viewable in Preview as well as Acrobat):

    Booklet example
    Booklet example
    Booklet example
  • A minimum of four pages

  • 1-up page layout (recommended)

  • To be viewed on-screen (digital)

  • PDF version not pertinent to Read Only

  • All text and images to be viewed horizontally

  • All fonts and images embedded

When creating your digital booklet, keep the following guidelines in mind:

  • You can add either a digital booklet or an iTunes LP file to your album, but not both.

  • When saving as a PDF file, make sure the document opens full screen (”Fit Visible” in Acrobat) with no negative space surrounding the document. The PDF files are meant to be viewed on screen, not printed out. When a user first opens the document, they should not have to zoom in to read copy. Text should read left to right, top to bottom. Do not display rotated text.

  • The file size should be reasonable (8 - 10 MB max). If the digital booklet is many pages, consider using fewer images or optimizing images to achieve lower overall file size.

  • Bar codes, crops, and printers marks are not allowed. Number all pages.

  • You cannot sell or advertise other products or services. No other promotional sites are allowed.

  • Documents can mention "iTunes" if they link or refer to iTunes for purchase.

  • No links to anything outside of the booklet, except to the artist or label websites, are allowed.

  • No time-sensitive information (for example, a promotion or dates for an upcoming tour or concert) is allowed.

Get additional information

If you need to request technical assistance or would like to provide feedback about iTunes Producer, visit Resources and Help on iTunes Connect at https://www.apple.com/itunes/go/itunesconnect/contactus or choose Help > Submit Feedback in the iTunes Producer menu to send an email to your iTunes Technical Account Manager at iTunesProducer@apple.com.

AppleCare support is not available for this product.

Revision history

This table describes the changes to iTunes Producer for music.

Date

Notes

05/17/21

This 3.1.4 release includes the following updates to iTunes Producer: updated system requirements.

02/01/16

This 3.1.1 release includes the following updates to iTunes Producer: updated system requirements; multiple provider support; enhanced artist identification lookup; plus additional enhancements and bug fixes.

07/03/14

This 3.1 release includes the following updates to iTunes Producer: updated system requirements; ringtone import template; artist identification lookup; track audio language; multiple track edit; plus additional enhancements and bug fixes.

01/15/14

This 3.0 release includes the following updates to iTunes Producer: improved user interface; find-as-you-type metadata lookup; plus additional enhancements and bug fixes.

02/19/13

This 2.9 release includes the following updates to iTunes Producer: improved user interface; enhanced validation and error feedback; additional metadata information; parental advisory support for digital booklets; plus additional enhancements and bug fixes.

06/26/12

This 2.7.1 release includes the following updates to iTunes Producer: localized user interface; plus additional enhancements and bug fixes.

06/13/12

This 2.7 release includes the following updates to iTunes Producer: additional metadata languages; import templates; additional genres; Sales Start Date; cover art updates; plus additional enhancements and bug fixes.

03/13/12

This 2.6 release includes the following updates to iTunes Producer: custom territory groups; send to Apple update; improved user interface; enhanced search; plus additional enhancements and bug fixes.

06/19/11

This 2.4 release includes the following updates to iTunes Producer: improved user interface; filtering capabilities; updated system requirements; plus additional enhancements and bug fixes.

02/11/11

This 2.3 release includes the following updates to iTunes Producer: iTunes LP support; updated file import; active user button; Submit Feedback menu; Spotlight integration; plus additional enhancements and bug fixes.

11/04/10

This 2.2 release includes the following updates to iTunes Producer: ringtone support; enhanced track details; package delivery enhancements; plus additional enhancements and bug fixes.

03/26/10

This 2.1 release includes the following updates to iTunes Producer: dynamic pricing support; plus additional enhancements and bug fixes.

12/14/09

This 2.0 release includes the following updates to iTunes Producer: digital booklet support; enhanced metadata lookup; quicker, more robust package delivery; enhanced error reporting; pre-order support; unlimited Undo and Redo commands; send to Apple functionality; a full Cocoa application; integration with Software Update; file import enhancements; plus additional enhancements and bug fixes.