
Effects let you shape and enhance the sound of your music in a variety of ways. Many familiar sounds in popular music are created using effects.
In a GarageBand project, each patch has up to four built-in effect plug-ins. You can add effect plug-ins to a patch, turn them on or off, reorder them, and remove them in the Smart Control inspector. You can also adjust effect settings by opening the effect’s plug-in window.
GarageBand includes a variety of studio-quality effect plug-ins that you can use in your projects:
Compressor: A compressor adjusts the volume of the patch to smooth out sudden level changes. Compressors can add punch and definition to a track or an entire song, and make it sound better when played on audio equipment with a narrow dynamic range.
Delay: A delay effect repeats a sound like an echo. It can add a subtle sense of space to a sound, or create the impression that a voice or an instrument is in a large room, a cavern, or outer space.
Distortion: Distortion effects, which include amp simulation and overdrive, change the tone of the original sound to re-create analog or digital distortion.
EQ: EQ (short for equalization) is a powerful and versatile effect that lets you change the level of selected frequencies in a sound. You can use EQ to make both subtle and dramatic changes to your projects. EQ is likely the most commonly used effect in popular music. GarageBand patches have an EQ effect that lets you view and edit different frequency bands.
Modulation: Modulation effects include chorus, flangers, and phasers. Like delay effects, they repeat the sound, but in addition, they shift or modulate when the repeated signal plays back. The signal can also be detuned relative to the original.
Noise Gate: A noise gate reduces low-level noise by cutting off the sound when it falls below a certain minimum level. It is often used as the first in a series of effects, and is included on audio tracks to help reduce input noise.
Reverb: Reverb simulates the natural reflections of a sound in a surrounding space. It can add definition and presence to voices and instruments, add ambience to a sound, or simulate different rooms and other acoustic environments.
Others: GarageBand includes other types of effects, such as amp models, filters, pitch shifters, and other specialized effects.
The master track includes effects that shape the sound of the overall project. You can add, edit, reorder, and remove effects on the master track the same way as on other tracks. You view the effects on the master track by clicking the Master button in the Smart Controls menu bar, then clicking the Inspector button ![]() .
.
The master track includes Master Echo and Master Reverb effects. You can change the setting for the Master Echo and Master Reverb in the Effects tab when the master track is selected. Each audio and software instrument track includes a Master Echo and Master Reverb slider, which you use to control the amount of Master Echo and Master Reverb used on the track.
Click the Inspector button ![]() in the Smart Controls menu bar.
in the Smart Controls menu bar.
Open the Smart Control inspector.
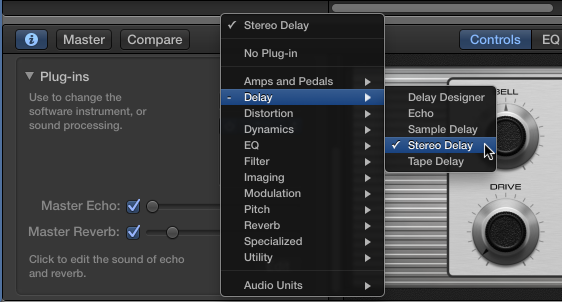
In the Plug-ins area, click an empty plug-in slot, choose an effect category, then choose a plug-in from the submenu.
The plug-in window opens, showing the plug-in’s controls.
Open the Smart Control inspector.
Click the right side of a plug-in slot, choose a category, then choose a new plug-in from the submenu. The new plug-in replaces the former selection.
Open the Smart Control inspector.
Hold the pointer over the plug-in slot, then click the Power button on the left side of the plug-in slot.
Click the Power button again to turn the plug-in on.
Open the Smart Control inspector.
Drag plug-ins by the center up or down.
Reordering plug-ins can change the sound of a patch. Plug-ins work in sequence; the output of a higher plug-in is sent to the input of the plug-in below it.
Open the Smart Control inspector.
Click the right side of a plug-in slot, then choose No Plug-in from the pop-up menu.
Open the Smart Control inspector.
Click the center part of a plug-in slot to open the plug-in window.
In the plug-in window, drag sliders, move control points, and manipulate other controls to change the values of the effect settings.
To turn the noise gate on or off: Select the Noise Gate checkbox.
To adjust the sensitivity of the noise gate: Drag the Noise Gate slider left or right.
Click the Edit button in the lower part of the Plug-ins area.
Choose Echo or Reverb from the upper pop-up menu.
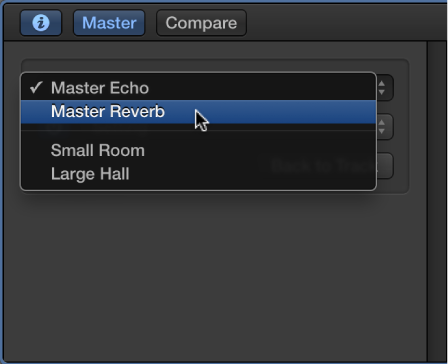
Choose a setting for the Master Echo or Master Reverb from the lower pop-up menu.
When you’re finished, click Back to Track to return to the track you started from.
You can also use Audio Units plug-ins in your GarageBand projects to add new sounds and effects. For more information, see Use Audio Units plug-ins with GarageBand.