Working with Patches in Edit Mode
Patches are the individual sounds you play using your keyboard controller (for MIDI keyboardists) and the effects setups you use with your guitar, microphone, or other instrument (for guitarists, vocalists, and other instrumentalists). MainStage patches can contain multiple channel strips, each with a different instrument or effects setup.
Some basic patch operations, including adding and naming patches, selecting and naming patches, and adding channel strips to patches, are described in Getting Started with MainStage.
If MainStage is currently in Layout or Perform mode, click the Edit button in the top-left corner of the MainStage window to begin working in Edit mode.
Selecting Items in the Patch List
All of the patches and sets in a concert appear in the Patch List, located to the left of the workspace. To select an item in the Patch List in Edit mode, you can click the item or use key commands.
In the Patch List, located to the left of the workspace, click the patch.
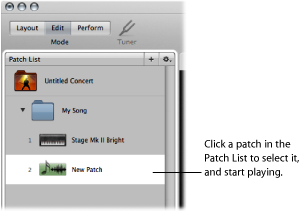
With the patch selected, you can start playing instantly.
You can also select patches in the Patch List using your computer keyboard.
Press the Down Arrow key to select the next (lower) patch in the Patch List.
Press the Up Arrow key to select the previous (higher) patch in the Patch List.
There are additional key commands you can use to select items in the Patch List.
Default key command | Selects |
|---|---|
Up Arrow | Previous item (patch or set) in the Patch List |
Down Arrow | Next item (patch or set) in the Patch List |
Command-Up Arrow | Previous patch in the Patch List |
Command-Down Arrow | Next patch in the Patch List |
Command-Left Arrow | First patch of the previous set |
Command-Right Arrow | First patch of the next set |
Note: When you use the Command-Arrow key commands listed above to select different patches, the selected screen control remains selected in the workspace. This makes it easy to see how a screen control is configured in different patches.
In addition to using key commands, you can select a patch (or set) in the Patch List by typing the first few letters of its name.
Click the border of the Patch List to select it.
With the Patch List selected, start typing the name of the patch. Once you type enough letters to uniquely identify its name, the patch or set is selected.
You can also select a patch by typing its name in Perform mode. For information, see Selecting Patches by Typing.
You can also select a patch using your computer keyboard by typing its patch number. Patch numbers appear to the left of the patch names in the Patch List.
Click the border of the Patch List to select it.
With the Patch List selected, type the patch number using your computer keyboard.
Skipping Items in the Patch List
You can skip patches or sets in the Patch List. When a patch or set is skipped, using the Command key together with the arrow keys to select items passes over the patch or set and the next (non-skipped) item is selected. However, you can still select the item by clicking it, or using the arrow keys alone.
Skipped items are also skipped when you use the patch selector in Perform mode.
Select the patch or set in the Patch List.
Choose Skip from the Action menu for the Patch List.
The item appears as a thin line in the Patch List.
Select the item (patch or set) in the Patch List.
Choose Don’t Skip from the Action menu for the Patch List.
The item returns to full size in the Patch List.
Collapsing Sets in the Patch List
You can collapse sets in the Patch List. When you collapse a set, you can select the set and use any channel strips or busses at the set level but cannot select or play patches in the set while in Edit mode.
In the Patch List, click the disclosure triangle for the set.
You can uncollapse the set by clicking its disclosure triangle again. Collapsing a set has no effect on whether you can select patches in the set in Perform mode.
For information about creating and using sets, see Working with Sets in Edit Mode.
Copying and Pasting Patches
You can copy, paste, and duplicate patches in the Patch List using the standard Mac OS X menu and key commands or by Option-dragging. When you paste or duplicate a patch, it includes any mappings made to parameters in the original patch.
Reordering Patches in the Patch List
When you add a patch to a concert, the new patch appears below the currently selected patch in the Patch List. You can drag patches in the Patch List to reorder them.
Drag patches up or down in the Patch List until they appear in the order you want.
Moving Patches in the Patch List Repeatedly
The MainStage command set includes a Move Again command that lets you easily move selected patches multiple times. You can use Move Again when you drag, paste, create, or delete patches in the Patch List. By default, the Move Again command is not assigned to a key command. To use it, you should first assign it to a key command in the Command Editor. For information about using the Command Editor, see Using the Command Editor.
Creating a Patch from Several Patches
You can create a patch by combining several existing patches. The new patch contains all of the channel strips of the selected patches.
In the Patch List, select the patches you want to use to create the new patch.
Choose “Create Patch from Selected Patches” from the Action menu at the upper-right corner of the Patch List.
The new “combined” patch appears in the Patch List, labeled “Untitled Patch.”
Double-click the name and type a name for the combined patch.
Note: Creating a patch with more than three channel strips can affect performance, particularly if they use a large number of plug-ins or processor-intensive plug-ins.
Setting the Time Signature for a Patch
You can set the time signature for a patch. Time signatures can be used with the Playback plug-in and also control the beats for the metronome. When you set the time signature for a patch, it overrides any concert- or set-level time signature.
In the Patch Inspector, select the Attributes tab.
In the Attributes tab, select the Has Time Signature checkbox.
Double-click the number in the field to the right, and enter the number of beats for one measure of the time signature.
Choose the beat value from the pop-up menu to the right.
Changing the Tempo When You Select a Patch
You can give a patch its own tempo setting so that when you select the patch, the tempo changes to the patch tempo setting. MainStage uses the new tempo until you select another patch or set with its own tempo setting, tap a new tempo, or until MainStage receives tempo information from incoming MIDI messages. For more information about using and changing tempo in MainStage, see Using Tempo in a MainStage Concert.
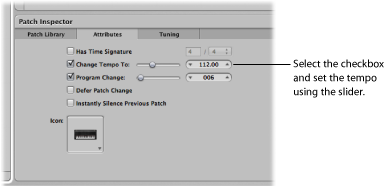
In the Attributes tab of the Patch Inspector, set the patch tempo using the Change Tempo To value slider.
Select the Change Tempo To checkbox to activate the patch tempo when the patch is selected.
Setting Patch Program Change Numbers
When you add a patch to a concert, the patch is given a MIDI program change number (the lowest available number between 0 and 127) until all available program change numbers are taken. You can select patches using program change numbers when performing by assigning buttons on a MIDI device to send program change messages. You can change the program change number in the Patch Inspector.
In the Patch List, select the patch.
When you select a patch, the Patch Inspector appears below the workspace.
In the Attributes tab of the Patch Inspector, select the Program Change checkbox.
Using the value slider, set the program change number.
The MIDI standard allows program change numbers with values from 0 to 127. If all available program change numbers in a concert are already in use, any new patches added to the concert will be given program change number zero (0), but the number is inactive (the checkbox is not selected). Bank changes are not supported.
If you set a program change number so that it duplicates an existing program change number, the word “Duplicate” appears in red next to the Program Change value slider. If two or more patches have the same program change number, and the numbers are active, the patch that appears first (highest) in the Patch List or patch selector is selected when you send the program change message with the corresponding value.
You can reset program change numbers for all active (non-skipped) patches in a concert. When you reset program change numbers, patches are assigned program change numbers based on their order in the Patch List, starting from the top. The program change numbers for skipped (inactive) patches are not reset.
Choose Reset Program Change Numbers from the Action menu for the Patch List (or press Command-Shift-Option-R).
You can assign buttons and other controls to send program change messages and use them to select patches in the concert. For information about assigning buttons, see Assigning Buttons.
Deferring Patch Changes
By default, when you switch patches, the new patch is ready to play immediately. You can “defer” a patch change so that the patch change occurs after the last note of the previous patch has been released or sustained.
In the Attributes tab of the Patch Inspector, select the Defer Patch Change checkbox.
Note: Deferring patch change works in Perform mode but does not work when you are editing patches in Edit mode. You can defer incoming MIDI program changes, and buttons mapped to actions, but not defer patch changes made by clicking the Selector object or using the arrow keys.
Instantly Silencing the Previous Patch
Sometimes you may want the sound of the previous patch to continue after you select a new patch, as when you want to sustain a chord pad while soloing over it. At other times, you may want to silence the sound of the previous patch instantly when you select a new patch.
In the Attributes tab of the Patch Inspector, select the Instantly Silence Previous Patch checkbox.
Changing the Patch Icon
Each patch has an icon that appears in the Patch List next to the patch name. By default, the patch icon shows the type of channel strip created when the patch was added. You can choose a new icon for a patch and use icons to visually distinguish patches in the Patch List.
In the Attributes tab of the Patch Inspector, choose an icon from the Icon pop-up menu.
Changing the Tuning for a Patch
By default, patches use the same tuning method as the concert (or the set, if they are in a set with its own tuning method). You can change the tuning for a patch so that it uses a different tuning. When you change the tuning for a patch, it overrides any concert- or set-level tuning method.
In the Patch Inspector, select the Tuning tab.
Choose the tuning you want the patch to use from the Method pop-up menu.