Getting to Know Ultrabeat’s Assignment Section
The Assignment section displays all sounds in a drum kit. It allows you to:
Select, organize, and name sounds.
Import sounds from other Ultrabeat settings or EXS instruments.
Set relative levels and pan positions for each sound.
Mute or solo sounds in the drum kit.
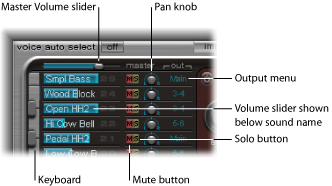
- Master (Volume) slider: Controls the levels of all drum sounds in the kit—the overall mix level of all drum sounds.
- Volume slider: Sets the volume of each sound. All sound levels are indicated by blue sliders that provide a complete overview of all relative levels within the kit. Drag the blue slider to set the volume for the desired sound.
- Keyboard: Acts as a display when appropriate MIDI information is received. You can also click the keys to play the sound on the corresponding row.
- M(ute) button: Mutes individual sounds in a drum kit. You can simultaneously mute several sounds or sequences by clicking the appropriate Mute buttons.
- S(olo) button: Allows you to listen to sounds in isolation. You can simultaneously solo several sounds or sequences by clicking the appropriate Solo buttons.
- Pan knob: Controls the placement of sounds in the stereo field (panorama).
- Output menu: Used to independently route each drum sound to individual outputs, or output pairs. Ultrabeat features eight separate stereo and mono outputs when inserted as a multi-output instrument.
Drum sounds that are routed to an output pair other than Main (1–2) are automatically removed from the main output channel strips.
Choosing an output pair other than Main (1–2) routes the sound to an aux channel strip.
Playing and Selecting Ultrabeat Drum Sounds
The 25 sounds of an Ultrabeat drum kit are mapped to the onscreen keyboard at the left side of the Ultrabeat interface. Sounds start from the bottom of the onscreen keyboard and correspond to note values on a connected MIDI keyboard, starting at C1.
Play a note on a connected MIDI keyboard. As mentioned, the bottom sound is mapped to MIDI note C1.
Click a key on the onscreen keyboard to trigger the sound on the adjacent row.
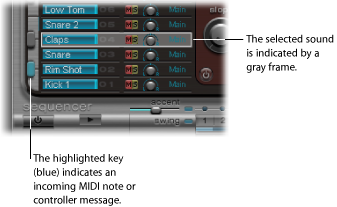
The corresponding key on the onscreen keyboard to the left of the sound name turns blue when it is clicked or when it receives appropriate MIDI information.
Click the name of the sound in the Assignment section.
You can recognize the selected sound by the gray frame that appears around the entire assignment row. The parameters of the selected sound are shown in the Synthesizer section to the right. See Getting to Know the Ultrabeat Synthesizer Section.
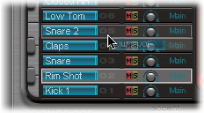
The example below shows drum sound 2 being played (as indicated by the blue key) while drum sound 4 is selected (the gray frame).
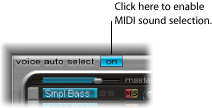
Activate the Voice Auto Select button in the upper-left corner of the Ultrabeat window.
Naming, Swapping, and Copying Ultrabeat Drum Sounds
This section outlines the steps required to rename and rearrange the positions of individual sounds within a drum kit.
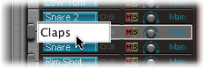
Double-click the name of a sound to open a text entry field.
Type in the name and press Return, or click anywhere outside the text entry field, to complete the naming operation.
Swapping and copying drum sounds within an Ultrabeat kit can be achieved with a drag-and-drop or shortcut menu operation.
Select the sound name (not on a button or menu).
Drag it to the desired position. The target is shaded as you drag across the list of sound names.
A simple drag and drop swaps the two drum sounds (including Mixer settings: volume, pan, mute, solo, and output configuration). Sequences arenot swapped.
Command-drag to swap the two drum sounds and sequences.
Option-drag to copy the sound. Sequences arenot copied.
Command-Option-drag to copy the sound and sequences.
Control-click or right-click the sound name.
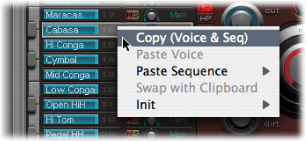
Choose one of the following commands from the shortcut menu:
- Copy (Voice & Seq): Copies the selected sound, including mixer settings and all sequences, to the Clipboard.
- Paste Voice: Replaces the selected sound with the sound from the Clipboard but does not replace existing sequences.
- Paste Sequence > (submenu): Enables you to replace all, or individual sequences, of the target drum sound. Sound parameters are not affected.
Pasting a single sequence replaces the currently active sequence (as set in the Pattern menu) of the target drum sound. This allows you to copy sequences into any of the 24 possible pattern locations.
Pasting all sequences replaces all sequences.
In situations where a sound only has several sequences (not all 24 are used), choosing “Paste Sequence > all” will place these sequences into the same positions; sequence 5 (in the Pattern menu) will be pasted to the same position in the new sound, for example. If a sequence already exists at this location in the target sound, it will be replaced. If no sequence exists at this location, the copied sequence will be added to the drum sound.
- Swap with Clipboard: Exchanges and replaces the selected sound with the sound from the Clipboard.
- Init > (submenu): Opens a submenu that contains a few starting-point (Init) sounds. Select one of these to replace the target drum sound.
The Sample Init sound initializes the filter and pitch parameters to neutral settings, which are ideal as a starting point for programming sample-based drum sounds.
These commands affect only the selected drum sound. The sequence and sound data of the other 24 sounds are unaffected.
Note: The shortcut menu commands Paste and “Swap with Clipboard” require an initial Copy command—to place data in the Clipboard—before they can be used.