Bouncing Regions and Tracks in Place
There are two different types of “in place” bounces that can be performed in Logic Pro: region-based bounces and track-based bounces. This allows you to bounce selected material and place the result at its original position in the arrange timeline—in other words, in place.
Using Bounce in Place, you can only process audio or software instrument tracks, or the regions on those tracks. It is not possible to perform an in place bounce of a region routed to a MIDI channel strip.
When bouncing in place, the audio file format of the bounce (sample rate and resolution) is determined by your audio recording settings, and the bounce file is created in the current recording folder.
The Bounce in Place function might, at first glance, seem similar to the Freeze function. See Freezing Tracks in the Arrange Area. To clarify which function best fits which situation, here’s a short comparison:
Both save CPU power by rendering all effect (or instrument) plug-ins of a track.
The Bounce in Place function makes it easy to access (and edit) the bounced audio file.
Freeze allows you to return to the original MIDI programming (or audio regions) and automation data.
Freeze (in 32 Bit Float) safeguards against volume clipping.
Bouncing Regions in Place
You can render one or more selected regions on audio or software instrument tracks into a new audio file, including all active plug-ins and automation data.
Select one or more regions on an audio or software instrument track.
Do one of the following:
Choose Region > Bounce Regions in Place (or use the corresponding key command).
Control-click (or right-click) the selected regions, then choose Bounce Regions in Place from the shortcut menu.
The Bounce Regions in Place dialog appears.
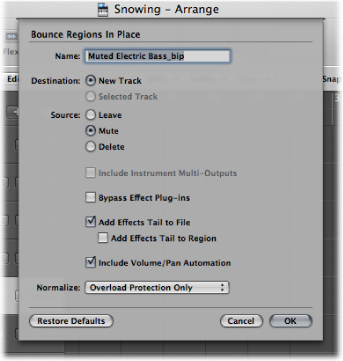
Define the following parameters, as required.
- Name field: Define a name for the bounce file in the text field. The name defaults to the region name of the first selected region, with the extension _bip added at the end.
- Destination buttons: Define the track on which the bounce file is placed. You have two options.
- New Track: Creates a new audio track below the selected track, and places the bounce file on that track.
- Selected Track: Places the bounce file on the selected track.
- Source buttons: Define what happens to the source regions after bouncing. You have three options.
- Leave: Leaves the source region unaltered after processing the bounce file.
- Mute: Mutes the source region after processing the bounce file.
- Delete: Deletes the source region from the original track after processing the bounce file.
- Include Instrument Multi-Outputs checkbox: Select this checkbox to include aux channel strips with multi-output signals of the software instrument in the bounce process. Otherwise, only the channel strips of tracks with selected regions are bounced.
- Bypass Effect Plug-ins checkbox: Select this checkbox to disable all plug-ins on the source track during the bounce process.
- Add Effects Tail to File checkbox: Select this checkbox to continue the bounce process after the end of the bounce range—either to the end of the cycle or to the end of the last selected region—until there is no longer a signal. Otherwise, only the bounce range is bounced.
- Add Effects Tail to Region checkbox: Select this checkbox to include the entire bounce file in the bounce region. Otherwise, the bounce region only includes the bounce range.
- Include Volume/Pan Automation checkbox: Select this checkbox to have volume and pan automation performed during the bounce process, with their result influencing the bounce file. Otherwise, the volume and pan automation is simply copied, not performed.
- Normalize pop-up menu: Choose between three states of normalization.
- Off: Turns off normalization.
- Overload Protection Only: Allows downward normalization in case of overloads—levels above 0 dB, which would lead to clipping—but no normalization in case of lower levels.
- On: Allows full bidirectional normalization.
- Restore Defaults button: Click this button to set all parameters in the dialog to their default settings.
Click OK to trigger an in place bounce of the selected region(s).
Note: When you click OK, the settings chosen above are stored in the preferences and recalled when you next access the Bounce Regions in Place function.
Bouncing Tracks in Place
You can render one or more selected audio or software instrument tracks into a new audio file, including all active plug-ins and automation.
Select the relevant audio or software instrument track.
Choose Track > Bounce Track in Place (or use the Bounce Track in Place key command).
The Bounce Track in Place dialog appears.
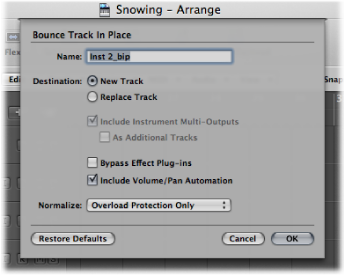
Define the following parameters, as required.
- Name field: Define a name for the bounce file in the text field. The name defaults to the region name of the first selected region, with the extension _bip added at the end.
- Destination buttons: Define the track on which the bounce file is placed. You have two options.
- New Track: Creates a new audio track below the selected track, and places the bounce file on that track.
- Replace Track: Replaces the existing track, and places the bounce file on it.
- Include Instrument Multi-Outputs checkbox: Select this checkbox to include aux channel strips with multi-output signals of the software instrument in the bounce process. Otherwise, only the channel strips of tracks with selected regions are bounced.
- As Additional Tracks checkbox: Select this checkbox to create additional bounce files for every aux with any multi-output of the selected multi-output software instrument as input source.
- Bypass Effect Plug-ins checkbox: Select this checkbox to disable all plug-ins on the source track during the bounce process.
- Include Volume/Pan Automation checkbox: Select this checkbox to have volume and pan automation performed during the bounce process, with their result influencing the bounce file. Otherwise, the volume and pan automation is simply copied, not performed.
- Normalize pop-up menu: Choose between three states of normalization.
- Off: Turns off normalization.
- Overload Protection Only: Allows downward normalization in case of overloads—levels above 0 dB, which would lead to clipping—but no normalization in case of lower levels.
- On: Allows full bidirectional normalization.
- Restore Defaults button: Click this button to set all parameters in the dialog to their default settings.
Click OK to trigger an in place bounce of the selected track(s).
Note: Following the in place bounce, the original track content (all regions, and all automation data except for volume, pan, and sends) is lost and the original instrument or track channel strip is reset. An Undo is always possible, of course.
Bounce-Replacing All Tracks
You can perform an in place bounce and replace for all audio and software instrument tracks available in the Arrange window.
Choose Track > Bounce-Replace All Tracks.
Note: This command only works if your Arrange area contains audio or software instrument tracks.
You are prompted to save your project; click Yes or No, as appropriate.
The Bounce Replace All Tracks dialog appears.
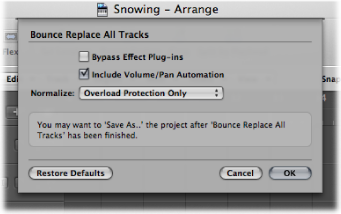
Define the following parameters, as required.
- Bypass Effect Plug-ins checkbox: Select this checkbox to disable all plug-ins on the source track during the bounce process.
- Include Volume/Pan Automation checkbox: Select this checkbox to have volume and pan automation performed during the bounce process, with their result influencing the bounce file. Otherwise, the volume and pan automation is simply copied, not performed.
- Normalize pop-up menu: Choose between three states of normalization.
- Off: Turns off normalization.
- Overload Protection Only: Allows downward normalization in case of overloads—levels above 0 dB, which would lead to clipping—but no normalization in case of lower levels.
- On: Allows full bidirectional normalization.
Click OK to trigger the in place bounce and replace for all tracks.