Managing Projects
This section outlines some housekeeping activities that may be required to keep your projects in order.
Copying or Moving a Project Folder
A project folder can be copied or moved to another location by using any of the standard operating system methods. This is great for the archiving and transport of projects to other studios or facilities.
The following should be taken into account when copying or moving project folders:
When a project is saved with Include Assets selected, and the recording path is pointing to a location inside the project folder, the recording path is relative. This means that the recording path for the audio data moves with the project, making it possible to move the project folder in the Finder or use the Save As command.
When manually setting a recording path (File > Project Settings > Recording > Core Audio Recording Folder) outside the current project folder, the recording path is absolute. This means that the recording path for the audio data always remains the same, even after using the Save As command to save as a new project or when moving the project file in the Finder. This is important if you prefer to record all audio data into a single location outside the project folder.
Cleaning Up Projects
If there are any unused project files in your project folder, make use of the File > Project > Clean Up command. If any unused files are found, the following dialog is displayed:
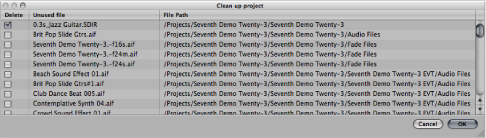
Select the checkboxes in the first column to choose files for removal. The name and path of the file to be deleted is shown in the last two columns.
Only files with active checkboxes in the first column are deleted. All unselected entries remain as they are.
If multiple rows are selected, a click in any checkbox switches all selected rows to the new state (either selected or unselected).
Note: The Clean Up command only deletes unused files (all types, except movie files). Clean Up takes into account the project currently loaded, and all other Logic Pro project files in the project folder. Only files that are not used by any of these projects are displayed in the Clean Up list.
Consolidating Project Settings
If your project contains files that are not in the correct sub-folders within the project folder, you can use the Consolidate command to automatically organize them into the standardized project file structure.
Choose File > Project > Consolidate (or use the Consolidate Project key command).
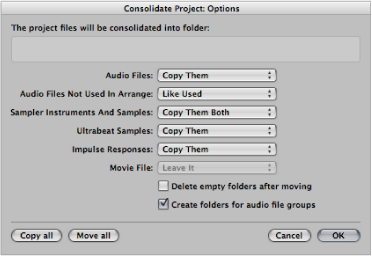
Choose a menu option for the different file types in the Consolidate dialog, to either move, leave, or copy the existing files.
The two buttons in the lower-left corner of the window make project consolidation quick and easy.
Click “Copy all” to set all menus to the Copy option.
Click “Move all” to set all menus to the Move option.
Select the “Delete empty folders after moving” checkbox to remove the empty folders in the source project, after files have been moved to the target project.
Select the “Create folders for audio file groups” checkbox to create group folders within the Audio Files sub-folder of the target project.
The groups must first be created in the Audio Bin of the source project. See Grouping Files in the Audio Bin.
Click OK when you’re done.
ReCycle Import Handling in Projects
EXS instruments created via a ReCycle import are placed in a Sampler Instruments/ReCycle sub-folder of the project folder. All audio data generated by a ReCycle import is placed in the ReCycle Audio folder, alongside the project file.
Note: This happens automatically and can’t be changed. If no project folder exists, ReCycle files are saved in ~/Music/Logic/ReCycle Audio.