GM Mixer Objects
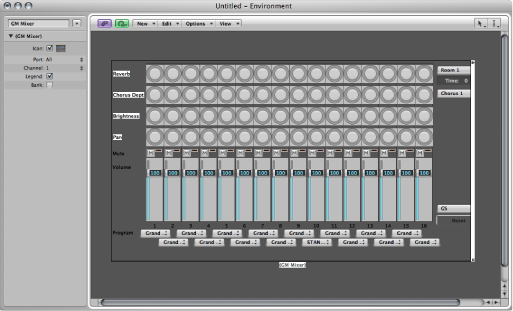
The GM mixer is a collection of 16 fader modules, configured to emulate a virtual mixing desk for 16 MIDI channels. Each module includes controls for volume, mute, preset, and bank, and four assignable knobs (one of which is typically used for pan). There are optional controls for standard XG and GS effects.
Choose New > GM Mixer.
The GM mixer is intended for controlling the 16 channels of a MIDI device which conforms to the GM, XG, or GS standard. This includes the GM set of 128 program names (with variation banks for XG or GS), MSB/LSB bank select messages, and standard controller names (#1 for mod wheel, #2 for breath, #7 for volume, #10 for pan, #11 for expression, and so on).
The Parameter Box of the GM Mixer
Most of the GM mixer’s setup is done in the mixer itself, but there are also a few parameters in its Parameter box.
Like the instrument and multi-instrument objects, the GM mixer can also have a direct MIDI output connection. It is set with the Port parameter.
The Channel parameter determines the channel number of the lowest GM mixer module. You can use this (coupled with resizing the GM mixer) to create sub-mixers for any continuous string of MIDI channels (1 to 4, for example).

Working with the GM Mixer Channel Strips
The MIDI channel strips work as a remote control for the mixing parameters of the controlled sound modules and synthesizers (volume and pan, for example).
Choosing a Program or Bank
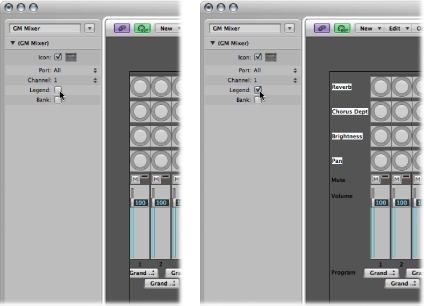
If your sound source understands bank select events, you can choose the bank number with the Bank parameter field at the bottom of each channel strip (only visible if the Bank parameter in the Object Parameter box is selected). Remember that not all synthesizers support bank select events. You can use several different bank select formats (see Mapped Instrument Objects).
The Program button allows you to select a sound by name. Click it to open a menu that contains all GM sound names. Each channel has its own menu.
Adjusting the Level of a Channel
The Level fader controls the output level of a MIDI channel. Adjusting it sends controller 7 via your MIDI interface.
Drag the Level fader up or down.
Muting a Channel
The Mute button switches the volume of the channel between zero and the current Level fader position. In practice, this means that if the button is down, the channel is muted. If you turn the Mute button off, the current Level fader position (and value) is used.
Click the Mute button of the channel.
Assigning the Knobs to Controllers
You can assign any controller to each of the knobs.
Click the label next to the knob.
Choose the controller you want from the menu that appears.
Extended GM, GS, and XG Functions
In addition to the GM Standard, there are extended standards created by Roland (GS) and Yamaha (XG).
GS and XG mode allow you to select different effect programs, and to control the level of the reverb and chorus effects.
Choose GS/XG Effect Controls from the local View menu in the Mixer.
The GS/XG configuration control is displayed in the upper-right corner of the Mixer, allowing you to select different effect programs.
Choose the standard you want from the first pop-up menu in the upper-right corner of the Mixer.
Depending on your selection, the controllers for the extended effects appear.
Select the reverb or chorus effect from the second pop-up menu.
Program the reverb or delay time by double-clicking the Time parameter, then entering a value in the input field.