Editing Notes in the Score Editor
Given the different types of notes (tuplets, dotted, grace notes, and so on), this section outlines a number of note-related editing operations that will help you get your score looking just right.
Note: If your editing requirements extend beyond those covered in this section, see Using Note Attributes to Change Individual Notes.
Editing Note Velocity, Length, or Pitch in the Score Editor
You can edit the velocity, length, or pitch of one or more selected notes in the Score Editor.
Select the note, then edit the Velocity parameter displayed in the Event Parameter box.
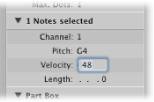
Grab one (or several) notes with the Velocity tool, and move the mouse up or down.
The value change can be seen in the help tag, and can also be heard if the MIDI Out button is activated.
Tip: Grabbing a note with the Pointer tool—while holding down the Option and Control keys—activates the Velocity tool, saving you a trip to the Tool menu. Once you release these modifier keys, the pointer returns to its previous shape and function.
Select the note, then do one of the following:
Edit the Length parameter in the Event Parameter box (shown as bars, beats, and ticks).
Use one of the Nudge Region/Event Length key commands.
Select the note, then do one of the following:
Drag it to the appropriate staff line (keep an eye on the help tag).
Edit the Pitch value in the Event Parameter box.
Use the Event Transpose +1 or the Event Transpose –1 key command.
Allowing Diatonic Input in the Score Editor
If your composition falls into a consistent key, you should turn on the Diatonic Insert feature. This feature helps you to place notes at the correct pitch by limiting input to notes that are diatonically correct for the current key.
Choose Edit > Diatonic Insert in the Score Editor.
Notes can be altered chromatically, once they have been inserted.
Note: If you protect (lock) your screensets, this function’s setting is also locked.
Creating and Editing Tied Notes in the Score Editor
Notes that are displayed as several graphical notes, connected with ties, only represent one actual MIDI note event.
Ties cannot be inserted directly into Logic Pro, but are created and displayed automatically, according to the length of the MIDI note. As such, you need to approach the creation of ties as follows:
Insert a note value that is shorter than the one you want to insert.
Change the note length in the Event Parameter box, the Event List, or the Event Float window.
Tip: You can also use duration bars to graphically edit note length. See Displaying Duration Bars and Changing the Length of Duration Bars.
If you don’t like the way particular tied notes are displayed, you can change the display by inserting a user rest at the position you want to see a graphic note.
The rest’s length is not important, but you should use a shorter one (an eighth note rest), if possible. Watch the help tag, for exact positioning. As soon as the rest is inserted, it is no longer visible in the score display, but the note display changes accordingly.
Note: If you want to delete or change the position of a (now invisible) user-inserted rest, use the Event List.
Choose a setting in the Attributes > Ties menu.
Creating and Editing N-Tuplets in the Score Editor
The symbol for N-tuplets is found in the triplet group. N-tuplets are groups of notes that are evenly spaced (by condensing or expanding them) over a specific time period. The most common tuplet is the triplet, a group of three notes; for example, a group of three eighth notes played within the space of one quarter note.

Depending on the situation, Logic Pro usually recognizes and notates regular triplets correctly. (You need to choose an appropriate display quantize value in the Display Parameter box. See Quantize.) You need to use the N-tuplet object for the display of other N-tuplets.
Drag the N-tuplet symbol onto the first note.
The target note must be indicated in the help tag before you release the mouse button. The Tuplet window opens, allowing you to define the N-tuplet attributes:
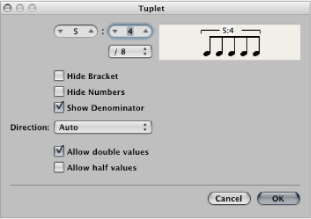
- Tuplet note number: The number of tuplet notes is defined in the upper-left field.
- Tuplet denominator: The value shown in the upper-right numerical field.
- Tuplet note values: Choose from 1/8, 1/16, 1/32 (and so on) tuplets.
- Hide Bracket: The bracket is not displayed.
- Hide Numbers: The N-tuplet’s number will not be printed. It will, however, be displayed in parentheses. This is necessary for further edits to the N-tuplet.
- Show Denominator: The N-tuplet display also contains the denominator (the second number in the dialog). This is 5:4 in the example above.
- Direction: The direction of the bracket and number. Auto refers to the setting in the staff style being used.
- Allow Double Values: If this option is selected, N-tuplets can contain note values that are twice as long as the regular tuplet value.
- Allow Half Values: If this option is selected, N-tuplets can contain note values that are half the length of the regular tuplet value.
Tip: Most changes made to the parameters listed above are reflected in the tuplet graphic.
Define the required settings in the Tuplet window.
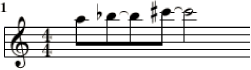
In the example above, five tuplet eighth notes should be displayed, in place of four regular eighth notes.
Click OK.
In the score, the above example would look like this:
Insert the first note at the appropriate position.
Drag the N-tuplet symbol onto it.
If you hold down the Option key as you insert the N-tuplet symbol, the most recently inserted N-tuplet settings are used, without the dialog opening.
Define the required settings in the N-tuplet window.
The display will initially show a series of rests, the number of which corresponds to the N-tuplet value. You can insert other notes at these rest positions. To do so, select a note value that approximately matches the length of the desired N-tuplet notes.
If you want to hear these notes played back with legato phrasing and the notes are too long or too short, you need to change their (MIDI) lengths. The fastest way to do this is to select all notes and then choose Functions > Note Events > Note Force Legato (Selected/Any). You can also use the corresponding key command.
The method described above also allows you to create N-tuplets which contain rests or syncopated note values (double length).
Tip: If you want an N-tuplet to begin with a rest, you first need to insert a user rest from the Part box, then drag the N-tuplet symbol onto the rest. Automatically displayed rests cannot function as starting points for N-tuplets.
Double-click the N-tuplet number, then select settings in the Tuplet window.
Click the tuplet number with the Eraser tool.
Double-click the N-tuplet number, then click the Delete button in the Tuplet window.
Using Artificial N-Tuplets to Bypass Display Quantization
You can bypass the display quantization value by using hidden, artificial N-tuplets.
For example, if there is a single 32nd note run in a MIDI region that otherwise contains only eighth notes or longer values, you can set (Display) Quantize to 1/8, and drag the N-tuplet symbol onto the first note of the 32nd figure.
In the resulting dialog, use the 8:8/32 setting, with Hide Brackets and Hide Numbers selected. The number (8) will be visible onscreen, but not in the printout.
Although this is not the way that tuplets are normally used, it is a handy way to force the display of runs (of shorter notes—1/32nd notes, in this case), with a display Quantize value set for longer note values (1/8 notes, in this example).
Creating Grace and Independent Notes in the Score Editor
Independent notes are notes that aren’t included in the automatic rhythmic (and graphic) display calculation of a measure, but are still played back via MIDI. There are two types:
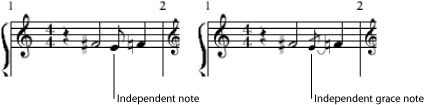
- Independent: These are displayed at their original length, as long as they are binary or dotted note values that can be displayed as a single (not tied) note. After insertion, you can change the stem direction, enharmonic interpretation, accidental distance, and note head, using the Note Attributes functions. (See Using Note Attributes to Change Individual Notes.)
- Independent Grace: These are always displayed as miniature eighth notes, with a slash across the stem, and a tie. The tie direction, stem direction, enharmonic interpretation, accidental distance, and note head can be changed.
Both types of independent notes can only appear as single notes, without beams to other notes.
Select the notes, then choose Attributes > Independent > Independent or Independent Grace, or use the corresponding key commands.
Choose Attributes > Independent > Not Independent to convert independent notes back into regular notes.
Hold down Option while selecting a note in the Part box, then drag it to the desired position.
Independent grace notes cannot be inserted directly. They need to be created by converting regular or independent notes.
In most situations, you will need to create additional space between the grace note and the note it is associated with. The best way to do this is with the Layout tool, which can be used to move the main note away from the grace note. (See Using the Layout Tool.)
Tip: If you want to create beamed grace notes, try using a polyphonic staff style with no rests displayed for the second voice. Assign the grace notes to the second voice, and resize them with the Resize tool. (See Adding Staffs to a Staff Style for more information on staff styles.)