Entering Notes and Symbols in the Score Editor
You can add notes and symbols in the following ways:
Real-time MIDI recordings (notes and sustain pedal markings only)
MIDI step input (notes only). This can be done with the computer or a MIDI keyboard.
Dragging notes or symbols from t7he Part box to the staffTo copy or convert audio files in the Sample Editor Choose Audio File > Save A Copy As. Choose settings in the Save A Copy As dialog.
Fast input of symbols by assignment to selected notes with key commands. These are available for some symbols that are attached to notes (accents, jazz symbols, and so on), and slurs or crescendi.
Hyper Draw allows you to insert and edit MIDI events that aren’t normally displayed in the Score Editor, such as continuous controller data (volume, pitch bend, and so on). See Creating and Editing Controller Events Using Hyper Draw for more information.
The display of input notes (and symbols) depends on the Score Editor’s display settings (especially those in the Display Parameter box), and the note attributes. (See Transcribing MIDI Recordings and Using Note Attributes to Change Individual Notes.)
MIDI playback is also influenced by the settings in the Region Parameter box and Track Parameter box. Settings in the Environment may also affect MIDI playback, if configured to do so.
Entering Notes and Symbols Using Real-Time Recording
Although real-time MIDI recordings are usually made in the Arrange area, you can also start recording directly from the Score Editor. You must first select the destination track in the Arrange area’s track list. You can do this directly from the Score Editor, by clicking a staff associated with the track. If no MIDI regions exist on the track, you need to switch to the Arrange area for recording, because the track won’t be displayed in the score. (The Score Editor only shows regions and folders.) For more information about MIDI recording, see Getting to Know MIDI Recording.
Entering Notes and Symbols Using Step Input
Step input in the Score Editor works in the same way as in other editor windows. (See MIDI Step Input Recording.)
However, the Score Editor (and Piano Roll Editor) allows the content of several regions to be displayed, and edited, at the same time. This feature results in a few differences regarding step input:
The MIDI region that you want to insert notes into must be selected. (Click the staff.) If no staff is visible, you must first create an empty MIDI region in the Arrange area.
Simultaneous step input into several regions is not possible. If more than one MIDI region is selected, the notes are only inserted into one of them.
If several MIDI regions follow one another on the same arrange track (even those with gaps in between them), you can step input notes from one MIDI region to the next. As soon as the playhead reaches the beginning of the next MIDI region, Logic Pro automatically inserts the notes into it.
Make the following adjustments to the display settings for the selected MIDI region:
Interpretation should be turned off. (See Interpretation.)
The Display Quantize setting should be set to the smallest note value that you intend to insert. (See Quantize.)
Set the first playhead insert position by Option-clicking the staff at the appropriate point. The selected position is displayed in the help tag while the mouse button is pressed.
This function is especially helpful in Page Score view, where no Bar ruler is displayed.
Note: You can only set the playhead position when Logic Pro is stopped.
Entering Notes and Symbols Using Mouse Input
A staff must exist before notes, symbols, and text elements (called objects in the following sections) can be inserted. Each staff (including empty staffs) represents one or more regions.
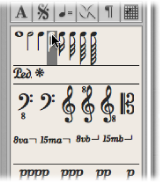
Select an object in the Part box. (See Selecting Part Box Objects.)
Do one of the following:
Drag it to the staff, then release the mouse button.
Select the Pencil tool in the Tool menu, then click a staff position.
As a positioning aid, a help tag appears while the mouse button is held down. Drag until the correct position is shown in the help tag, then release the mouse button. The help tag is especially important for positioning when working at smaller zoom levels.
When working in Full Score view (when more than one MIDI region is displayed), and inserting objects between the staffs (such as dynamic symbols), you should make sure that these symbols have been inserted into the appropriate MIDI region. The target MIDI region is automatically selected (green staff lines) once the object has been inserted. You can also see the name of the selected region in the top line of the Display Parameter box.
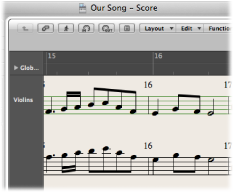
Tip: It’s generally better to change to single staff display (Linear Score view) when inserting objects that are positioned between staffs—especially lyrics.
Although it doesn’t matter which MIDI region (staff) an object belongs to in Full Score view (as they stay where they are placed), such objects can be displayed with the wrong instrument when single instrument parts are later displayed and printed.
Double-click the MIDI region (staff).
Double-click in the empty space below or above the staff.
This displays the full score, including all MIDI regions in the project.
For full details on all Part box objects and features, see Working with the Part Box.
MIDI Channel and Velocity of Inserted Objects
The MIDI channel and velocity of objects inserted with the mouse are determined by the Insert Defaults settings in the Event Parameter box. These are visible (and can be edited), when no object is selected.
Click anywhere in the background of the working area.

When inserting events into a staff that uses a polyphonic staff style, only MIDI channels that correspond to those of the voices can be used. (See Adding Staffs to a Staff Style.)
Many symbols display a MIDI channel in the Event List. For most objects, the MIDI channel determines the staff (theoretically, up to 16) that the symbol belongs to, in polyphonic staff styles.
Note: If this parameter is set to a value that exceeds the number of staffs in the staff style, the symbol disappears.
Insert Quantization
To make positioning of notes and symbols easier, objects can only be inserted at certain bar positions:
There is an invisible note positioning grid. Imagine that the whole bar—beginning at beat one—is filled with notes of the chosen value. For example, in an empty 4/4 measure, half notes can only be inserted on beats one and three, eighth note triplets only on the first, second, or third eighth note triplet of every beat.
All binary and dotted values can be inserted at any position of an automatically displayed rest. This means that if there is an eighth note on (count) one, you can insert a quarter or a dotted quarter note at the second eighth’s position. In this situation, Interpretation must be turned off in the Display Parameter box, to allow the display of the eighth note rest on the “and” of beat one. (See Interpretation.) The Syncopation setting determines how the inserted note is displayed, in this example.
Symbols (except those directly attached to notes) can be inserted at any Quantization parameter grid position. For hybrid quantization values (such as 8,12), the insert quantization is determined by the binary value (1/8 in this example).
Simultaneous Input of Objects into Several Regions
Press Shift to insert an object from the Part box into all currently selected regions, at the same position. (The help tag shows Insert Multi while you’re performing this action.) This technique allows you to insert notes, symbols, and even text elements into several regions at once.
You can make the multiple MIDI region selection in either the Arrange area or the Score Editor. Shift-click (or drag to select) all applicable regions or staffs.
Following selection, the top line of the Display Parameter box indicates the number of staffs (regions) that have been chosen.
Note: Key changes, signature changes, and global signs are automatically inserted into all staffs of the project, and cannot be inserted into individual, selected staffs.
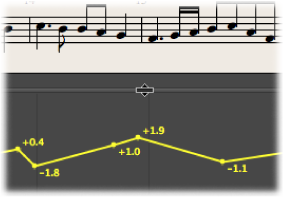
Creating and Editing Controller Events Using Hyper Draw
You can directly create and edit MIDI controller information in the Score Editor. These types of edits are made easier when you can see the notes that will be affected.
Open a Hyper Draw display in the Score Editor by doing one of the following:
Choose the appropriate View > Hyper Draw command.
Click the Hyper Draw button in the lower-left corner of the Score Editor, then choose a MIDI controller by clicking the arrow button to the left.
The selected controller type (volume, for example) is shown in a gray field below the Score Editor area. An event value scale is displayed in the instrument name column if View > Instrument Names is activated.
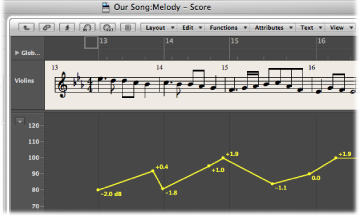
Click at different points in the gray area to create Hyper Draw nodes.
A connecting line is automatically created between the nodes.
Grab and vertically move the dividing line that separates the Hyper Draw area from the Score Editor area.
For more information, see Using Hyper Draw in the Arrange Area.
Note: Hyper Draw can only be used in Linear Score view, and when a single MIDI region is displayed. If you switch to another view (Page Score view, or Full Score view), the Hyper Draw area disappears. The view settings are stored, however, so when you return to single MIDI region and Linear Score view, the previous Hyper Draw setting is recalled.