Working with Staff Styles
Staff styles store multiple attributes, such as the clef, staff size, vertical distance between staffs, instrument transposition, and so on. It’s simply a case of choosing a new staff style to alter the score layout of any existing, or newly created, MIDI region. The chosen staff style has no effect on MIDI playback. It only affects the way Logic Pro displays the score.
On occasion, the included set of predefined staff styles may not meet your needs, and you will need to create your own. You do this in the Staff Styles window. (See Creating Staff Styles.)
Staff styles are saved with the project file, allowing different staff styles in different projects.
Tip: Create some empty template projects with (among other things) the staff styles, and other score settings, that you would normally use as a basis for your work.
Assigning Staff Styles to MIDI Regions
You can assign a different staff style to each individual MIDI region. In most circumstances, the predefined staff styles will meet your needs (see Knowing the Predefined Staff Styles). Changing staff styles allows you to quickly:
Create parts for transposing instruments.
Display the same MIDI region at different sizes—perhaps to print a full score, and individual parts for the different instruments.
Change between different display forms in one staff. You do this by cutting a MIDI region, and assigning different staff styles to the resulting shorter regions. This might be used to alternate between passages that are completely transcribed, and improvised passages—using only beat slashes and chord symbols, for example.
Select the MIDI region.
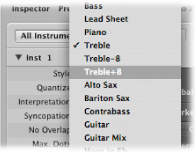
Choose a staff style from the Style parameter pop-up menu in the Display Parameter box.
You can also simultaneously assign a staff style to several selected regions.
Assigning Staff Styles Automatically
When you create a new MIDI region, either by making a real-time recording or with the Pencil tool in the Arrange area, the MIDI region is assigned the staff style selected in the bottom line of the Track Parameter box.
When you create template projects, or begin work on a new project, you may want to change these settings for tracks that are likely to use a specific staff style. This ensures that regions recorded on these tracks are immediately displayed with the correct staff style.
If Auto Style is chosen in the bottom line of the Track Parameter box, every new MIDI region is automatically assigned a staff style that fits the register of the recorded notes. In other words, a Bass staff style is selected automatically if your region consists of notes played in a low octave. Similarly, two-handed parts are assigned a Piano staff style.
Note: Auto Style can only be chosen in the Arrange area’s Track Parameter box, and does not appear in the list of staff styles in the Score Editor’s Display Parameter box.
Knowing the Predefined Staff Styles
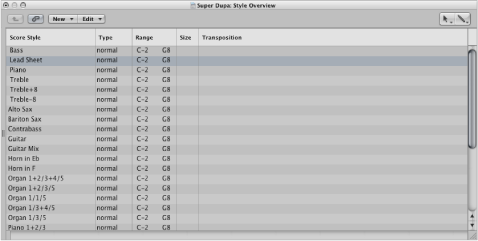
Logic Pro contains a number of predefined staff styles. The table lists them all, and their parameters:
Staff style | Clef type | Transposition |
|---|---|---|
Bass | Bass clef | - |
Lead Sheet | Treble clef | - |
Piano (two staffs) | Treble/Bass clef | - |
Treble | Treble clef | - |
Treble −8 | Treble (−8) clef | +1 octave |
Treble +8 | Treble (+8) clef | −1 octave |
Alto Sax | Treble clef | Eb (+9) |
Baritone Sax | Bass clef | Eb (+21) |
Contrabass | Bass (−8) clef | +1 octave |
Guitar | Tablature display | - |
Guitar Mix (Tablature display and one staff) | Tablature display/Treble (−8) clef | - |
Guitar Mix 2 | Treble (−8) clef/Tablature display | - |
Horn in Eb | Treble clef | Eb (−3) |
Horn in F | Treble clef | F (+7) |
Organ 1/1/5 (3 staffs) | Treble/Bass/Bass clef | - |
Organ 1/3/5 (3 staffs) | Treble/Bass/Bass clef | - |
Organ 1/3+4/5 (3 staffs) | Treble/Bass/Bass clef | - |
Organ 1+2/3/5 (3 staffs) | Treble/Bass/Bass clef | - |
Organ 1+2/3+4/5 (3 staffs) | Treble/Bass/Bass clef | - |
Piano 1/3 (2 staffs) | Treble/Bass clef | - |
Piano 1/3+4 (2 staffs) | Treble/Bass clef | - |
Piano 1+2/3 (2 staffs) | Treble/Bass clef | - |
Piano 1+2/3+4 (2 staffs) | Treble/Bass clef | - |
Piccolo | Treble clef | −1 octave |
Soprano Sax | Treble clef | Bb (+2) |
Tenor Sax | Treble clef | Bb (+14) |
Trumpet in A | Treble clef | A (+3) |
Trumpet in Bb | Treble clef | Bb (+2) |
Viola | Alto clef | - |
Violoncello | Bass clef | - |
# Drums | Percussion Clef | Mapped |
Getting to Know the Staff Style Window
The main elements of the Staff Style window are as follows:
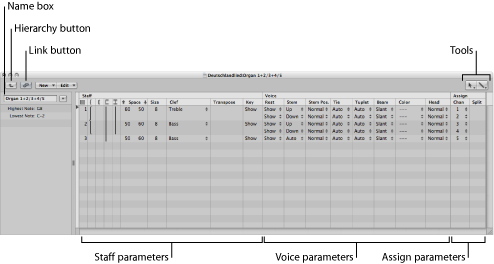
- Link button: If the Link button is activated while the Staff Style window is open, you always see the parameters of the currently selected MIDI region’s staff style. If you switch to a different MIDI region, the Staff Style window reflects the new selection.
- Hierarchy button: Click to switch the Staff Style window between Single staff style view and List views. (The latter shows a list of all available staff styles.)
- Tools: Contains the Pointer tool, the Pencil tool (for creating new staffs and voices), and the Eraser tool (for deleting staff styles, staffs, or voices).
- Name box: The field shows the name of the selected staff style. Click the arrow button next to it to open a pop-up menu that lists all styles available in the current project. Switch to another staff style by choosing a different entry.
- Staff parameters: The parameters for staffs. Each line below the word Staff represents one staff in the score display.
- Voice parameters: The parameters for independent voices. Each line below the word Voice represents one independent voice. The term voice only relates to the simultaneous display of rhythmically independent, polyphonic passages in the music—not the number of notes that can be displayed simultaneously. One voice can consist of as many simultaneous notes (chords) as you like. Only notes that should be displayed as rhythmically independent (of the other notes in the same staff) need to be assigned to separate voices.
- Assign parameters: The parameters for the assignment of notes to the different voices. Every staff can contain several independent voices (up to 16), but one voice cannot be displayed across different staffs. Therefore, a staff style must contain at least as many voices as staffs.
Choose Layout > Staff Styles (or use the Open Staff Style Window key command).
The Staff Style window features the Single staff style view shown above, and List view. List view is mainly intended for copying staff styles between projects, or for deleting styles.
Double-click in the empty space below the parameters to switch to List view.
Another double-click on one of the listed staff styles switches to the Single view of that particular style.
Click the Hierarchy button to the left of the menu line.
Creating Staff Styles
You can create new staff styles, and edit, delete, and duplicate existing staff styles in the Staff Style window.
A staff style includes the following editable parameters:
Number of staffs (for the display of one MIDI region)
For polyphonic, multiple staff styles: Configuration of brackets and bar lines that connect the staffs
For every staff: Staff size, distance to the next (higher and lower) staffs, number of independent (polyphonic) voices in the staff, clef, display transposition, key signature on/off
For every independent (polyphonic) voice: Automatic rest display on/off, stem direction of notes, tie direction, direction of N-tuplet brackets and numbers, beaming
MIDI channel assignment for the voice, or definition of a split point pitch, for separation of the different voices, note color, number of staffs used to display a MIDI region (usually one, but two when using the Piano styles, and three when using the Organ styles), the clefs, and display transposition
In Single view, you can create a new staff style by choosing New > Single Staff Style or New > Dual Staff Style. The parameters of styles created this way are very basic, and need to be edited to meet your requirements, in most cases. For details, see Changing Staff Style Parameters.
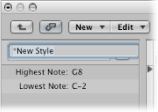
The default name of styles created in this fashion is *New Style. Double-click the name box to open a text entry field, in which you can enter a new name.
Creating Staff Styles Based on Existing Ones
You’ll often need a new staff style that is almost identical to an existing one. In this situation, make a copy of the existing style, and edit the copy.
Choose New > Duplicate Style in the Staff Style window’s Single view.
Click the arrow button next to the Staff Style window’s Name box, then choose ****DUPLICATE!**** from the pop-up menu.
You can also copy the current staff style and assign it to a selected MIDI region at the same time.
Select a MIDI region in the Score Editor.
Click the Style parameter in the Display Parameter box, and choose ****DUPLICATE!**** from the pop-up menu.
Any of these methods results in a new style, named after the staff style it is derived from, with “*copied” appended to its name. This text can be edited in the name box of the Staff Style window.
Adding Staffs to a Staff Style
You can add a staff to your staff style. This allows you to create a two-staff piano style from a single staff style, for example.
Each staff is represented by a number in the first column. These numbers are assigned automatically, and cannot be changed.
Determine the staff insert position by clicking in the narrow column to the left of the staff numbers in the Staff Style window, then choose New > Insert Staff.
The new line is inserted at the insert mark (>) position.
Adding Voices to a Staff Style
You need polyphonic staff styles (staff styles with independent voices) to display rhythmically different melodic lines in the same staff (typical for choirs). Theoretically, you can create up to 16 independent voices in a staff style.
Choose New > Insert Voice.
The newly inserted voice inherits the parameters of the voice above it. These can be freely edited. The staff field in the first column remains empty.
The new voice is inserted at the insert mark (>) position, set with a click in the narrow column to the left of the staff numbers. (This is important if you want to insert a new voice between existing voices.)
The default project contains a number of polyphonic staff styles for piano (Piano 1+2/3+4, for example) and church organ (Organ 1+2/3+4/5, with three staffs, for example).
Copying Voices or Staffs into Other Staff Styles
You can copy one (or several) voices and staffs, inclusive of their parameters, into other staff styles.
Select the voices or staffs you want to copy, by dragging vertically in the margin column to the left of the staff numbers.
The selection is indicated by a dark gray vertical beam.
Choose Edit > Copy (or use the corresponding key command, default assignment: Command-C).
Switch to the target staff style that you want to paste these voices into. (This also works between different projects.)
Set the insert mark, then choose Edit > Paste (or use the corresponding key command, default assignment: Command-V).
Note: If a voice is selected in the destination staff style (indicated by a black beam in the left column), it is replaced by the pasted voices.
Copying Staff Styles Between Projects
At some point, you’ll probably want to use staff styles that already exist in another project.
Do one of the following:
Choose File > Project Settings > Import Project Settings (or use the corresponding key command).
Click the Settings button in the Arrange toolbar, then choose Import Settings.
Click the Browser tab in the Media area.
Navigate to and select the appropriate project file.
Click the Import button.
Note: If accessing the settings from the Browser tab, you also need to click the Import Settings button, which appears after you click the Import button.
In the Import Settings window, select the Staff Styles checkbox (and deselect all other settings that you don’t want to import).
Click the Import button.
All staff styles from the other project are imported into the current one.
In the project that contains the staff styles you want to copy, open the Staff Style window. (Single view is displayed.)
Double-click in the space below the staff style parameters to display a listing of all staff styles.
Select the staff styles you want to copy.
Choose Edit > Copy (or use the corresponding key command, default assignment: Command-C).
Open the Staff Style window in the target project.
Choose Edit > Paste (or use the corresponding key command, default assignment: Command-V).
Note: If you copy a MIDI region from one project to another, and the staff style used by the original MIDI region doesn’t exist in the target project file, it is automatically copied, along with the MIDI region.
Deleting Voices or Staffs from a Staff Style
To delete voices or staffs from a staff style, select them and press Delete, or choose Edit > Delete.
Deleting Staff Styles
You can delete staff styles in both Single view and List view. The latter allows you to select, and delete, several staff styles simultaneously.
Choose New > Delete Style.
Shift-click the staff styles you want to remove, then choose Edit > Delete (or press the Delete key).
Tip: In List view, you can use the Edit > Select Unused command, to select all staff styles that are currently not assigned to any regions or track instruments in the project.
Changing Staff Style Parameters
Once you have created or imported a staff style and set the number of voices and staffs, you can edit the following parameters in the Staff Style window.
Double-clicking in the name box to the left of the Staff and Voice columns allows you to enter a new staff style name.
Notes that fall outside the key range (defined to the left of the Staff Style window) are not displayed in the Score Editor. This allows you to hide notes that are used for key-switching duties (for example, VSL sample libraries loaded into the EXS24 mkII).
You can only edit this parameter in styles with multiple staffs: it lets you determine which staffs are bracketed (two bracket types are available) or connected by bar lines (only at the beginning of each staff line, or at every bar line). Drag in the corresponding column until you see the appropriate display for any of these connections.
If a staff style consists of more than two staffs, the brackets and bar lines can be set to connect only certain parts of the overall staff style—they can be interrupted in between staffs. If you want to delete any connections, grab the symbol at its end (bottom), and drag it up, until it disappears.
These values determine the distance to the next (higher and lower) staff, or the page margins, for the top and bottom staffs in a full score.
The first value increases or decreases the space above staffs, and the second value, the space below staffs.
This parameter is helpful when you need to create additional space above or below a staff, allowing symbols to be inserted between staffs.
You can also change the vertical distance above the staff directly in the score, by dragging the staff up or down (at the clef).
The distance below the staff can also be edited in the score, but only for the bottom staff in the score display, or if one staff is displayed. You drag the bottom line of the score display with the mouse.
These editing procedures change the settings of the corresponding staff style. All regions that use the same staff style are affected.
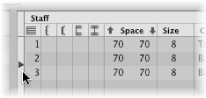
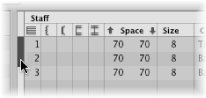
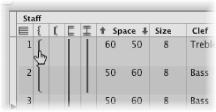
Use this parameter to determine the size of the staff, and the notes and symbols (including slurs and ties) it contains.
There are 16 sizes available (0–15). Here are some size recommendations:
For regular instrument parts and lead sheets, use size 7 or 8.
The staff size you should use in full scores depends on the number of staffs in the score, and the size and format of the paper being used. When using A4 or US letter paper: full orchestra: 2, big band: 3, wind quintet: 4.
Note: The size of all staffs in a score set can also be affected by the Scale parameter in the Score Set window. (See Using Score Sets to Create Scores and Parts.) This makes it possible to use the same sizes for both the whole score, and parts of a piece.
You can choose the clef to be used in the staff style from a pop-up menu. This pop-up menu offers some special options, in addition to the usual clefs:
- Drum.0 to Drum.8: Staffs with 0 to 8 lines and a neutral percussion clef. The relationship of MIDI note pitches to the top line of all staffs corresponds to the top line in a regular bass clef (A2). No accidentals are displayed in these drum staffs. Drum.0 also omits any ledger lines. These clefs are often used in mapped drum styles, where the vertical position of a note on the staff doesn’t correspond to pitch, but is determined by different drum map parameters. See Using Drum Notation with Mapped Staff Styles for more information on mapped drum styles.
- no clef.0 to no clef.8: Is like the Drum.0 to Drum.8 staffs, but without a clef.
- TAB Guitar and TAB Bass: Twelve different options for displaying notes as guitar or bass tablature. Tablature tuning sets are defined and edited in the Tablature window (Layout > Guitar Tablature).
The display transposition, measured in half steps up or down. This parameter does not affect MIDI playback. If a staff contains chord symbols, these are also transposed accordingly. If the Automatic Key Transposition project setting, in the Clefs & Signatures pane, is activated (which is the default), key signatures are also transposed (with one exception—see “Key,” next).
If this parameter is set to Hide, the corresponding staff is displayed without a key signature. All sharps and flats are indicated directly beside notes. This parameter is usually set to show the key signature. The Hide option is mainly used for transposed French horn parts, which are sometimes written without a key signature.
Note: The Automatic Key Transposition project setting affects the whole project, but still indicates the nontransposed basic key signature. Hide Key suppresses any key signature display.
The automatic rest display can be turned off (Hide), or set to display beat slashes (slash) instead of rests. This is useful for rhythm section parts, and improvised solos. In this situation, the number of slashes per bar is determined by the nominator in the time signature (4 slashes in 4/4-time, 6 slashes in 6/8-time, and so on). Inserted notes and symbols are still displayed, but automatic rests are shown only if shorter than one beat. You can insert user rests manually, to replace individual beat slashes, if needed.
This controls the direction of stems. The default setting is Auto. Up or Down forces all stems, regardless of pitch, in the corresponding direction. Hide makes all stems (and beams and flags) invisible.
Determines the vertical direction of automatically displayed ties. The default setting is Auto. Up or Down forces all ties in the corresponding direction.
Controls the direction of N-tuplet brackets and numbers. The default setting is Auto. Up or Down forces all N-tuplet brackets and numbers in the corresponding direction. Hide prevents the automatic display of triplet brackets and numbers. In this situation, the numbers are still displayed in brackets on the screen, to allow edits to these triplets. These bracketed numbers do not appear, however, on the printout.
If you set this parameter to Hide, you can still make particular triplets visible: Double-click the bracketed number (3) to open a tuplet dialog. If you close this dialog by clicking OK, you convert the automatically displayed triplet to a forced triplet, which is displayed in accordance with the parameters set in the dialog.
Controls the appearance of beams. The default Slant setting allows slanted beams. Horiz. only allows horizontal beams. Vocal prevents the display of beams, as is typical in classical vocal parts, where notes are only displayed with flags.
Sets the color of the voice’s notes. The color options are Black (“---”), Pitch, Velocity, and the 16 colors of the user palette. (See Color Settings.)
These settings only affect regions if the View > Colors > Normal item is chosen in the Score Editor (default setting).
Controls the appearance of note heads. You can choose to display note heads as normal, show note names or finger names, or hide the note heads completely.
The Chan and Split parameters of the Staff Style window are covered in detail in Assigning Notes to Voices and Staffs.
Assigning Notes to Voices and Staffs
You can use two different methods to assign notes to voices and staffs: define a fixed split point, or use MIDI channels for each voice of a staff.
Using a Split Point
You can use a fixed split point to assign notes to voices. This is a defined pitch, which determines the absolute border between two voices. Notes above it, or at the same pitch, are assigned to the upper voice. Notes below it are assigned to the lower voice. Quite often, in real-life situations, the border between voices needs to be flexible. A piano piece’s right-hand part may dip below middle C (the defined split point), or the left hand may go above. It’s not possible to notate this properly using a fixed split point, but you can use this feature to create an “almost right” version.
In the Staff Style window’s Split column, choose a note pitch.
Using MIDI Channels
You can use MIDI channels (Chan) to assign notes to voices. Every note belongs to the voice that “owns” its MIDI channel. The different MIDI channels have no impact on MIDI playback, as the playback channel is determined by the Track Parameter box setting (in the Arrange window). Given the use of MIDI channels for voice assignment, notes that aren’t assigned to channels are not displayed at all. This can, however, be used to your advantage, as it allows you to exclude certain notes from the display (improvised parts, trill notes, and so on).
In the Staff Style window’s Chan column, assign a MIDI channel to each voice.
When you use MIDI channels to assign notes to staffs or voices:
You can edit the MIDI channel in the same way you do all other events: by selecting the events and changing the MIDI channel in the Event Parameter box or the Event List.
You can quickly change the MIDI channel of selected note events with the Event Channel +1 and Event Channel −1 key commands. These can be especially useful when used in combination with the Select Next Region/Event, or Set Marquee End to Next Transient key command and the Select Previous Region/Event, or set Marquee End to Previous Transient key command, which allow you to move the selection from note to note.
In addition, you can also use Score Editor functions designed to speed up the process of changing the MIDI channel settings of notes, in order to assign them to the specific voices. These include the Auto Split preference and the Voice Separation tool.
Splitting MIDI Channels Automatically
If you record polyphonic voices as separate passes in real time, you can set your keyboard or MIDI controller to the appropriate MIDI channel for each voice. This saves you from editing the channels after the fact. The same applies to step input.
Alternately, you can automatically split MIDI notes using the “Auto split notes in multi staff chord styles” Score preference.
If this preference is turned on, and the default staff style in the selected Track Parameter box is a polyphonic style, all played notes are automatically assigned MIDI channels that match the staff style’s voice assignments. Notes at, and above, the split point are assigned the channel of the first voice. Notes below are assigned the second voice’s channel. (This feature only works for two voices at a time.) This creates a rough, but usable, voice assignment, which can be edited later.
Select the region.
Choose Functions > Note Events > Assign Channels based on Score Split (or use the corresponding key command).
The region’s notes are assigned to voices in the staff style, according to the Auto Split pitch in the Score preferences.
Using the Voice Separation Tool
The Voice Separation tool allows you to draw a separation line between notes on a staff, thereby assigning them to the MIDI channels of the voices. MIDI channels have to be predefined for each of the voices that you want to separate. This is because Logic Pro needs to know which MIDI channels are assigned to each note.

Select the Voice Separation tool.
Draw a line (between notes) where you want to separate the voices.
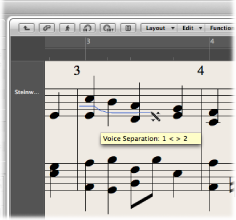
Notes below the line are moved to the MIDI channel below their current assignment.
If you make a mistake, move the mouse back slightly to the left.
The separation line is erased to the right of the tool, allowing you to try again.
Staff Style Examples
The following sections illustrate how you can use the staff style features to meet specific notation needs.
Creating a Staff Style for Two Independent Voices
If there are two independent voices throughout the piece, the parameters might be set as follows: stem, tie, and N-tuplet direction are set to Up for the top voice and Down for the bottom voice. Note that even with these general parameters, note attributes can be changed for each note. (SeeUsing Note Attributes to Change Individual Notes.) Both voices are displayed with automatically displayed rests (Rest parameter: Show).
Creating a Single Staff Style with Optional Polyphony
Sometimes you need to add a second voice to a staff that usually only requires one voice, in order to properly notate a short, rhythmically independent passage. This is not uncommon with orchestral scores, in which the unison part for a group of instruments is temporarily separated from the other parts.
One solution is to use a staff style with a main voice and a secondary voice. The parameters for the main voice should be set as you would a nonpolyphonic style. The secondary voice is set to channel 16, and is displayed without automatic rests:
The stem, tie, and tuplet directions for the main voice are set to Auto, which is necessary for the proper notation of unison parts. No MIDI channel is defined for the main voice, so all notes with a channel other than 16 are assigned to the main voice. As long as no notes or rests with MIDI channel 16 are used, the score display looks the same as with a simple, nonpolyphonic staff style.
For the second voice, the stem, tie, and tuplet direction parameters are set to Down, and the automatic rest display is turned off (Hide). Only MIDI channel 16 note events are assigned to this voice.
The following additional steps are necessary to improve the score’s appearance:
Rests in the second voice need to be inserted manually where needed. The MIDI channel of inserted rests must match the second voice’s channel (16, in this case). You can edit this in the Event List.
In the polyphonic passages, the stems of the main voice need to be forced upward by selecting the corresponding notes, and changing their individual stem parameters. SeeUsing Note Attributes to Change Individual Notes.
An advantage of this approach is that you don’t need to worry about MIDI channels during recording or input, and notes won’t disappear unintentionally. There is, however, the disadvantage that the Voice Separation tool cannot be used to assign notes to voices.
Other applications for this method would include the display of beamed grace notes, occasional polyphony in a guitar part, or the indication of rhythmic accents above or below beat slashes in rhythm section parts.
Don’t forget that you can add further voices to a staff, to display more complex parts (up to 16).
Using Mouse Input in Polyphonic Staff Styles
Mouse input into polyphonic staff styles is very easy, if you turn on View > Explode Polyphony (also available as a key command). This forces all voices to be displayed on separate staffs, regardless of staff style settings. (The other voice parameters remain valid.)
If you insert a note into a staff style that uses MIDI channels for voice separation, it is automatically assigned the corresponding MIDI channel (of the staff that you add the note to). Following input, turn off the Explode Polyphony setting. All voices are displayed correctly in one staff, as per the staff style settings.
You can, of course, also insert notes directly into polyphonic staffs without turning on the Explode Polyphony setting. In this situation, inserted notes are assigned the MIDI channel set in the Insert Defaults of the Event Parameter box (but only if that particular channel is used by one of the voices in the staff).
Changing the Staff Assignment of Symbols
There is a Staff parameter in the Event Parameter box for most symbols inserted into multiple staff styles. This parameter determines which staff the symbol belongs to.
Cross Staff Beaming
Music for keyboard instruments or harp (which is notated in two staffs) sometimes contains passages where notes in the upper and lower staff (played by the left and right hand) are connected with a beam, to emphasize the continuing musical phrase.

In the Score Editor, notes can only be connected with beams if they belong to the same voice. Notes that belong to the same voice, however, are displayed in the same staff. You need to use the Score Editor’s Staff Assignment commands to display the same voice notes in separate staffs.
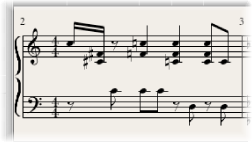
For example, the following screenshot depicts a piano passage, displayed in the Piano staff style. The notes in the upper staff belong to voice one, using MIDI channel one. The notes in the lower staff belong to voice two, using MIDI channel two. Imagine that you want to connect the eight notes in the first bar with beams, to emphasize the continuing musical phrase.
Change the voice assignments for the notes that you want to connect with beams (in the lower staff) by doing one of the following:
Draw a line below these notes with the Voice Separation tool.
Select all notes, and change their MIDI channel to match that of the upper voice (in the Event Parameter box).
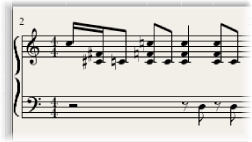
All notes are displayed in the upper staff, probably accompanied by a lot of ledger lines.
Select the notes that you want to define a beaming connection for, then choose Attributes > Beaming > Beam Selected (or use the corresponding key command).
Select the notes that you want displayed in the bottom staff, and choose Attributes > Voice/Staff Assignment > Staff below Voice (or the corresponding key command).
All selected notes are moved down to the lower staff, although they still remain part of the upper voice.
You can also use the reverse approach, first assigning all notes to the lower voice, then moving some notes to the upper staff with Attributes > Voice/Staff Assignment > Staff Above Voice.
To display all selected notes in their original staff, use Attributes > Voice/Staff Assignment > Default Staff.
Note: As always, rests are displayed automatically in Logic Pro, as per the Rest settings in the staff style. Given the cross staff beaming situation described above, however, most (or all) notes belong to the voice of the top staff, and the lower staff will contain rests—some even at positions occupied by notes. To avoid this potential issue, use a staff style where the automatic rest display is deactivated for the bottom staff’s voice. Wherever rest display is desired, insert it or them from the Part box, with the mouse.
Using Drum Notation with Mapped Staff Styles
In MIDI regions that are assigned to drum instruments, each MIDI note usually triggers a different sound. If such MIDI regions are displayed with a regular staff style, you see notes with no apparent relationships to the sounds represented by them.
If you want to notate these musically meaningless pitches as a readable drum part—which uses special percussion note heads—you should use mapped instruments and mapped staff styles.
Mapped staff styles allow you to assign individual voices to drum groups. Drum groups use specific drum notation head shapes to display note events. You can define the respective drum note head shapes in a Mapped Instrument window.
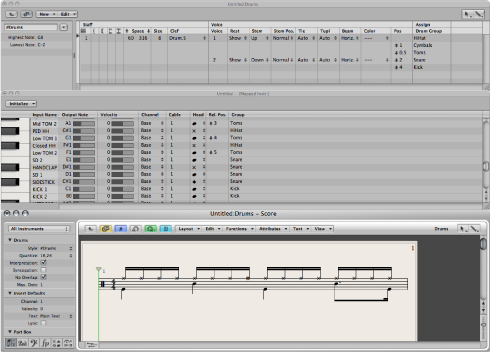
The best way to create drum notation for an existing MIDI region is to open the Score Editor (to display the MIDI region), the Mapped Instrument window, and the Staff Style window. This way, you can directly see how parameter changes affect the score display.
Prior to defining the details of a mapped staff style, you should set up all drum groups, note head shapes, and relative note position parameters in the Mapped Instrument window.
Create a mapped instrument in the Environment, then double-click its icon. For details about creating mapped instruments, see Mapped Instrument Objects.
The Mapped Instrument window opens. Its default settings correspond to the General MIDI drum note assignments, but they can be edited.
In the columns to the far right are three parameters relevant to notation.
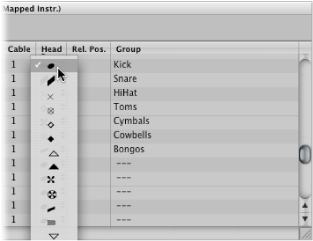
In the Head menu, choose the shape of the note head for notes triggered by this particular pitch.
A note must be assigned to a drum group to be displayed in a mapped staff style. If it’s not, it won’t be visible.
Choose a drum group in the Group menu.
A number of groups are predefined for the most commonly used drum sounds (Kick, Snare, Hi-Hat, Toms, Cymbals, and so on).
Note: If you want to define a new drum group for another instrument sound (such as tambourine), choose New Group from the pop-up menu, and double-click the entry to name the new drum group.
Set the Rel. Pos. (relative position) parameter.
The Rel. Pos. parameter assigns the note to a line in the staff. The note position is relative to the top line of the staff. Integer values make the note fall on a line; fractional values result in a note position between two lines.
Note: Positions can also be influenced in the Staff Style window, but this affects all notes of a particular drum group.
These options allow you to have two different MIDI notes (different bass drum sounds, for example) displayed in the same way in the score, or on the same line, but with different note heads.
Create a new mapped staff style by choosing New > Mapped Style in the Staff Style window, and inserting all staffs, voices, and drum groups as described above, and in Working with Staff Styles.
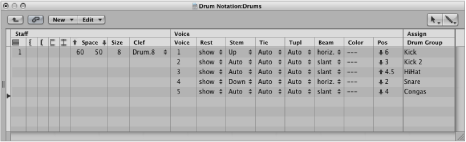
- Staff section: Everything is identical to nonmapped staff styles (with the exception of the missing Transpose and Key parameters, which wouldn’t make sense here).
- Voice section: Below Voice (in the top header line), is a separate Voice column, where the different voices are numbered automatically. The staff style shown above contains one staff with five independent voices.
- Horizontal lines: Display the Staffs-Voices-Drum Groups hierarchy, indicating the borders between these elements. Each drum group belongs to the voice at the same horizontal position.
- Pos parameter: Affects the vertical positioning of all notes in the corresponding drum group. The value shown here is an offset that is added to, or subtracted from, the relative positions (if defined for individual notes in the Mapped Instrument window).
Mapped staff style names are preceded by the # character in the Staff Styles window.
If you are using several MIDI instruments with different drum assignments, you can create a separate drum map (in the Mapped Instrument window) for each instrument. The list of drum groups, however, is the same for all instruments in a project. This allows you to display different drum tracks with the same mapped staff style. All snare drums, for example, will be displayed in the same way.
Create additional drum groups (Kick2, Snare2, and so on).
Create a second mapped staff style to display these drum groups.