Working with Standard Text
You can use standard text objects in the Part box to add standard text. The basic functions for moving the pointer, deleting parts of the text, and so on, are the same as they are for most word-processing applications.
Inserting Text
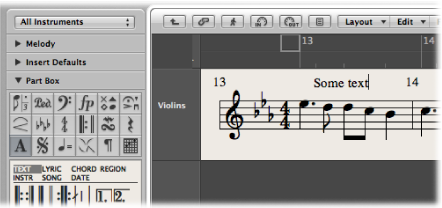
You can add text in the same way as you add other score symbols: by dragging the object from the Part box to the score. Alternately, you can use the Text tool to enter text.

Select a text object in the Part box.
Do one of the following:
Drag the text object to the desired position.
Select the Text tool (or use the Set Text Tool key command), then click the position where you want the text to appear.
An insertion point appears at the target position. (If you choose one of the automatic text objects, the respective text is inserted automatically.)
Enter text with the computer keyboard.
As long as you are in text entry mode (indicated by the blinking insertion point), you can click any position in the text field. You can select parts of the text by dragging the mouse in the text field, and apply the usual Cut, Copy, or Paste commands. Press Return, or click anywhere outside the text field, to exit text entry mode.
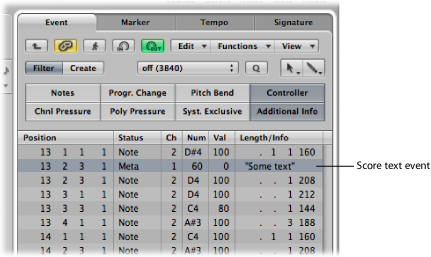
Each text object (except text in the header, or at or outside of the page margins) is saved as a meta event within a particular MIDI region, at a certain bar position. This position can be seen in the help tag as you insert the text object. Text events are also visible in the Event List, allowing you to change their position, but not the text itself.
Tip: You can simultaneously add text to several staffs. This is handy if you want to insert the text “accelerando al fine,” for example, into all instruments. You can enter text into several staffs at once just as you can other objects. (See Simultaneous Input of Objects into Several Regions.)
Editing Text
In general, you edit text objects in the same way as other objects (see General Editing in the Score Editor). If a text object is selected, you can set its parameters in the Event Parameter box. If you want to edit the text itself, either click it with the Text tool, or double-click it with the Pointer tool. The blinking insertion point appears.
Choose Text > Fonts, then choose settings in the Fonts window.
Setting Special Text Object Parameters
You can set the following options for the selected text object in the Event Parameter box:
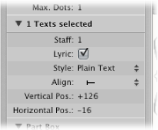
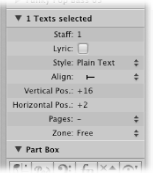
- Staff number value: Only relevant in multiple staff styles. It determines the staff that the text object is assigned to. The Vertical Pos. parameter indicates the vertical distance to the top line of the staff. The Horizontal Pos. indicates the graphical horizontal deviation of the selected text object from its actual bar position (also in relation to the Align parameter).
Using Musical Symbol Fonts
Musical symbol fonts do not contain letters. They only contain musical symbols (such as special percussion symbols). You can use text objects (set to a musical symbol font) to freely create, and position, musical symbols anywhere in the score.
Learning About Text Styles
All text elements refer to user-definable format settings called text styles. A text style contains all text attributes, such as font, size, and style, which saves you the time and effort of manually setting them whenever you insert a new text object.
About the Text Styles Window
All text styles used in a project are listed in the Text Styles window. This window allows you to edit existing text styles, or create new ones.
Choose Text > Text Styles in the Score Editor.
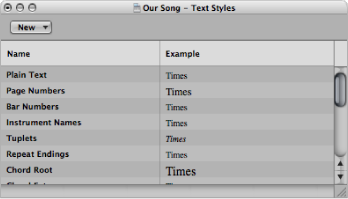
The first 15 lines contain the default text styles, which exist in every project (but can be edited, according to your needs). Below these are user-created text styles. User text styles are saved with the project file, allowing them to be different for each project.
Each line shows the name, and an example, of the text style. Double-clicking the Example line opens the Font window, allowing you to edit both the default and user text styles. Any fonts installed on your system can be used.
About the Default Text Styles
The default text styles have been designed for specific text elements, and are automatically assigned when inserted.
- Plain Text: This is the default setting for regular text.
- Page Numbers, Bar Numbers, Instrument Names: The text styles for automatic page and bar numbering, and display of instrument names (see Numbers & Names Settings). These styles can also be edited in the Numbers & Names pane of the Score project settings (File > Project Settings > Score). Changes in either window automatically update the settings in the other window, and affect the entire project.
- Tuplets: This text style is used for triplet and other tuplet numbers.
- Repeat Endings: The text style for anything written into the repeat ending boxes (usually just numbers, but text can also be entered).
- Chord Root, Chord Extension: Used for the display of chord symbols. The Root covers the root and (optional) extra bass note in chord symbols. The Chord Extension is used for everything else.
- Multiple Rests: The text style for the number above multiple rests.
- Tablature: Used for the display of fret numbers in guitar tablature. (See Tablature Settings.)
- Tempo Symbols: Used for the display of numbers in tempo symbols. (See Tempo and Swing Symbols in the Part Box.)
- Octave Symbols: Used for the display of octave symbols. (See Clefs & Signatures Settings.)
- Note Heads: Used for the display of note heads.
- Guitar Grid Fingerings: Used for the display of guitar grid markings.
- Guitar Markings: Used for the display of guitar markings.
- Fingerings: Used for the display of fingering markings.
Working with Text Styles
You can create, assign, and import text styles.
Choose New > New Text Style in the Text Styles window.
A new line appears below the bottom text style entry, allowing you to define the attributes of the new text style. The names of any new style can be edited in the text entry field, which opens when you double-click the name of the text style.
Select the text object.
Choose a text style from the Style pop-up menu in the Event Parameter box.
Do one of the following:
Choose File > Project Settings > Import Project Settings (or use the corresponding key command, default assignment: Option-Command-I).
Click the Settings button in the Arrange toolbar, then choose Import Project Settings.
Click the Browser tab in the Media area.
Navigate to, and select, the required project file.
Click the Import button.
Note: If accessing the settings from the Browser tab, you will also need to click the Import Project Settings button, which appears after you click the Import button.
In the Import Settings window, select the Text Styles checkbox.
Click the Import button.
Text style settings are imported into the active project.
Working with Global Text
Global text objects appear in all score sets of a project (score, parts, and so on), although they are inserted just once.
Score sets determine which instrument tracks are included in the score display. Each project can contain as many score sets as required. Full details on score sets can be found in Using Score Sets to Create Scores and Parts.
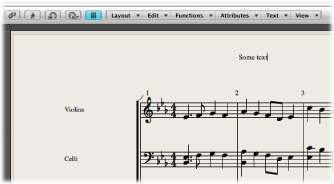
The position of global text does not relate to bar positions (unlike regular text objects), but is defined as a graphic position on the page. Given this behavior, global text can only be inserted and seen in Page Score view. The most obvious example of a global text object is a song name (in the page header).
Insert text into one of the following areas of the page:
In the header space (set in Layout > Global Format).
Outside, or directly on, any of the page margin lines.
Text objects inserted in one of these areas are automatically made global.
After being inserted into one of the margin areas, global text can be moved anywhere on the page.
Use the Layout tool to move global text objects both vertically and horizontally.
Use the Pointer tool to move global text objects vertically.
Hold down the Shift key, then use the Pointer tool to move global text objects both vertically and horizontally.
When a global text object is selected, the Event Parameter box contains some additional parameters: