Connecting Your Audio and MIDI Devices
You need to connect your external audio and MIDI devices to your computer to allow communication between Logic Pro and the devices. The following sections introduce you to Mac expansion capabilities, audio and MIDI cabling, and other things you should consider when connecting audio and MIDI interfaces to your system.
Computer Expansions
Depending on your Mac system, some or all of the following expansion capabilities are available, which can be used for audio and MIDI interfaces:
FireWire (IEEE 1394)
USB
PCI Express
ExpressCard/34
Note: Data transfer rates discussed in the following sections are theoretical maximums. In real-world use, this will be reduced due to system overheads. In general, protocols with faster theoretical maximums will deliver data more quickly than slower protocols.
FireWire (IEEE 1394)
FireWire is a professional and consumer standard that can be used for both audio and MIDI devices, as well as hard disks and other peripherals. It combines fast data transfer rates, high storage capacities, and plug-and-play connection. All current Mac computers offer FireWire connectors, and a number of FireWire audio and MIDI interfaces are available.
FireWire 400, also called IEEE 1394a or i.LINK, is the consumer and professional standard for formats such as DV, DVCAM, DVCPRO, DVCPRO 50, DVCPRO HD, and HDV. FireWire is an inexpensive and easy way to capture and output high-quality digital video using a variety of camcorders and decks and is capable of data rates as high as 400 Mbps. Standard FireWire cables can be up to 4.5 meters long.
There are two kinds of FireWire connectors: a 4-pin connector (typically found on video equipment such as camcorders or decks) and a 6-pin connector (used for computer equipment). However, some newer video equipment uses the 6-pin connector, and some video interfaces use the 4-pin connector. See your equipment’s documentation for more information.

FireWire 800, also called IEEE 1394b, is the next generation of FireWire after IEEE 1394a, a higher-bandwidth version capable of data transfer speeds of up to 800 Mbps. FireWire 800 is also capable of supporting cable distances of up to 100 meters.
In addition to the standard 9-pin-to-9-pin FireWire 800 cables, 9-pin-to-4-pin and 9-pin-to-6-pin FireWire 400 to FireWire 800 cables are also available to connect older devices to a FireWire 800 interface.
Note: FireWire 800 is commonly used to connect hard disks and other data peripherals to your computer, but this connector is rarely used to connect video devices.
USB (Universal Serial Bus)
USB is a consumer standard used for computer peripherals and other devices. USB 1.1 offers a much lower data transfer rate than FireWire (11 Mbps). USB 2.0, however, transfers data at 480 Mbps. It supports plug-and-play operation and the ability to connect several devices in sequence (daisy-chaining). Some USB devices draw their power over the USB cable, while others require a separate power connection. USB 2.0 ports are included on all current Mac computers.
There are two kinds of USB connectors:
A connector, typically used to connect a device to a USB hub
B connector, typically used to connect devices together, and also to connect a device to a computer
Note: USB audio interfaces should always be directly connected to your computer, not via a hub or to the computer’s display, keyboard, or another peripheral.
PCI Express
PCIe (Peripheral Component Interconnect Express) interfaces, unlike FireWire and USB interfaces, require that you install a dedicated card in your computer. PCIe provides extremely high bandwidth and fast data transfer rates, allowing you to record and play back large numbers of files at the highest possible sample rates and bit depths.
Audio Cabling
The following types of audio cables and connectors are usually used on professional and consumer audio equipment:
XLR
1/4-inch (6.35 mm) audio
1/8-inch (3.5 mm) miniplug
RCA (Cinch)
S/PDIF
AES/EBU
TOSLINK Optical and ADAT Lightpipe
XLR
XLR cables and connectors are used on professional-quality microphones, monitors, and other musical equipment. They provide a high-quality, balanced signal at +4 dB level.
1/4-inch (6.35 mm) Audio
1/4-inch (6.35 mm) connectors (sometimes called phono or phone plugs) are used on a wide variety of professional and consumer musical equipment, including musical instruments and amplifiers, speakers, and external effects devices. They can be either balanced or unbalanced. Some devices require Tip-Ring-Sleeve (TRS) connectors. These three-contact connectors are used for balanced mono signals and unbalanced stereo signals.

1/8-inch (3.5 mm) Miniplug
Miniplug connectors are used for audio input and output to computers, and on some consumer electronic devices, particularly portable ones.
RCA (Cinch)
RCA connectors are used on consumer audio equipment such as home stereo systems and videocassette recorders.
S/PDIF
Sony/Philips Digital Interface Format is a consumer-level variation of the AES/EBU digital audio protocol. S/PDIF audio data can be transmitted several ways, including:
Via coaxial cables with an RCA connector
Via optical TOSLINK
Connectors for S/PDIF signals are found on most consumer digital equipment, such as DAT (digital audio tape) recorders, CD players, DVD players, MiniDisc equipment, and some audio interfaces.
AES/EBU
The AES/EBU (Audio Engineering Society/European Broadcasting Union) standard for transferring digital audio typically uses XLR connectors in professional studio environments. The data protocol is essentially identical to S/PDIF.
TOSLINK Optical and ADAT Lightpipe
TOSLINK is a connector for optical digital signals. TOSLINK is used for several digital signal formats, although most devices support only one of these formats:
S/PDIF (stereo digital)
AC-3 and DTS (5.1-channel surround)
ADAT Lightpipe (an 8-channel digital signal)
ADAT Lightpipe is an eight-channel digital audio format developed by Alesis. This signal format uses TOSLINK optical connectors. Eight channels are supported at sample rates of 44.1 and 48 kHz using 24 bits per sample.
Connecting Your Audio Interface
Logic Pro supports plug-and-play for audio interfaces, making it possible to connect and turn on a new audio interface while Logic Pro is running. An alert appears when you connect a new device, and prompts you to select and confirm the audio interface and driver that you want to use.
All digital audio interfaces can be susceptible to latency—a noticeable delay between the time the audio signal is produced, and when you hear it. You should always attach your audio interface directly to the computer, rather than through a hub, or daisy-chaining it through another device. Doing so can cause an unacceptable amount of latency, particularly with slower USB 1.1 devices.
MIDI Cabling
MIDI is an abbreviation for Musical Instrument Digital Interface—a universal 5-pin connection standard and computer language—that allows communication between MIDI devices.
Connecting Your MIDI Keyboard and Modules
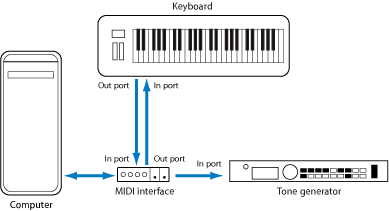
If using a simple MIDI master keyboard without internal tone generation facilities, you only need to connect the MIDI Out port of the keyboard to a MIDI In port on your MIDI interface, using a MIDI cable.

If the keyboard can generate its own sounds, you should also connect the MIDI Out port of the MIDI interface to the keyboard MIDI In port. If your MIDI interface offers more than one MIDI output, connect any other tone generators (or other MIDI devices, such as control surfaces that require bidirectional MIDI communication) to these.
If the MIDI interface connected to your computer only offers one MIDI output, you need to connect the MIDI In of the second tone generator to the keyboard MIDI Thru port. A third device can be connected to the MIDI Thru of the second unit, and so on.
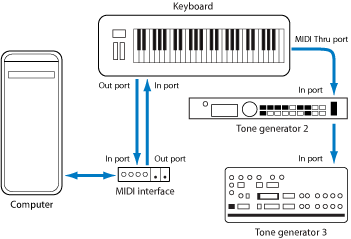
The MIDI Thru port replicates the signals coming into the MIDI In port of the device. It is preferable to use a direct connection from the computer MIDI Out to a device, rather than chaining too many units, one after the other. Doing so can cause timing problems in the chain, if numerous MIDI commands are sent quickly. This is due to the slight delays introduced by each MIDI In to MIDI Thru transaction. As such, a multi input/output MIDI interface is recommended in studios with several MIDI tone generators and controllers.
Using Multichannel MIDI Devices
Most modern MIDI tone generators can simultaneously receive MIDI data on multiple MIDI channels (multitimbral MIDI devices). Each MIDI channel can be assigned a tone or sound, such as piano, strings, bass, and so on.
To take full advantage of the capabilities of each connected multitimbral device, you need to use separate MIDI Out ports (from the computer MIDI interface to the MIDI In ports) for each device. To explain further, imagine a scenario where:
There are four MIDI tone generators that are capable of receiving data on multiple channels.
All devices can receive on all 16 MIDI channels.
There is only one MIDI Out from the computer, and all devices are daisy-chained via MIDI Thru to MIDI In connections.
Logic Pro is capable of channelizing MIDI data (routing it to MIDI channels 1 to 16) and is also capable of sending this channelized data to specific MIDI Out ports. Unfortunately, in the scenario above, there is only one MIDI Out port available.
As such, all data sent on MIDI channel 1 will be sent to all four of the daisy-chained MIDI tone generators. Each MIDI tone generator will play the incoming data with the sound assigned to channel 1, which may be:
Bagpipes on module 1
A drumkit on module 2
A helicopter effect on module 3 and so on
While this would be colorful, it would hardly be musical, unless your tastes lean towards the avant-garde. The same applies to the other 15 MIDI channels.
MIDI, as you can see from the example, can be separated onto 16 different channels, but it can’t be separated between devices, unless a multi-output MIDI interface is used.
Using the scenario above, but substituting a single output MIDI interface with a four-output MIDI interface—connected from MIDI Out ports A, B, C, and D—to the respective MIDI In ports of each device. There are no MIDI Thru connections, which allows Logic Pro to assign and send:
A recording/performance on MIDI channel 1 to port A/module 1
A separate recording/performance—also on MIDI channel 1—to port B/module 2
A further recording/performance on MIDI channel 1 to port C/module 3, and so on with subsequent channels and modules
In effect, having a multi-output MIDI interface is something like having more MIDI channels. In this scenario, it would be like having 64 independent MIDI channels—with 16 channels per port (A, B, C, and D).
Not only does this allow you to play up to 64 different sounds simultaneously through your tone generators, it also allows full MIDI control for each channel of each device. This becomes increasingly important when arranging and orchestrating such a large number of instrument parts.
If your computer offers several MIDI inputs, you can connect the MIDI outputs of other MIDI expanders and controllers to it.
Using USB MIDI Keyboards
If using a MIDI keyboard fitted with a USB connector, you don’t require a separate MIDI interface, as it is already built into the keyboard. Just be sure to install the driver, if needed, and connect the keyboard to your computer with a USB cable. Some modern USB keyboards and controllers are automatically recognized by Mac OS X.
Separating a MIDI Keyboard from Its Sound Generator
If your MIDI keyboard has an internal sound source, it is important that you stop the keyboard from generating sounds directly from its own keyboard.
For example, if you buy a new keyboard that is to be used without a sequencer, and connect it to an amplifier, you would expect the device to make a sound when you press its keys—in other words, the keyboard is directly connected to the sound generator.
When using the MIDI keyboard with Logic Pro, however, this is not desirable. In this situation, the keyboard is used as a computer input device, and Logic Pro passes the incoming performance information back to the keyboard’s sound generator (or to an internal software instrument or another connected sound module, if you like).
If the direct connection between the keyboard and its tone generator isn’t cut, a doubling of each note results—one played directly from the keyboard to the internal tone generator, and another sent through Logic Pro back to the tone generator.
Not only does this cause a phased sound, but it also halves the polyphony of the keyboard’s tone generator. In situations where you want to control or record another sound module or software instrument with your keyboard, you would hear both the keyboard sound (due to the direct keyboard to tone generator connection) and the sound of the software or MIDI instrument. This is why the keyboard must be separated from its own internal sound generator.
This function is known as Local Off, and is set directly on your keyboard. Don’t worry about losing the ability to use the tone generator of your keyboard. Logic Pro will still be able to communicate with your keyboard tone generator just like any other connected, keyboardless sound module or software instrument.
Note: If you cannot find the Local Off function in the MIDI menu of your keyboard, consult its manual on sequencer use. Some keyboards allow you to select from: Local, MIDI, or Both for each of their Parts (individual MIDI channels/sounds in multitimbral MIDI devices). The MIDI setting, if applicable to your keyboard, is the equivalent of Local Off.