Using Hyper Draw in the Arrange Area
Hyper Draw works much like track automation, with a couple of key differences:
Hyper Draw data is restricted to MIDI regions.
Hyper Draw data uses MIDI controller values (rather than the internal meta events used by the track automation system), which are represented as lines between nodes.
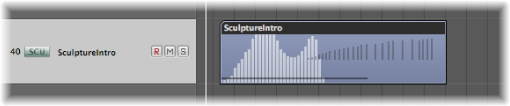
You can edit nodes and lines in a similar way to track automation data.
You can record MIDI controller events in real time on MIDI tracks, or use Hyper Draw to create and edit controller events in the Arrange area, Piano Roll, and Score Editor. The Hyper Editor is purpose-built for MIDI controller editing, providing more precision and flexibility than the Hyper Draw options of other windows.
Numerical MIDI controller values are automatically displayed as Hyper Draw nodes. These values are context-sensitive—the centered pan position is displayed as 0 (not 64), and volume is displayed in dB, for example. If no events exist, Logic Pro automatically creates a horizontal line (of the current value, if available).
You can use any of the 127 MIDI controller values to automate parameters such as volume or pitch, for example.
Choose an event type directly from the View > Hyper Draw menu.
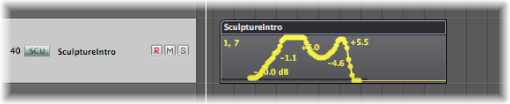
The chosen event type is displayed as a controller number, or by name, in the upper-left corner of the Hyper Draw area. You can choose different Hyper Draw parameters for each MIDI region in the Arrange area, if needed. You can use multiple types of Hyper Draw information for each region.
If activated in the Piano Roll Editor or Score Editor, a gray Hyper Draw section is displayed below the editing area.
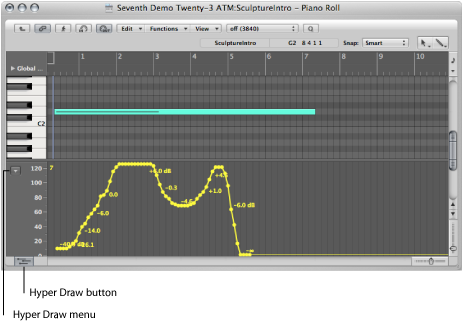
The Piano Roll Editor and Score Editor feature a Hyper Draw button at the lower-left corner. Click this button to open or close the Hyper Draw section. When the gray Hyper Draw area is visible, you can choose the controller type from the menu (Down Arrow) shown to the left of the Hyper Draw scale.
Choose View > Hyper Draw > Off.
Choose a channel number from the View > Hyper Draw > Channel submenu.
The chosen channel number is also displayed alongside the event type.
Choose View > Hyper Draw > Other, and select the number of the controller and the MIDI channel in the Hyper Draw window.
Use this option if you want to use Hyper Draw to edit a controller that isn’t directly available in the Hyper Draw menu.
Using the Autodefine Mode
The Autodefine mode sets the Hyper Draw parameters automatically, making the first event in the region visible.
Autodefine is not limited to switching the Hyper Draw display to the first incoming controller; it can also respond to other types of events. It responds in this order:
Controller
Aftertouch
Pitch Bend
Program Change
Note Velocity
Recording MIDI Automation Data
You can record MIDI automation just like regular MIDI events. Logic Pro must be in record mode to capture this type of automation.
Move any Environment fader to record the fader’s MIDI events to the currently selected track. For more information see Recording and Playback of Fader Movements.
Record events via external MIDI controllers, such as the modulation wheel or filter cutoff control of your MIDI synthesizer.
Editing MIDI Automation Data
As MIDI automation data consists solely of MIDI events, you can edit it just like any other MIDI events, using the Event List, Hyper Editor, or the Transform window.
Using the Note Velocity Mode
Hyper Draw offers the Note Velocity mode, which is perfect for creating crescendos or diminuendos across a range of notes. You can use it at any point in a region (on a note in the Piano Roll window, for example).
Choose View > Hyper Draw > Note Velocity.
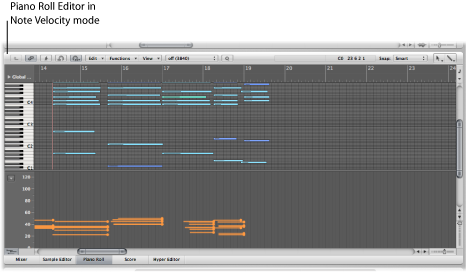
Click and hold until you see the (Start Line) help tag, and release the mouse button. The (End Line) help tag is shown, along with a green line, which can be visually positioned onscreen. Keep an eye on the help tag while moving the line.
Click an end point—both vertical and horizontal—to automatically scale all note velocities, aligned with the inserted line.
Note: Use of this mode only makes sense when the region actually contains notes.
The Note Velocity Line tool works in different modes:
- Absolute: With no modifier key pressed, the velocity of notes is changed to match the values of the line.
- Relative: Using Command-click, the original and new note velocity are analyzed. The resulting velocity is an average of both values.
- Just Selected: With Option pressed, only selected notes are affected.
Both Relative and Just Selected modes can be combined.