Creating and Editing Events in the Hyper Editor
The Hyper Editor, like the other MIDI editors, can be used for event input duties. In some situations, manual entry of note and controller events is more efficient than performing and recording them. One example would be the creation of 1/16th note hi-hats in a region when the tempo is 160 bpm, which would be difficult to play.
You can, of course, record events with a MIDI keyboard, and then refine your performances in the Hyper Editor.
Changing the Grid and Beam Display
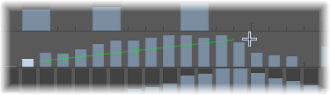
The Grid parameter in the Event Definition Parameter box of the Inspector is important when creating events in the Hyper Editor. Newly created events are automatically added at grid positions. This makes it easy to create a drum pattern, with 4 divisions on one lane, 8 divisions on another lane, and 16 divisions on another lane; assigned to kick, snare, and hi-hat sounds, for example.
Choose a grid type from the Grid pop-up menu in the Event Definition Parameter box.
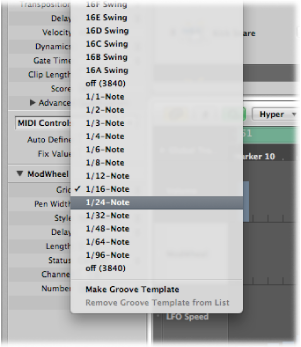
Any events that you add snap automatically to the nearest grid position. The positions of existing events are not affected.
Tip: When editing or constructing complex rhythm patterns, it can be useful to create several event definitions (see Selecting and Creating Event Definitions) for one drum note, each with a different quantization grid. For example, if there are two lanes for a snare drum, one with a 1/16th and the other with a 1/96th grid, you can use the Pencil tool to add individual hits in the coarser grid, and drum rolls in the finer grid.
When defining the Grid parameter to add a succession of controllers, use the motto, “as coarse as possible, and as fine as necessary” to minimize data output. Logic Pro can handle very large amounts of data, but unfortunately the same cannot be said of MIDI.
You can also alter the width and style of event beams to make event creation and editing easier.
Choose a Pen Width value in the Event Definition Parameter box.
The exact event position is always marked by the left edge of the beam, regardless of the beam width.
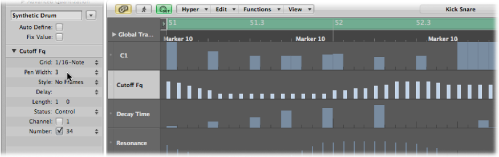
When you set the Pen Width parameter to Note Length, note event beams are displayed at their actual length. The Status parameter must be set to Note for this to work.
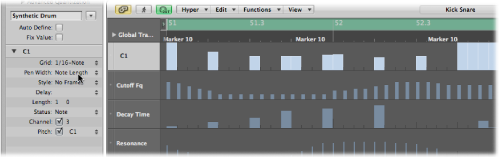
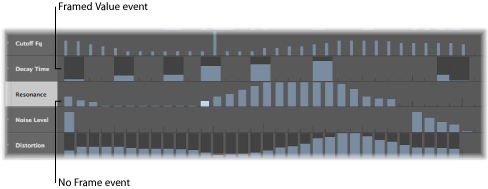
Choose a setting in the Style menu.
- No Frames: Shows the value of the event as a colored beam.
- Framed Values: Shows a hollow frame beam that is the full height of the event definition lane. The value of the event is displayed as a colored beam within the frame beam.
Creating Events
The Hyper Editor provides several unique methods for the creation (and editing) of MIDI events.
Select the Pencil tool.
Click a time position on the appropriate event definition lane.

Drag up or down to alter the event value before you release the mouse button.
With the Pencil tool, drag horizontally over the time position on the appropriate event definition lane.
This results in a freehand curve of new events that follows the (vertical and horizontal) Pencil tool movements in the lane.
Select the Line tool.

Click a position on the appropriate event definition lane.
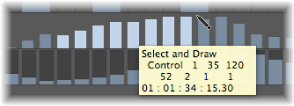
A help tag appears, showing the exact position and event value in the top line.
Move the mouse to the desired end point of the line (to the right or left).
As you do so, you see the line trailing behind the Line tool pointer, with the exact position and event value shown in a help tag.
Click the end point to create several event beams, aligned along the line.
New events are created at each grid position (in accordance with the Grid parameter), within the line start and end points.
Select the Line tool.
Click a position on the appropriate event definition lane.
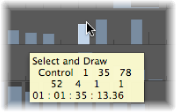
A help tag appears, showing the exact position and event value in the top line.
Move the mouse to the desired end point of the line (to the right or left).
As you do so, you see the line trailing behind the Line tool pointer, with the exact position and event value shown in a help tag.
Shift-click the end point.
This immediately draws another line from the end point of the original line.
Select the Line tool.
Click a position on the appropriate event definition lane.
A help tag appears, showing the exact position and event value in the top line.
Move the mouse to the desired end point of the line (to the right or left).
As you do so, you see the line trailing behind the Line tool pointer, with the exact position and event value shown in a help tag.
Option-click the end point.
The values of existing events in the area between the line start and end points are aligned along the line (creating a crescendo, for example). New events are created at every (unoccupied) grid value.
You can also assign a fixed value when creating events. The Fix Value checkbox in the Inspector, when selected, prevents any event value from being altered with the Pointer or Pencil tool.
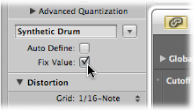
This is ideal when adding events with the Pencil, as all are assigned the value of the previously selected event. This allows you to draw a succession of events with the same value—perfect for drawing in a row of 16th note hi-hats, for example.
Select the Fix Value checkbox in the Inspector.
Click any existing event with the Pencil tool to use its value as a preset.
In Fix Value mode, it is impossible to alter an event value by clicking it.
Note: When adding events with the Line tool in Fix Value mode, the preset value is always used as the starting value of the line.
You can use the Length parameter to change the length of events (this primarily applies to note events) to be added, measured in divisions (the left number), and ticks (the right number). You should avoid the use of small tick values. Many MIDI devices do not respond quickly enough when note on/note off messages are sent in quick succession, resulting in no note being heard.
Selecting Events
You can use any of the usual selection techniques (see Using Selection Techniques), with the following differences:
Hold Shift, and click the events.
Hold Shift, and drag to select the events.
Make sure that you do not click any events. If you simply click or drag with the Pointer tool, the selected event values are changed, so make sure Shift is held down.
Click the event definition name.
Shift-click the appropriate event definition names.
Deleting Events
Events can be deleted individually by clicking them with the Eraser tool. The following techniques cover deletion of multiple events.
Drag across the events with the Eraser tool.
Select the events you want to remove, then press Delete.
Select one of the notes you want to delete.
Choose Edit > Select Similar Events or Edit > Select Equal Events (notes of the same pitch, for example), and then delete the selected events by pressing Delete.
For more information about similar and equal events, see Selecting Similar or Identical Objects, Regions, or Events.
You can also delete events by choosing one of the Delete MIDI Events commands from the Hyper Editor’s local menu bar. For further information, see Deleting Notes in the Piano Roll Editor.
Restoring Deleted Events
Accidental deletions of one or more events, or a simple change of mind or editing mistake is an inevitable part of song creation. Fortunately, you can backtrack your edits easily in Logic Pro. You also have the option of simply re-creating an event with the Pencil tool.
Choose Edit > Undo from the main menu (or use the corresponding key command, default assignment: Command-Z) immediately after making the error.
Choose Edit > Undo History.
This opens the Undo History window. The most recent editing step (at the bottom of the list) is highlighted.
Click any entry to undo or redo all steps between the clicked and highlighted entries.
All steps are animated during this process.
Important: A Redo list is not displayed until an Undo operation has been performed.
The Redo list appears below the Undo items. The first item that can be redone is indicated by gray text.
Command-click the step.
A warning dialog opens.
Click Apply to undo or redo the step. Click Cancel to abort the step.
This will undo or redo an isolated step without influencing all steps between the clicked and higlighted (most recent) entries.
Changing Event Values
Events can be altered individually or as a group. When adjusted as a group, the absolute differences between the event values remain constant.
Grab the event beam (with the Pointer or Pencil tool), and drag vertically.
The current value is shown in a help tag as you drag.
Drag across the events with the Pointer tool.
The current value is shown in a help tag as you drag across each event.
Use any selection technique to select the events you want to edit.
Grab one of the grouped (and highlighted) beams, and drag vertically.
The values of all events are adjusted. If any of the beams in the group reaches the maximum or minimum value, you can’t go any farther in that direction.
If you hold Option while doing so, you can keep raising or lowering the values of all events in the group, until the grabbed event beam reaches the maximum or minimum value.
Moving and Copying Events
Events can be moved or copied to other positions in the same, or other, lanes. When moved or copied between lanes, the event values are retained, but are converted to the target event definition. For example, moving several events from the Volume lane into the Pan lane results in the volume values being used for pan position changes.
Hold Shift, and drag to the new position and lane.
As you do so, a help tag informs you of the position, event definition type, and value (if applicable).
Hold Option, and drag to the new position and lane.
As you do so, a help tag informs you of the position, event definition type, and value (if applicable).
Moving Events via Key Commands
Editing can be accelerated by assigning, and using, the following key commands to move one or more events.
Nudge Region/Event Position Right by SMPTE Frame
Nudge Region/Event Position Left by SMPTE Frame
Nudge Region/Event Position Right by 1/2 SMPTE Frame
Nudge Region/Event Position Left by 1/2 SMPTE Frame
Nudge Region/Event Position Right by 5 SMPTE Frames
Nudge Region/Event Position Left by 5 SMPTE Frames
Nudge Region/Event Position Right by SMPTE Bit
Nudge Region/Event Position Left by SMPTE Bit
Nudge Region/Event Position Right by Tick
Nudge Region/Event Position Left by Tick
Nudge Region/Event Position Right by Division
Nudge Region/Event Position Left by Division
Nudge Region/Event Position Right by Beat
Nudge Region/Event Position Left by Beat
Nudge Region/Event Position Right by Bar
Nudge Region/Event Position Left by Bar
Nudge Region/Event Position Right by Nudge Value
Nudge Region/Event Position Left by Nudge Value
Nudge Region/Event Position Right by Sample
Nudge Region/Event Position Left by Sample
Nudge Region/Event Position Right by 1 ms
Nudge Region/Event Position Left by 1 ms
Nudge Region/Event Position Right by 10 ms
Nudge Region/Event Position Left by 10 ms
The selected events are shifted one step right (+1) or left (−1), by whatever unit is referred to in the particular command name.
Using the Clipboard to Copy and Move Events
You can also use the Clipboard to copy and move events:
Edit > Copy (or Command-C) copies events into the Clipboard.
Edit > Cut (or Command-X) moves the events into the Clipboard.
Edit > Paste (or Command-V) pastes the events at the current playhead position, at their original pitch.
You can also perform advanced copy and move operations within the Hyper Editor. These allow you to directly swap events, or to merge a group of events from one section of a region to the same, or another, region, as examples. For more information, see Advanced Note Copy and Move Options.
Protecting the Position of Events
There are times where you will want to protect certain events from being moved. For example, several note events may be used to trigger footstep samples that match an actor walking down a corridor, in a video soundtrack. You have already created the music for this scene, but have been asked to increase the tempo to match several cuts of different camera angles in the corridor. Obviously, a change in the project tempo will move the events, resulting in out-of-sync footstep samples. Fortunately, Logic Pro has a feature that preserves the absolute time position of events.
Choose Functions > Lock SMPTE Position (or use the corresponding key command). This ensures that events that fall at a particular absolute time position—1 hour, 3 minutes, 15 seconds, 12 frames, for example—remain at this position when tempo changes are made.
Choose Functions > Unlock SMPTE Position (or use the corresponding key command).