Snapping Region Edits to Time Positions
You move and resize regions in the Arrange area because you want them to start and end at a specific point in time. For example, in a music-based project, you may want to align the start points of regions with measures and beats.
Logic Pro offers a snap feature that automatically aligns region start and end points to a selected grid value, when you move or resize them.
Tip: Turn on the View > Grid item in the Arrange area’s local menu bar, as this will help you to visualize how the Snap pop-up menu items automatically align regions to specific grid positions.
Choose one of the following values in the Snap pop-up menu (at the top of the Arrange area):
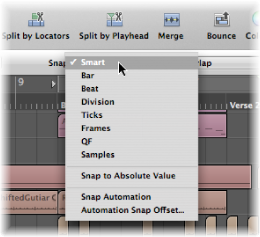
- Smart: Edit operations snap to the nearest bar, beat, sub beat, and so on, depending on the current Bar ruler division value, and the zoom level.
- Bar: Edit operations snap to the nearest bar.
- Beat: Edit operations snap to the nearest beat in a bar.
- Division: Edit operations snap to the nearest division value. (This is the time signature shown in the Transport and Bar ruler.)
- Ticks: Edit operations snap to the nearest clock tick (1/3840th of a beat).
- Frames: Edit operations snap to the nearest SMPTE frame.
- QF (Quarter Frames): Edit operations snap to the nearest SMPTE quarter frame.
- Samples: Edit operations snap to the nearest sample.
Note: Sample-accurate editing is directly tied to the zoom level. If the zoom level is insufficient, sample-accurate edits are not possible. Make use of the Zoom slider at the bottom of the Arrange window, and take advantage of the Save and Recall Zoom Setting key commands to speed up your workflow.
The Snap functionality is relative, which means that the edit operation is snapped to the nearest bar, beat, and so on, retaining the region’s distance from its original position. For example, if a region is placed at position 1.2.1.16, and you move this region forward to around bar 2 (with the Snap pop-up menu set to Bar), the region automatically snaps to position 2.2.1.16, rather than 2.1.1.1 (the bar 2 start point). You can override relative snaps with the Snap to Absolute Value option.
Choose the Snap to Absolute Value option from the Snap pop-up menu (at the top of the Arrange area).
A tick appears to the left of this option when it is active. This feature works in conjunction with the chosen snap grid division.
For example, if Bar is chosen in the Snap pop-up menu, when Snap to Absolute Value is active, moving a region (from position 1.2.1.16) to around bar 2 results in the region being snapped to position 2.1.1.1 (the bar 2 start point), rather than its relative position (2.2.1.16).
The Snap pop-up menu setting applies to the following edit operations:
Moving and copying regions
Resizing regions
Cutting regions
Moving, adding, and resizing markers
Setting cycle boundaries
Overriding the Snap Grid
You can temporarily override the snap grid, allowing finer edits and adjustments.
Hold down the Control key while performing the editing operation:
The division value chosen in the Transport bar (1/16, for example) determines the editing grid scale at lower zoom levels (macroscopic or wide view).
At higher zoom levels, (microscopic or close-up view), the editing grid scales by a certain factor.
Hold down the Control and Shift keys while performing the editing operation:
The editing grid switches to ticks if editing at lower zoom levels (macroscopic or wide view).
At higher zoom levels (microscopic or close-up view), the editing grid switches to samples.
Understanding the Link Between Zoom Level and Snap Value
In cases where the zoom level is so high (microscopic), that the chosen Snap value would result in extremely large movements or edits, the Snap value is temporarily dimmed, and Smart snap is used instead.
In cases where the zoom level is extremely low (macroscopic), and a fine Snap value (such as Division or Frames) is chosen, normal mouse movements result in larger grid units. In these situations, either alter the zoom level, or hold down the Control key to actually use the chosen Snap value.
Using Control-Shift breaks the 1:1 relationship between the mouse and region (or edit tool) movements. This means that you may need to move the mouse a long way (horizontally) to make the region (or edit tool) move one pixel. Watch the help tag for exact numerical readouts.
Imagine you want to shorten a region in a 4/4 bar so that the 4 is played, but not the “4 and” of the last bar.
Horizontally zoom the screen display until you can see quarter notes in the Bar ruler.
Grab the bottom-right corner of a region, and move the mouse to the left, until the region is shortened by one quarter note.
Press the Control key, and move the mouse carefully to the right, until the region becomes one division longer.
While you’re doing this, the help tag shows the region start position, track number, and the current length of the region in bars, beats, divisions, and ticks. The three numbers to the right should be 3 1 0.