Ultrabeat Tutorial: Creating Snare Drums
The sound of an acoustic snare drum consists primarily of two sound components: the sound of the drum itself and the buzzing of the snare springs. Try to approximate this combination in Ultrabeat with a single oscillator and the noise generator.
Load the Standard Tutorial setting. Deactivate Oscillator 1, and switch Oscillator 2 on (in phase oscillator mode).
Choose LFO 1 in the Mod menu of Osc 2 Pitch.
Set the pitch value for Osc 2 to around G#2 and set the Mod amount (the blue Mod control) to about 3 to 4 octaves higher.
You have modulated Osc 2 Pitch with a rapidly vibrating LFO with a medium Ramp Decay value. This eliminates the sine wave—which is not especially desirable for a snare sound, in contrast to the bass drum.
Set LFO 1 to a high Rate. Choose a value of 20 for Cycles and −20 for Ramp. Set the LFO Waveform parameter to a value of about 0.58, which is a square wave.
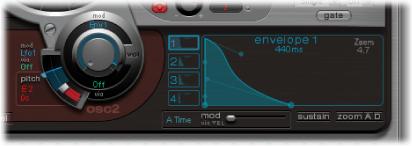
Use Env 1 to control the volume of Oscillator 2 by setting Vol to the lowest possible value (−60 dB), choosing Env 1 in the Mod pop-up menu, and adjusting the modulation intensity to a point just below its maximum value.
The figure shows the settings of Oscillator 2 and Env 1.
Experiment with different Slope and Asym values to impart a more or less electronic character to the sound.
Turn on the noise generator and control its volume with the same quick envelope used in Osc 2 Volume.
Use the filter parameters of the noise generator to roughen up, refine, or add bright frequencies to the noise component of the snare drum sound. Select an LP filter type, and try a filter frequency between 0.60 and 0.90. Modulate it with LFO 1, which you’re already using to control the pitch of Oscillator 2.
Note: The snare drum sound is listed as “snare 1” in the Tutorial Kit, at a pitch of E1.
Turn on Oscillator 1 in FM mode. Use Env 1 to control the volume of Osc 1 as well.
Choose a pitch for Oscillator 1 that’s about an octave lower than Oscillator 2. Consciously avoid even intervals between the oscillators and detune them slightly from each other. For example, try a pitch setting of F#2 in Osc 2 and E1 in Osc 1, then fine-tune Osc 1 a few cents higher by holding Shift while adjusting the Osc 1 Pitch slider.
Experiment with FM Amount, and add more tone (low FM Amount) or noise (more FM Amount) as desired. Also try modulating the FM Amount with a fast LFO.
Note: An exemplary snare drum sound that uses FM can be found in the Tutorial Kit at a pitch of F1. It is listed as “snare 2.”
Higher FM Amount values lead to considerably more overtones and a very electronic sound character. If you want to make the sound more acoustic, feed Oscillator 1 (and possibly Oscillator 2 as well) into the main filter. Use these settings to start: LP 24 mode, and a Cutoff value of about 0.60.
Ultrabeat Tutorial: Recreating the TR-808 Snare
The famous 808 snare is based on two resonating filters and a noise generator, fed through a highpass filter. The mix ratio of the two filters and the volume of the noise generator can be adjusted. This structure cannot be 100% replicated in Ultrabeat.
Load the Standard Tutorial setting.
You are now ready to replicate the resonating filters of the 808 snare using two cleverly programmed phase oscillators.
Assign slightly different Slope values to two phase oscillators, and detune them by almost an octave.
Adjust the tonal relationship between the oscillators so that it is uneven—from E3 to F2, for example.
Control the volume of each oscillator with a different envelope. Adjust the decay times so that the envelope for the lower-tuned oscillator has a longer decay time than the very snappy envelope setting for the higher oscillator.
Feed the output of both oscillators into Ultrabeat’s main filter, and hollow out the sound with a highpass filter. Activate the filter bypass button in both oscillators. Choose the HP 12 setting in the filter, a Cutoff value around 0.40, and a Resonance value of about 0.70.
You have just cleverly emulated both of the 808’s resonating filters. Shifting the pitch of both oscillators simulates the behavior of the 808’s Tone control, by the way.
Switch the noise generator on, and activate the highpass mode in its filter (HP).
Set the Cutoff value to about 0.65, Resonance to 0.35, and add a little Dirt (around 0.06).
The noise generator provides the sustained snare sound. It should be shaped by its own envelope—independent of the decay phases of both oscillators—to get 808-like results. Changing the volume of the noise generator simulates the snap parameter of the 808.
Note: The 808 snare drum described is listed as “snare 3-808” in the Tutorial Kit, at a pitch of F#1. It also features an interesting EQ setting.
Ultrabeat Tutorial: Changing Dynamics with Velocity
Use the 808 snare drum sounds in the Tutorial Kit to explore the possibilities Ultrabeat offers for implementing velocity.
Select the “snare 3-808” sound.
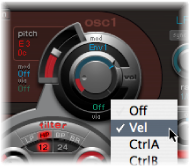
Open the “via” pop-up menu below the Oscillator 1 Volume knob and choose Vel. A slider appears on the ring around the knob.
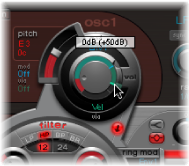
Drag the slider clockwise. When you drag the slider, a help tag displays the value. Set it to 0 dB.
Repeat steps 2 and 3 in both Oscillator 2 and the noise generator.
You can now dynamically play the sound using velocity.
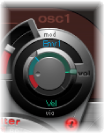
Reduce the values of the individual volumes by turning down the Volume knobs in both oscillators and the noise generator. Note how the Mod ring and its Via sliders also move back. Change the Via slider positions until all three Volume knobs look like this:
If you use differing intensities for each Volume knob when completing this step, you’ll have the potential of individual velocity reactions for each sound component.
Increase the dynamics of the sound as a whole by assigning the following setting to the Voice Volume knob:

You now have an 808 snare that is exceptionally responsive to velocity. As you may know, this wasn’t possible with the original—not even an 808 sample could offer the dynamic volume control of individual sound components that’s demonstrated here. A sample offers you only the whole sound, not its constituent parts.
In the next step, you use velocity to control the character of the sound—individually for each component—plus volume, of course.
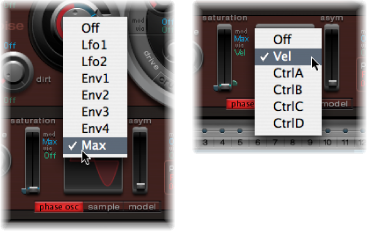
In the Saturation Mod pop-up menu of Oscillator 2, choose Max, and then choose Vel(ocity) in the corresponding Via pop-up menu.
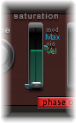
Set the additional control that appears as shown in the figure below, to control the character of the sound with velocity:
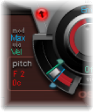
Repeat this with the other parameters of Oscillator 2, as well as pitch:
Modulate the noise generator as follows:
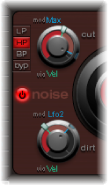
- Cut parameter: Choose Max as modulation source, then set the modulation control as shown below.
- Dirt parameter: Choose LFO 2 as modulation source, then set the modulation control as shown below.
The sound is now nothing like an 808 snare, which was your goal. Keep experimenting with velocity and figure out when it makes sense to use it as a direct or indirect modulation source, in either its positive or negative form.
Note: The dynamic 808 snare drum described above is listed as “snare 4-vel” in the Tutorial Kit, at a pitch of G1.
Ultrabeat Tutorial: Recreating the Kraftwerk Snare
Another classic electronic snare drum sound is the highly resonant lowpass filter of an analog synthesizer that quickly closes with a snap. This sound was used extensively by Kraftwerk.
Select the Snare 1 sound.
Direct the signals of both oscillators and the noise generator to the main filter.
Modulate Cutoff with Env 1 (which is already modulating the volume of the noise generator).
Modulate the filter resonance with Env 2.
Experiment with the parameters mentioned in steps 2 to 4 (especially the envelopes), introduce EQ into the sound, and discover how much “playing room” these basic settings allow you.
Note: An exemplary sound is listed as “snare 5-KW” in the Tutorial Kit, at a pitch of G#1. Analyze this sound, and compare it to your own creation.