Ultrabeat Tutorial: Creating Kick Drums
Electronically produced kick drum sounds are based primarily on the sound of a deeply tuned sine wave.
Choose Settings > 03 Tutorial Settings > Tutorial Kit, and select Standard Tut from the Assignment section.
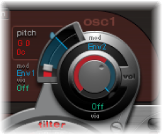
Note that Oscillator 1 is in Phase Oscillator mode.
Find a suitably tuned pitch in the lower octaves by soloing the bass drum along with other important tonal elements of the song (a bass or pad sound, for example). Drag the Osc 1 Pitch slider to adjust the pitch until appropriate.
Use Env 4 to shape the volume of the bass drum.
For slower beats you’ll want a longer decay phase, whereas at faster tempos you’ll choose a shorter decay time. The attack time of Env 4 should be very short in any case (0, in most cases) or the sound will lose its percussiveness and its ability to be clearly heard in the mix.
The kick drum still sounds very soft and is somewhat reminiscent of the famous TR-808 bass drum. It’s still missing a clearly defined attack.
Ensure that Env 1 is chosen in the Mod menu of Oscillator 1’s Pitch parameter.
Set the degree of modulation by dragging the blue Mod slider approximately 3 to 4 octaves above the original pitch.
Set the attack time in Env 1 to 0 by dragging the leftmost of the two junction points on the x-axis all the way to the left.
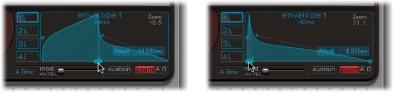
Experiment with the decay time by dragging the rightmost of the two junction points on the x-axis; you’ll discover that higher decay values (shifting the Bezier handle to the right) result in sounds similar to synth toms, whereas shorter decay values (shifting to the left) provide the kick character.
Change the Mod amount (the blue slider) of Osc 1 Pitch again (see step 2).
The interaction of this parameter with the envelope’s decay time provides numerous possibilities for shaping the kick or punch of the bass drum sound.
Note: This simple bass drum sound is listed as Kick 1 in the Tutorial Kit, at a pitch of C1.
Ultrabeat Tutorial: Reducing Tonality
One advantage of bass drums based on sine waves is that their sound can be precisely tuned to match the song. The disadvantage is that a recognizable pitch is not always desirable. Ultrabeat offers several methods to reduce the tonality of the sound. A very effective tool is the 2 Band EQ.
For band 1, select the Shelving mode at a frequency of about 80 Hz, a high Q value, and a negative Gain value.
For band 2, select the Peak mode at a frequency of around 180 Hz, a medium Q value, and also a negative Gain value.
On the EQ graph, notice how the frequencies around 80 Hz are boosted, while the surrounding frequencies are reduced.
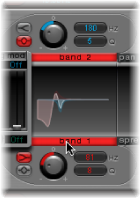
Vary the frequency of band 2 (easily recognizable in the blue part of the EQ graph) to influence the extent of bass drum tonality.
A further method for reducing the tonality of a drum sound that is rich with overtones is to use a lowpass filter. In the following example you will control the cutoff frequency of the filter with an envelope.
Reload the Standard Tutorial sound, choose A#0 as the basic pitch in Oscillator 1, and modulate it with Env 1.
Increase the Saturation parameter value to enhance the overtones of the drum sound.
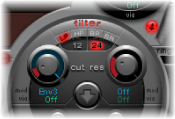
Note that the output of Osc 1 is directed to the filter, as the filter bypass button (the arrow between Osc 1 and the filter) is activated.
Set Filter type to LP 24.
Set Cutoff value to 0.10.
Set Mod Source for Cut to Env 3.
Set Mod Amount for Cut to 0.60.
Set Resonance to 0.30.
Set the attack time of Env 3 to 0. Use the Decay time of Env 3 to shape the sound of the filtered bass drum.
You may also choose to control the filter resonance with an envelope. Make sure you dedicate a single envelope to this function (in this case, use Env 2 as a Mod source for Res). Choose a Mod amount for Res of about 0.80. Select a longer decay time in Env 2 than in Env 3 and listen carefully to the fatter and more atonal bass drum sound achieved through this Res modulation (due to the higher filter resonance).
Note: The bass drum described in the above example is listed as Kick 2 in the Tutorial Kit, at a pitch of C#1. It also features an interesting EQ setting, as described in the next section.
Ultrabeat Tutorial: Adding Bass, Kick, and Body to Sounds
Try the options outlined in this section to add “missing” elements to your sounds.
Use the Kick 2 filtered bass drum sound as a starting point, and try out the remaining parameters in the phase oscillator. You will discover that high saturation values make the sound rounder and add more bass, for example. The character of the example is beginning to head in the direction of a TR-909.
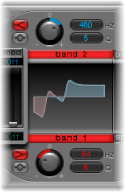
To get even closer to the TR-909, use an EQ setting as shown in the following figure. Note that the low frequency pressure point around 60 Hz (in the red area on the EQ graph) as well as the assertive punch or kick (the blue area starting at 460 Hz and up) of a 909 bass drum are strengthened. (This EQ setting is already part of the Kick 2 setting.)
In the example, all four envelopes are being used. Take some time to play with the shapes of the envelopes, while maintaining the attack and decay settings. Experiment with the junction points of the decay phase in the different envelopes to familiarize yourself with the sound-shaping options available. Start with the decay phase of Env 4, which controls both the volume of Oscillator 1 and filter resonance, and observe how reshaping the belly of the envelope can change the character of the sound from crisp and short to round and full.
Ultrabeat Tutorial: Creating the Ultrabeat Kick
You can create bass drum sounds that are uniquely “Ultrabeat.” Try modulating pitch with an LFO instead of an envelope, for example.
Start with the Standard Tutorial sound at a pitch of A#0 (Osc 1 Pitch), and choose LFO 1 as the Mod source in the Osc 1 Pitch section.
Set the degree of modulation by dragging the blue Mod slider to a value of A3.
Set LFO 1 to a low number of Cycles (25 to 35), a high Rate (starting with 70 Hz and higher) and a medium value for Decay (set the Ramp knob to about −190).
Experiment with the LFO waveform and you’ll discover that you can attain different nuances in the character of the bass drum attack.
Modulate the Asym(metry) parameter with the same LFO, and also vary the Slope and Saturation values.
This method enables you to create very different bass drum sounds with a single oscillator, one LFO, and one envelope (for volume). The character of the sounds can range from soft to punchy, and the degree of tonality in the sound can be adjusted to taste.
Note: The bass drum sound described is listed as Kick 3 in the Tutorial Kit, at a pitch of D1.
Use the second oscillator (with similar settings or with a sample), or use the filter and the ring modulator—the sky’s the limit as far as your imagination is concerned, so get on with it and create that next “gotta have it” drum sound.
Note: You can find an “emulation” of the legendary 808 bass drum in Kick 4 in the Tutorial Kit, at a pitch of D#1.