Working with the Ultrabeat Step Sequencer
Ultrabeat also incorporates a powerful, integrated step sequencer, which you can use to create polyphonic rhythmic sequences and patterns. The sequencer displays running light-style controls like those of classic drum machines and shares many of the sequence and pattern creation methods employed in these devices.
Ultrabeat’s sequencer expands on the features of hardware drum machines by providing extensive automation and editing features. These enable you to precisely vary the timbre of the sound and the overall dynamics—at any point in the pattern. The sequencer plays an important role in shaping the rhythms and sounds that you can produce with Ultrabeat.
The step sequencer allows all Ultrabeat sounds to be combined in patterns, based on sequences for each individual sound. Its design and use—commonly referred to as step programming—are based on analog sequencers and drum machines. Unlike these analog precursors, Ultrabeat enables you to program automated changes for nearly every synthesizer parameter.
Depending on your personal taste and favored musical style, you’ll want to control Ultrabeat from either the integrated step sequencer or from Logic Pro when programming rhythms. Combining both sequencers is also possible; they can be active at the same time and are automatically synchronized with each other. Logic Pro acts as a master clock in this situation, determining the tempo of Ultrabeat’s internal step sequencer.
If you’re unfamiliar with the concept of step sequencing, the following section will help you understand the design of Ultrabeat’s step sequencer.
How Step Sequencers Work
The basic idea behind analog step sequencers is to set up a progression of control voltages and output these step-by-step, typically in an endlessly repeating pattern. This basic principle helped to spawn a number of electronic music styles based on the mesmerizing effect that repeating patterns can have.
In early analog sequencers, three control voltages were usually created per step in order to drive different parameters. The most common usage was control of a sound’s pitch, amplitude, and timbre (cutoff) per step.
The control surface of analog sequencers often contained three rows of knobs or switches aligned on top of (or beside) each other. Each row commonly contained 8 or 16 steps. Each row provided a control voltage output that was connected to a control input (for a particular parameter) on a synthesizer. A trigger pulse determined the tempo between steps. A running light (an LED) indicated the step that was currently being triggered.
The running light programming concept also appeared in later drum computers, the most well-known examples being the Roland TR series drum machines.
The introduction of the MIDI standard and increased use of personal computers for music led to a rapid decline in the step sequencer and related technology. More flexible recording and arranging concepts that didn’t adhere to the step and pattern principle were possible with the far more powerful personal computer.
Despite these technological advances, step sequencers haven’t disappeared completely. Hardware groove boxes have experienced a renaissance in recent years due to their intuitive nature, which has made them a favored tool for rhythm programming.
Ultrabeat’s integrated step sequencer couples the advantages and general working principles of its analog forebears with far more flexible control options, raising modern rhythm programming to a new level.
Getting to Know Ultrabeat’s Step Sequencer
Ultrabeat’s step sequencer contains a sequence for each sound in a drum kit. Each sequence can consist of up to 32 steps. A pattern is a container for all sequences in a drum kit. Up to 24 patterns can be saved and recalled with each Ultrabeat setting.

The sequencer is divided into three sections.
- Global parameters: Enable the step sequencer, control playback, provide access to various modes, and control the overall playback feel.
- Pattern parameters: Provide control over the length and resolution of the currently selected pattern. You can also accentuate individual steps in the pattern, for each drum sound.
- Step Grid: This is where actual sequencing takes place. A sequence of up to 32 steps, for the sound that is currently selected in the Assignment section, is shown. You can add, remove, or alter events in the grid.
Note: An alternate view allows you to simultaneously see and edit the steps of all drum sounds in the pattern. See Switching the Ultrabeat Step Grid to Full View.
Using Ultrabeat’s Global Sequencer Parameters
A description of the parameters that apply globally to all patterns follows.
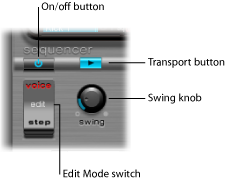
- On/Off button: Enables or disables the step sequencer.
- Edit Mode switch: Chooses either Voice or Step mode.
- Voice mode (default): In Voice mode, editing a drum sound’s parameters sets the parameters of the drum sound itself.
- Step mode: In Step mode, you can automate a sound’s parameters from one step to the next. For more information see Automating Parameter Values in Ultrabeat’s Step Sequencer.
- Transport button: Starts and stops the sequencer pattern. The step sequencer is always synchronized to the tempo of the host application.
Note: If the Transport button is displayed in blue, the sequencer interprets incoming MIDI notes between C-1 and B0 as performance information. For more information see Using MIDI to Control Ultrabeat’s Sequencer.
- Swing knob: Determines the swing intensity for all sounds that have the Swing function activated (see Using Ultrabeat’s Swing Function).
Using Ultrabeat’s Pattern Parameters
A pattern contains all events, stored in sequences, for all 25 sounds. At the bottom edge of the Ultrabeat window you can select from one of 24 patterns, and set parameters that globally affect all sounds in the kit.
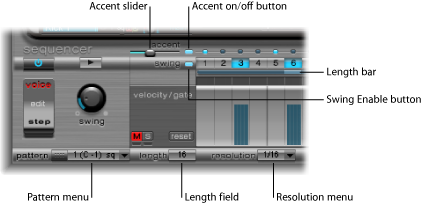
- Pattern menu: Allows you to choose one of the 24 patterns.
- Length field and bar: Defines the length of the pattern. You can adjust the length of the grid by dragging the value in the Length parameter field or the bar beneath the swing buttons.
- Resolution menu: Determines the resolution of the pattern. It defines the metric unit of a measure that is represented by the individual steps. For example, the 1/8 setting means that each step of the grid represents an eighth note. Given a pattern length of 32 steps, the pattern would run for 4 measures (the 32 setting applies to the entire grid and, therefore, equally to all sounds).
Note: The interplay between the Length and Resolution values allows the creation of different kinds of time signatures. For example, the values Length = 14 and Resolution = 1/16 results in 7/8 time; Length = 12 and Resolution = 1/16 results in 3/4 time; and Length = 20 and Resolution = 1/16 results in 5/4 time.
- Accent button and slider: Allows individual steps to be strongly emphasized, or accentuated. See Using Accents in Ultrabeat.
- Swing Enable button: When enabled, the grid of the currently selected sound is played in accordance with the Swing knob setting. See Using Ultrabeat’s Swing Function.
Copying and Reorganizing Ultrabeat Patterns
You can reorganize the 24 patterns in the Pattern menu, using Copy and Paste commands.
Choose the desired pattern from the Pattern menu.
Control-click (or right-click) the Pattern menu, then choose Copy from the shortcut menu.
Choose the target pattern from the Pattern menu.
Control-click the Pattern menu, then choose Paste from the shortcut menu.
You can also use a key command to copy patterns.
Select the desired pattern in the Pattern menu.
Press Option, open the Pattern menu and select another Ultrabeat pattern. This replaces the pattern in the target position.
Note: Be aware that all existing sequencer data in the target pattern will be replaced. If you change your mind during the process, select the source pattern number.
Select the desired pattern in the Pattern menu.
Control-click (or right-click) the Pattern menu, then choose Clear from the shortcut menu.
Using Ultrabeat’s Swing Function
Swing changes the distance between notes. Only even-numbered steps are affected by the Swing parameter, with notes on odd-numbered steps remaining where they are.
Which beats are affected depends on the selected Resolution parameter setting, as illustrated in the following example: At a Resolution of 1/8 and a Length of 8, the notes on steps 1, 3, 5, and 7 represent quarter notes in the measure. These remain unchanged. Only the eighth notes found between them (steps 2, 4, and so on) are shifted by the Swing function. The amount of shift is equal to the swing intensity (set with the Swing knob).
Note: Swing is active only for grid resolutions of 1/8 and 1/16 (see Using Ultrabeat’s Pattern Parameters).
Click the Swing Enable button.
This forces the grid of the currently selected sound to be played in accordance with the Swing knob setting.
Adjust the Swing knob.
At a 0 setting, with the knob all the way to the left, the Swing function is disabled. Turn the knob to the right to move affected notes toward the following note.
Getting to Know the Ultrabeat Step Grid
The step grid displays sequence steps on two rows. The steps shown in these rows correspond to the sound that is currently selected in the Assignment area. Choosing a different sound switches the sequencer display to show the rows that correspond to the newly selected sound.
The step grid area contains two rows, each with 32 fields (steps).
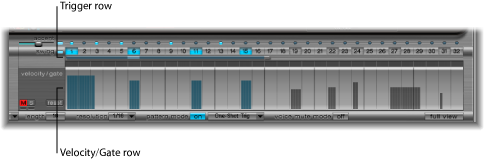
- Trigger row: Click a button to activate or deactivate the sound on the corresponding beat.
- Velocity/Gate row: Sets the length (gate time) and velocity of steps entered in the Trigger row. Both parameters are displayed as a single graphical bar. The bar’s height represents the velocity; its length, from left to right, depicts the note length.
Creating and Removing Steps in the Ultrabeat Trigger Row
The Trigger row consists of buttons 1 to 32, which represent steps or beats in the selected sequence. Note trigger events are placed on corresponding steps. This is where you designate when (on which beat) the selected sound plays.
Note: You can create and remove steps while the step sequencer is running.
Choose the desired sound in the Assignment section.
Enable the step sequencer by clicking the On button.
Choose a pattern and set the desired length and resolution. For details, see Using Ultrabeat’s Pattern Parameters.
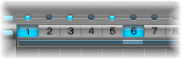
Click the desired buttons, 1 through 32, to activate or deactivate the selected sound on the corresponding beat. In the example shown above, these are steps 1 and 6.
Note: An alternate view allows you to simultaneously see and edit the steps of all drum sounds in the pattern. See Switching the Ultrabeat Step Grid to Full View.
Ensure that the appropriate sound is selected in the Assignment section.
Click the desired buttons, 1 to 32, that correspond to the step(s) that you want to remove.
Note: Drag horizontally across the buttons to quickly enable or disable trigger events.
Using the Ultrabeat Trigger Shortcut Menu Commands
Control-click (or right-click) any of the trigger buttons to open the Trigger shortcut menu, which offers the following commands:
- Copy: Copies all activated triggers (steps) to the Clipboard.
- Paste: Pastes all triggers from the Clipboard.
- Clear: Turns off all activated triggers.
- Add Every Downbeat: Adds triggers on every downbeat in the sequence. The exact determination of which steps are downbeats depends on the grid resolution. For example, if the resolution is set to 1/16, Add Every Downbeat would create triggers on every 4th step. Starting with the initial downbeat at step 1, this would create trigger events on step 5, step 9, step 13, and so on. This command does not erase existing trigger events; it only adds trigger events.
- Add Every Upbeat: Adds triggers on every upbeat in the sequence. The exact determination of which steps are upbeats depends on the grid resolution. For example, if the resolution is set to 1/16, Add Every Upbeat would create triggers on every 4th step. Starting with the initial upbeat at step 3, this would create trigger events on step 7, step 11, step 15, and so on. This command doesn’t erase existing trigger events; it only adds trigger events.
- Alter Existing Randomly: Randomly reorders steps while retaining the number of activated triggers.
- Reverse Existing: Reverses the order of existing steps.
- Shift Left by 1 Step: Shifts all steps in the sequence one step to the left.
- Shift Left by 1 Beat: Shifts all steps in the sequence one beat to the left. The precise number of steps that equals a beat depends on the current grid resolution. For example, at a resolution of 1/16, a beat equals four steps; at a resolution of 1/8, a beat equals two steps, and so on.
- Shift Left by 1/2 Beat: Shifts all steps in the sequence one-half beat to the left. The precise number of steps that equals one half of a beat depends on the current grid resolution. For example, at a resolution of 1/16, a beat equals four steps, so half of one beat is two steps; at a resolution of 1/8, a beat equals two steps, so half of one beat equals one step, and so on.
- Shift Right by 1 Step: Shifts all steps in the sequence one step to the right.
- Shift Right by 1 Beat: Shifts all steps in the sequence one beat to the right. The precise number of steps that equals a beat depends on the current grid resolution. For example, at a resolution of 1/16, a beat equals four steps; at a resolution of 1/8, a beat equals two steps, and so on.
- Shift Right by 1/2 Beat: Shifts all steps in the sequence one-half beat to the left. The precise number of steps that equals one half of a beat depends on the current grid resolution. For example, at a resolution of 1/16, a beat equals four steps, so half of one beat is two steps; at a resolution of 1/8, a beat equals two steps, so one half of one beat is one step, and so on.
- Create & Replace Randomly: Erases, then randomly creates new, steps in the sequence; in other words, a brand new sequence is created. The number of events that are created depends on the grid resolution.
- Create & Replace Few: Similar to Create & Replace Randomly, but only a handful of new steps are created. The number of steps that are created depends on the grid resolution.
- Create & Replace Some: As above, but more new steps are created. The number of steps created depends on the grid resolution.
- Create & Replace Many: As above, but a large number of new steps are created, effectively filling the pattern.
For example, start with an empty sequence of 32 steps at 1/16 resolution. Using Create & Replace Few creates 4 new steps; using Create & Replace Some creates 8 new steps; and using Create & Replace Many creates 16 new steps.
Setting Step Lengths and Velocities in Ultrabeat’s Velocity/Gate Row
This row enables you to set the length (gate time) and velocity of the notes entered in the Trigger row. Both parameters are displayed as a single graphical bar. The bar’s height represents note velocity, and its width indicates the note length (gate time).
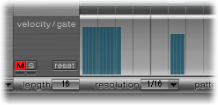
Drag vertically on the blue bar to change the velocity.
Drag horizontally on the blue bar to change the note length (gate time).
The gate time is divided into four equal sections, making it easy to set rhythmically accurate note lengths. In order for the one-shot envelope to react to gate time, it is necessary to either activate the Gate function in the sound itself (see Changing the Ultrabeat Trigger Mode) or use envelopes in sustain mode (see Using Ultrabeat’s Envelope Parameters), in conjunction with rhythmically useful (short) decay times.
Click the Reset button at the left of the velocity/gate row.
The default velocity setting = 75 percent. The default gate time = all four sections are active.
Using Ultrabeat’s Velocity/Gate Shortcut Menu Commands
Control-click (or right-click) any step in the velocity/gate row to open a shortcut menu that has the following commands:
- Alter Vel(ocities): Changes the velocity values of all steps by a random amount, while retaining the selected beats (the Trigger row remains unchanged).
- Alter Gate (Time): Changes the note lengths of all steps by a random amount, while retaining the selected beats (the Trigger row remains unchanged).
- Randomize Vel(ocities): Creates a new, random velocity value.
- Randomize Gate (Time): Creates a new, random gate value.
Using Accents in Ultrabeat
The Accent setting can be switched on or off individually for each drum sound. This allows you to turn accents on for cymbals but turn accents off for the kick drum, for example.
Click the blue LED to the right of the Accent slider to enable the accent function.
Move the Accent slider to globally determine the volume of programmed accents.
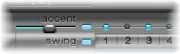
Click the blue LED above the desired step (steps 1 and 3 in the image). The sound at this step position will be accentuated (played louder).
Switching the Ultrabeat Step Grid to Full View
Click the Full View button in Ultrabeat’s lower-right corner to see a large sequencer grid filled with trigger buttons. The large grid simultaneously displays the 32 trigger buttons for all 25 drum sounds.
Full view provides an overview of the whole pattern, as opposed to just one sequence. Because the trigger events for all sounds are shown, you can easily spot erroneous notes, and the entire pattern creation process is simpler and faster.
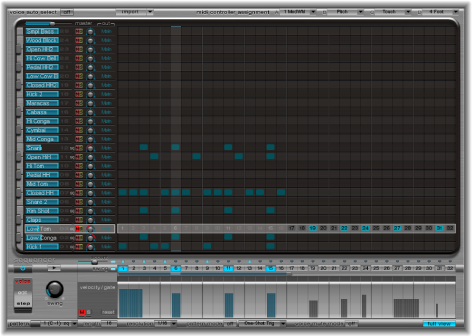
The selected sound is highlighted with a gray box in the step sequencer area, making it easy to set the velocity and gate time for each step, or offsets in Step mode (see Automating Parameter Values in Ultrabeat’s Step Sequencer), within the context of all sequences/sounds in the pattern.
Both the grid and the Trigger and Gate/Length rows are displayed for the selected drum sound. This makes it simple to create trigger events in the full view grid, then set accents in the Gate/Length rows, for example.