Using the Ultrabeat Output Section
Depending on the status of each signal flow button, the output signals of both oscillators, the ring modulator, and the noise generator are routed to the Output section of Ultrabeat. This routing is either direct or through the Filter and Distortion section.
The Output section passes signals through both equalizers (EQ), then on to the Pan Modulation/Stereo Spread section (in a preconfigured order) before the final level is set for the selected sound and the trigger behavior is adjusted.
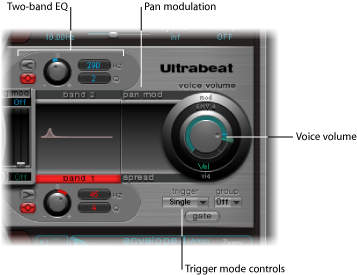
- Two-Band EQ: Provides precise tonal control of each drum sound.
- Pan Modulation and Stereo Spread parameters: Pan Modulation varies the panorama position of a drum sound. Stereo Spread broadens the stereo image.
- Voice Volume: Sets the default level of each drum sound.
- Trigger Mode controls: Determine the way that Ultrabeat reacts to incoming MIDI notes. This is independently defined for each sound.
Using Ultrabeat’s Two-Band EQ
Both equalizer bands have almost identical features. Their parameters are explained jointly, but you can, of course, adjust band 1 (the lower EQ in the Output section) and band 2 separately.

- Band 1 and Band 2 buttons: Turn the individual band on or off. When active, the label is red. If neither EQ is activated, the signal passes through unaffected.
Band 1 offers a low shelving EQ whereas band 2 features a high shelving EQ.
- EQ type buttons: Switch between two different types of EQs: shelving and peak.
In shelving mode, activated by clicking the upper EQ type button, all frequencies above or below the set frequency are either increased or reduced.
In peak mode, activated by clicking the lower button, only frequencies located near the set frequency are affected.
Note: Shelving EQs behave much like synthesizer lowpass and highpass filters. The key difference is that lowpass and highpass filters merely dampen certain frequencies (filter them out), whereas shelving EQs also allow these frequencies to be boosted.
- Gain knob: Positive values boost a certain frequency range as determined by the EQ type and Hz settings. Negative gain values reduce the gain of the frequency range. If the Gain knob is set to a value of 0, the EQ has no effect.
Option-click a Gain knob to set it to a neutral position. Alternatively, you can click the tiny 0 above the Gain knob.
- Frequency (Hz) field: Determines the frequency range to be boosted or reduced, by dragging vertically on the Hz value field.
Option-click the Hz parameter to set the value to a neutral position. This is 200 Hz for the first band and 2000 Hz for the second. The selection of these default frequencies was made in accordance with the different shelving characteristics of each frequency band. Band 1 is designed to filter low frequencies and band 2 is designed to filter high frequencies.
- Q field: Sets the Q (Quality) factor, by dragging vertically on the Q value field. The effect of Q on the sound is heavily dependent on the selected EQ type:
With shelving filters, as the Q value goes up, the area around the threshold frequency becomes more pronounced.
With the peak EQ, Q determines the width of the frequency band selection: low Q values select a broad band whereas high Q values select a very narrow band to be boosted or reduced with the Gain control.
Each EQ band displays parameter changes on a frequency response curve. The display provides immediate access to the Gain, Hz, and Q parameters of each band.
Horizontally drag to change the EQ frequency.
Vertically drag to change the Gain.
Drag the handle shown at the peak (maximum point) of the EQ curve to change the Q factor.
Using Pan Modulation and Stereo Spread in Ultrabeat
The EQ’s output signal is passed along to the Pan Modulation/Stereo Spread section where the placement of the sound in the stereo field can be modulated (Pan Modulation mode), or the stereo basis of the sound can be broadened (Stereo Spread mode).
Ultrabeat Pan Modulation Mode
Pan Modulation varies the panorama position of a drum sound with a “mod” (and “via”) source.
Note: The modulation set here is relative to the panorama position set in Ultrabeat’s Mixer in the Assignment section.
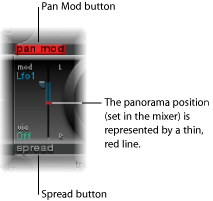
- Pan Mod and Spread buttons: Activate the corresponding mode. If neither mode is activated, the signal passes through unaffected.
- Mod and via menus: Determine the modulation and via sources for pan modulation.
- Mod and via sliders: The blue control on the left and the green control on the right are used to set the amount (intensity) of mod and via modulation.
Note: You cannot directly move the red line that represents pan position shown in this section. In order to move the line, rotate the pan knob in the Mixer section.
Ultrabeat Stereo Spread Mode
Stereo Spread broadens the stereo image, making it wider and more spacious.
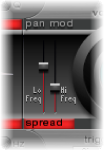
- Lo Freq(uency) slider: Adjusts the width (the spreading effect) of bass frequencies: the higher the value, the more prominent the effect becomes.
- Hi Freq(uency) slider: Adjusts the width of high frequencies.
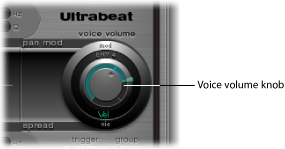
Controlling Ultrabeat Drum Sound Levels with Voice Volume
The Voice Volume knob adjusts the output volume of individual drum sounds. To be more exact, you are setting the maximum level for the selected drum sound with Env 4, following the attack phase of Env 4.
Note: Envelope 4 (Env 4) is hard-wired to voice volume—the level control for the selected sound. Each sound in the kit also has a further three envelopes and other modulation sources available for control of other synthesis parameters.
The intensity of Envelope 4’s impact on Voice Volume can also be modulated with a via source.
Note: Voice Volume precedes the sliders in the mixer. This approach allows the starting volume of individual drum sounds to be set independently of their relative levels in the drum kit mix, which you adjust in the Assignment section mixer.
Changing the Ultrabeat Trigger Mode
The way Ultrabeat reacts to a succession of incoming notes is independently defined for each sound. Parameters that provide control over this aspect of Ultrabeat’s behavior are found in the Trigger Mode section, below the Voice Volume knob.
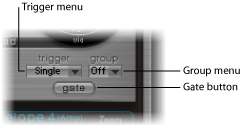
- Trigger pop-up menu: Enables you to choose between Single and Multi trigger modes.
- Single: A new trigger note cuts off the note that is currently playing.
- Multi: When a new note is played, currently playing notes continue to decay in accordance with their respective amplitude envelope settings (Env 4).
- Group pop-up menu: Enables you to choose between Off and settings 1 through 8. If two different sounds are assigned to the same group, they will cut each other off when a new note message is received. Only one sound in the group can be played at a time.
A typical use of this feature is when you’re programming hi-hat sounds: when playing a real hi-hat, the closed hi-hat note cuts off or mutes the ringing of the open hi-hat. This feature is often referred to as hi-hat mode.
Note: While in Single Trigger mode, only the currently sounding note of the same sound is cut off. A sound that is assigned to a group cuts off all other sounds, regardless of note, in the group.
- Gate button: Enables or disables the Gate function. When active, the sound is immediately cut off when the MIDI note is released (MIDI note off), regardless of envelope settings.
Note: The Gate function ensures that a specific sound does not play—it can’t be heard—after a note-off event in a host sequencer such as Logic Pro, or Ultrabeat’s internal sequencer. Note length can be an important creative element when you are programming rhythm tracks.