Multipressor
The Multipressor (an abbreviation for multiband compressor) is an extremely versatile audio mastering tool. It splits the incoming signal into different frequency bands—up to four—and enables you to independently compress each band. After compression is applied, the bands are combined into a single output signal.
The advantage of compressing different frequency bands separately is that it allows you to apply more compression to the bands that need it, without affecting other bands. This avoids the pumping effect often associated with high amounts of compression.
As the Multipressor allows the use of higher compression ratios on specific frequency bands, it can achieve a higher average volume without causing audible artifacts.
Raising the overall volume level can result in a corresponding increase in the existing noise floor. Each frequency band features downward expansion, which allows you to reduce or suppress this noise.
Downward expansion works as a counterpart to compression. Whereas the compressor compresses the dynamic range of higher volume levels, the downward expander expands the dynamic range of the lower volume levels. With downward expansion, the signal is reduced in level when it falls below the threshold level. This works in a similar way to a noise gate, but rather than abruptly cutting off the sound, it smoothly fades the volume with an adjustable ratio.
Multipressor Parameters
The parameters in the Multipressor window are grouped into three main areas: the graphic display in the upper section, the set of controls for each frequency band in the lower section, and the output parameters on the right.
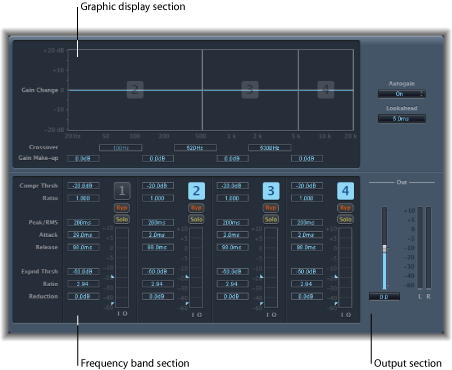
- Graphic display: Each frequency band is represented graphically. The amount of gain change from 0 dB is indicated by blue bars. The band number appears in the center of active bands. You can adjust each frequency band independently in the following ways:
Drag the horizontal bar up or down to adjust the gain makeup for that band.
Drag the vertical edges of a band to the left or right to set the crossover frequencies, which adjusts the band’s frequency range.
Using the Multipressor
In the graphic display, the blue bars show the gain change—not merely the gain reduction—as with a standard compressor. The gain change display is a composite value consisting of the compression reduction, plus the expander reduction, plus the auto gain compensation, plus the gain make-up.
Setting Multipressor Compression Parameters
The Compression Threshold and Compression Ratio parameters are the key parameters for controlling compression. Usually the most useful combinations of these two settings are a low Compression Threshold with a low Compression Ratio, or a high Compression Threshold with a high Compression Ratio.
Setting Multipressor Downward Expansion Parameters
The Expansion Threshold, Expansion Ratio, and Expansion Reduction parameters are the key parameters for controlling downward expansion. They determine the strength of the expansion applied to the chosen range.
Setting Multipressor Peak/RMS and Envelope Parameters
Adjusting the parameter between Peak (0 ms, minimum value) and RMS (root mean square −200 ms, maximum value) is dependent on the type of signal you want to compress. An extremely short Peak detection setting is suitable for compression of short and high peaks of low power, which do not typically occur in music. The RMS detection method measures the power of the audio material over time and thus works much more musically. This is because human hearing is more responsive to the overall power of the signal than to single peaks. As a basic setting for most applications, the centered position is recommended.