Speaker and Microphone Placement Suggestions
Where you place your speakers and microphones in the recording space will have a large impact on the specific echoes and reflections that your impulse response captures. It goes without saying that creativity is key, and experimentation the name of the game.
There are, however, some general suggestions and guidelines that may help when you make your initial recordings.
One general suggestion for placement in environments with hard floors, made from materials such as concrete: You may find that a “chirp” is recorded at the beginning of your impulse response. This sound is actually the generated sine sweep resonating through the floor into the microphone stand, and then into microphone itself. The speed of sound through floors and concrete material is much faster than through air, resulting in a pre-impulse response that starts before the impulse response you actually want to record. To circumvent this potential problem, you can use “studio” drum pedestals and specialized microphone mounts that have strong acoustic absorbers built into them. If you can’t transport pedestals, or afford expensive microphone mounts, try a thick carpet under the speakers and microphone stand(s).
Below are some specific approaches for you to experiment with when creating impulse responses. Remember, these are just suggestions. There are no rules regarding how far the speakers need to be placed away from the microphone array, the best angles, ideal distances between speakers and microphones, and so on. You may want to try a number of different techniques and placements to find the ideal arrangement. Creating impulse responses is an art unto itself.
The Virtual Listener Approach
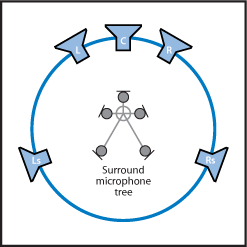
This is perhaps the most common technique for placing speakers and microphones when creating impulse responses. The goal is to capture the effect of the echoes and reflections coming from all around the space—as heard at the listening position. In this approach, the speakers are set up at the edges of the room, and the microphone is placed in the listening position.
The resulting impulse response (when later used in Space Designer to add reverb to your signal) should sound like your audio is being played back from the various speaker locations in the “space.” This method doesn’t require multiple microphones; a single microphone can be turned toward each speaker in turn, and different audio recordings can be made from the same location. The image below illustrates the virtual listener approach to setting up five speakers (for a five channel surround impulse response), with one microphone placed centrally in the space.
This method can create the impression of the audio signal being completely immersed in the simulated space.
The Auralization Approach
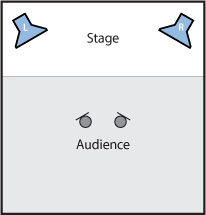
Another common strategy for placing speakers and microphones in a space uses the auralization approach. This technique attempts to capture the reflections from the performer’s perspective. Place one or more speakers at the performer’s location (or another audio source) and place the microphone at the listening position. The resulting impulse response should sound like your audio is being played back from these specific speaker locations. For example, you can make a stereo impulse response of a particular stage using the auralization technique, and when you use the IR in Space Designer, your audio should sound like it is on that stage. The image below illustrates use of the auralization technique to set up your speakers and microphones for a true stereo impulse response.
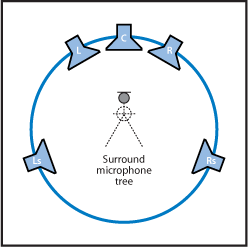
To capture a surround impulse response that represents being “in the audience” of a space, set up two speakers in the performer’s position as above, but place a surround array of microphones around the room. This can create a realistic feeling (and effect) of being “in the audience” when the performance is coming from in front of you. This can help to create a surround-like effect from a live stereo recording.
The Virtual Echo Chamber Approach
A good alternative to the auralization approach is placement of your speakers and microphones in a way that creates a virtual space that resembles a physical echo chamber. To create this kind of impulse response, face the loudspeakers toward the corners, and the microphones toward the opposite corners. This is how microphones in a physical echo chamber would be placed. This eliminates a direct path from the speaker to the microphone, and captures more reflections. The image below illustrates how you could set up two speakers and two microphones to create a stereo impulse response, using this virtual echo chamber approach.

The resulting impulse response allows you to mix the reverb into the dry signal, without any phase cancellation issues caused by early reflections or direct signals. This approach works particularly well if you want to keep your signal mostly dry, without any alteration or coloration from the reverb, but still want to add a high fidelity reverb tail to your audio.
You can also use this method for surround or multi-channel reverbs. The main concept to remember is that the speakers should be pointing at the wall, to eliminate direct paths between microphones and speakers. The illustration below offers a possible layout for a five channel reverb chamber. The loudspeakers, placed in a circle, are directed at the walls, and the microphone array is in the center of the circle.