Editing Your Impulse Response
When you have finished recording your audio tracks, you may feel that they have superfluous silence at the beginning or end of the file, don’t fade out early enough, and so on. To address these minor issues, Impulse Response Utility allows you to cut, crop, and fade your audio files in the Editing area.
Select the audio file.
Your audio file will automatically appear in the Editing area.
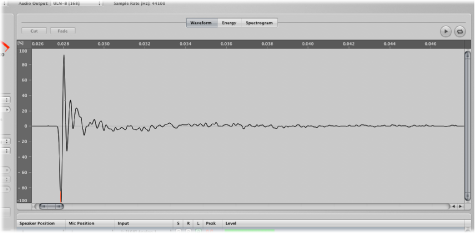
You can choose from three different display modes by clicking the buttons at the top of the Editing area:
- Waveform button: Shows the recorded audio as a standard waveform. The horizontal axis displays the elapsed time. The vertical axis displays the audio level as a percentage.
- Energy button: Shows the sound energy distribution over time. The horizontal axis displays the elapsed time. The vertical axis displays audio levels in dB.
- Spectrogram button: Shows the frequency distribution over time. The horizontal axis displays the elapsed time. The vertical axis displays the frequencies, which are color-coded by dB range. The color legend in the upper-right corner of the Editing area indicates the color schema.
These display modes allow you to effectively analyze your waveforms, making it easy to identify material you need to cut or crop, or that requires a fade. The Spectrogram mode, in particular—which simultaneously shows frequency, level, and time—allows for very detailed analysis of your audio.
Drag horizontally over the desired section.
Audition your selection by clicking the Play button. Click the Cycle button to continuously play back the selected track.
Tip: Use the Space bar to toggle playback, or the C key to toggle cycle playback.
Choose one of the editing operations from the buttons at the top-left corner of the Editing area:
- Crop button: If you make a selection that doesn’t extend to either the beginning or end of the audio, the left edit button activates the Crop function. Clicking this button will remove the audio to the right and left of your selection, without touching the selected audio. You can also choose Edit > Crop (or press Command-X) to crop.
- Cut button: If you make a selection that extends to either the very beginning or very end of the audio, the left edit button activates the Cut function. Clicking this button will remove the selected audio, without touching the unselected audio. You can also choose Edit > Cut (or press Command-X) to cut.
- Fade button: If you make a selection that includes either the very beginning or end of the audio, you can select the Fade function. Clicking this button creates a gradual fade over the length of the selection area. You can also choose Edit > Fade (or press Command-F) to fade.
Note: In order to maintain phase coherency between all tracks of your impulse response, edits are performed across all tracks equally. To ensure that your impulse response cannot include tracks that are not edited equally, you are prevented from recording further tracks once an edit has been made.